

Create a sweet and cuddly handmade gift with this Crochet Butterfly Lovey Pattern! This adorable butterfly lovey combines a soft crochet comfort blanket with a cute butterfly amigurumi-style center.
The design features beautiful purple wings decorated with pink and cream accents, a sweet embroidered face, curly antennae, and a soft, textured blanket that spreads out beneath the butterfly.
It is a lovely project for baby showers, birthdays, nursery gifts, or anyone who enjoys whimsical handmade crochet creations.
Pattern note: This is an original, adaptable tutorial inspired by the pictured butterfly lovey. Stitch counts may need to be adjusted depending on your yarn, hook size, and crochet tension.
🦋 Crochet Butterfly Lovey Details
- Project Type: Crochet lovey / security blanket
- Design: Butterfly
- Skill Level: Beginner to Intermediate
- Crochet Terms: US terminology
- Main Colors: Purple, cream, pink
- Construction: Butterfly head + body + wings + blanket
- Finished Size: Approximately 30–40 cm, depending on yarn and hook
🧶 Materials
Yarn
You will need:
- Purple yarn – butterfly body, blanket, and wing borders
- Cream yarn – face and wing sections
- Pink yarn – wing accents and decorative edging
- Black yarn – eyes and facial details
- Small amount of darker purple yarn, optional
For a soft baby lovey, choose a washable, lightweight yarn designed for baby projects.
Crochet Supplies
- 3 mm–3.5 mm crochet hook
- Yarn needle
- Scissors
- Stitch markers
- Polyester fiberfill
- Measuring tape
Safety
For a baby or young child, embroider the eyes, mouth, and other facial details securely rather than using loose beads or detachable embellishments.
✂️ Crochet Abbreviations
- MR – Magic Ring
- ch – Chain
- sc – Single Crochet
- hdc – Half Double Crochet
- dc – Double Crochet
- tr – Treble Crochet
- sl st – Slip Stitch
- inc – Increase
- dec – Decrease
- BLO – Back Loop Only
- FO – Fasten Off
🌸 STEP-BY-STEP CROCHET BUTTERFLY LOVEY
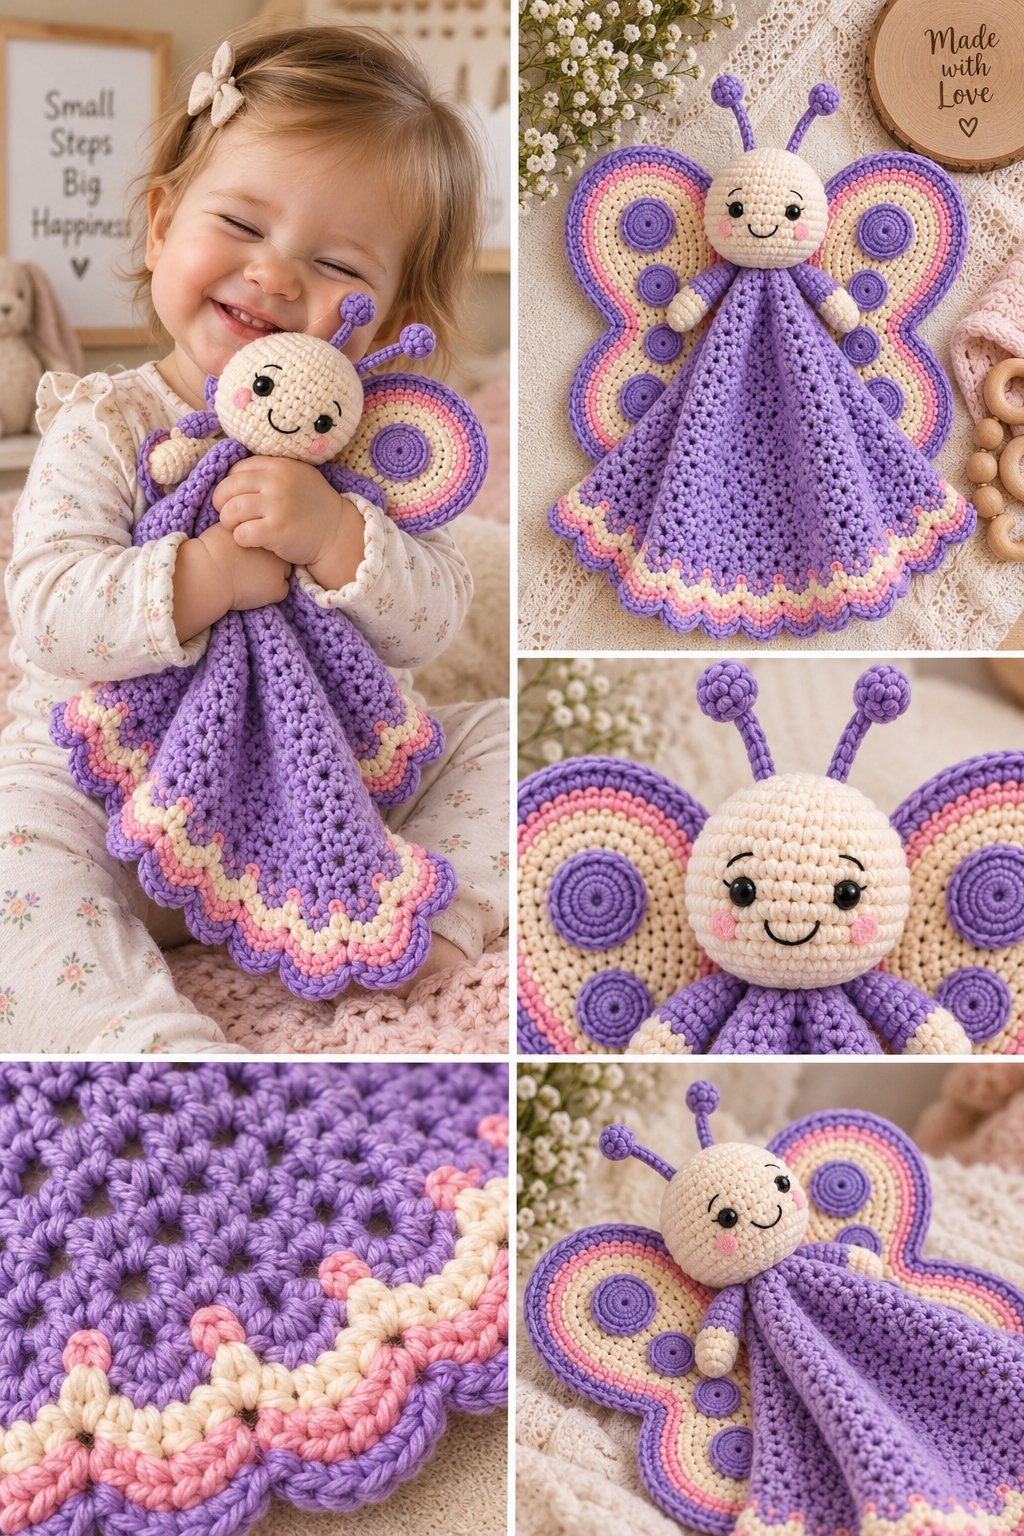
Step 1 — Crochet the Butterfly Head
Begin with cream yarn.
Make a magic ring.
Round 1
Work 6 sc into the magic ring.
Round 2
Increase in every stitch.
You should have 12 stitches.
Round 3
Repeat:
1 sc, inc
around.
Round 4
Repeat:
2 sc, inc
around.
Continue increasing until the head reaches your preferred size.
Step 2 — Shape the Butterfly Head
Once the head is wide enough, work several rounds of single crochet without increases.
This creates the rounded head.
Begin adding a small amount of polyester stuffing.
Continue crocheting while gradually decreasing.
For example:
4 sc, dec
around.
Then:
3 sc, dec
around.
Continue until the opening is almost closed.
Add the final amount of stuffing before closing.
Fasten off and hide the yarn tail.
😊 Step 3 — Add the Butterfly Face
Use black yarn to embroider two small eyes.
Add a sweet curved smile.
For a more playful appearance, use pink yarn to add two tiny cheeks.
Keep the face simple and symmetrical.
The embroidered expression gives the butterfly a soft, friendly appearance.
🦋 Step 4 — Crochet the Butterfly Body
Switch to purple yarn.
Create a magic ring and work several single crochet stitches into it.
Increase gradually to form a small oval body.
Continue working rounds of single crochet until the body is approximately 8–12 cm long.
Add a small amount of stuffing as you work.
Finish by decreasing toward the bottom.
Close the opening securely.
💜 Step 5 — Make the Upper Wings
The wings are the main feature of the lovey.
Using purple yarn, begin with a chain.
Work rows of single crochet, half double crochet, and double crochet to gradually create a large wing shape.
Increase toward the outside edge.
A basic wing can be shaped like this:
- Start with a short foundation chain.
- Work sc across.
- Increase at the outer edge.
- Continue with hdc and dc stitches.
- Add additional rows to enlarge the wing.
- Decrease slightly near the outer point.
Make two matching upper wings.
🌸 Step 6 — Add the Wing Colors
To recreate the colorful butterfly appearance, add several decorative sections.
Work:
- Purple outer edge
- Cream middle section
- Pink accent row
- Purple inner section
You can work the colors directly into the wings or crochet separate decorative pieces and sew them onto the wings.
Keep both wings as symmetrical as possible.
🟣 Step 7 — Create the Decorative Wing Circles
The pictured butterfly features rounded crochet details on the wings.
Make small circles using purple yarn.
Start with a magic ring.
Work 6 sc into the ring.
Increase around the next round.
Continue for another round if you want a larger circle.
Make several circles in different sizes.
Sew them onto the cream and pink sections of the wings.
🦋 Step 8 — Crochet the Lower Wings
Create two smaller wings underneath the large upper wings.
Use purple yarn.
Start with a small chain and work rows of sc and hdc.
Gradually increase toward the bottom.
Finish with a decorative scalloped or shell border.
Repeat for the second lower wing.
🎀 Step 9 — Add the Wing Border
Use your darker purple yarn.
Work single crochet around the outer edge of each wing.
For a decorative finish, try:
sc, skip 1, 5 dc in next stitch, skip 1
Repeat along the edge.
This creates a soft scalloped border.
🌿 Step 10 — Make the Butterfly Antennae
Using purple yarn:
- Chain approximately 15–20 stitches.
- Work slip stitches back along the chain.
- Make a tiny crochet ball at the end.
- Fasten off.
Repeat for the second antenna.
Sew both antennae securely to the top of the butterfly’s head.
For a baby-safe lovey, make sure the antennae are firmly attached and avoid long loose loops.
🧸 Step 11 — Begin the Lovey Blanket
Now create the soft blanket that extends underneath the butterfly.
The easiest method is to begin at the center beneath the butterfly body and work outward.
Start with purple yarn.
Make a magic ring.
Work several stitches into the ring and begin creating a circular or slightly square blanket.
🌸 Step 12 — Create the Blanket Pattern
A simple repeating pattern can be created using:
3 dc, ch 2, 3 dc
into selected spaces.
Continue around the blanket.
On each new round, increase at the corners or designated expansion points.
This gradually creates a larger blanket while keeping the fabric flat.
🧶 Step 13 — Continue Increasing
Continue the same stitch pattern for several rounds.
Check your blanket regularly.
If the fabric begins to curl upward, add a few extra increases.
If it becomes wavy, reduce the number of increases.
The finished blanket should lie comfortably flat.
💜 Step 14 — Add the Butterfly to the Blanket
Place the butterfly body at the center of the blanket.
Position the upper and lower wings evenly on both sides.
Sew the butterfly body securely to the center section.
For a baby lovey, attach the butterfly firmly along the body rather than leaving the center loose.
🌷 Step 15 — Add the Decorative Border
When the blanket reaches the desired size, finish the outside edge.
Work one round of single crochet.
Then add a decorative shell border.
A simple shell repeat is:
Skip 2 stitches, 5 dc in next stitch, skip 2 stitches, sc in next stitch.
Repeat around the entire blanket.
🌸 Step 16 — Add Pink and Cream Details
For a look similar to the inspiration design, add two narrow decorative rows around the blanket edge.
You can use:
- Pink
- Cream
- Purple
Change colors after completing each round.
This creates the beautiful layered border around the lovey.
🧵 Step 17 — Weave in All Yarn Ends
Use your yarn needle to carefully weave every loose end into the back of the crochet fabric.
Secure each end through several stitches.
Trim the excess yarn.
Pay particular attention to:
- Wing attachments
- Antennae
- Butterfly body
- Decorative circles
- Blanket border
💧 Step 18 — Block the Finished Lovey
Lightly dampen the finished lovey.
Lay it flat on a clean towel.
Gently shape the butterfly wings and blanket.
Make sure the wings are symmetrical and the blanket lies flat.
Allow the project to dry completely.
Blocking helps the lace and decorative stitches look more defined.
🌈 Color Ideas for Your Butterfly Lovey
💜 Purple Butterfly
- Lavender
- Cream
- Pink
- Dark purple
🌸 Pretty Pink Butterfly
- Blush pink
- White
- Lavender
- Rose pink
🌿 Garden Butterfly
- Sage green
- Cream
- Soft yellow
- Lavender
🌼 Sunshine Butterfly
- Butter yellow
- Cream
- Peach
- Coral
🦋 Rainbow Butterfly
Use a different pastel shade for each wing section.
This is especially cute for nursery décor and baby gifts.
👶 How to Customize the Lovey Size
To make a smaller lovey, stop increasing the blanket after fewer rounds.
For a larger lovey, continue adding rounds until you reach your preferred size.
You can also make the butterfly larger by increasing the number of head and wing rounds.
Keep the butterfly and blanket proportional for the best finished appearance.
🧶 Helpful Crochet Tips
Keep your tension consistent
Consistent tension helps both wings match in size.
Count your stitches
Counting is especially important when creating symmetrical wings.
Use stitch markers
Place a marker at the beginning of each round when working in continuous rounds.
Don’t overstuff the head
The butterfly head should remain soft and cuddly.
Secure all details
Baby loveys are handled frequently, so all sewn pieces should be reinforced carefully.
Choose washable yarn
A washable yarn makes the finished lovey easier to clean and maintain.
🎁 Who Would Love This Crochet Butterfly Lovey?
This handmade lovey makes a beautiful gift for:
- Baby showers
- Newborn gifts
- First birthdays
- Nursery décor
- Baptisms
- Handmade gift baskets
- Butterfly lovers
- Crochet enthusiasts
You can personalize the colors to match a baby’s nursery or create a special color combination for the recipient.
❓ Frequently Asked Questions
Is this butterfly lovey suitable for beginners?
The blanket uses simple crochet techniques, but shaping the butterfly wings and assembling the pieces may require some practice. It is best suited to beginners who are comfortable with basic crochet or intermediate crocheters.
What yarn is best for a baby lovey?
Choose a soft, washable yarn that is comfortable against delicate skin. Cotton, acrylic, or baby-specific yarn blends can work well depending on the desired texture.
How large should a baby lovey be?
A small lovey can be approximately 25–30 cm, while a larger version can reach 35–45 cm or more. Adjust the blanket rounds according to your preference.
Can I make this butterfly in different colors?
Absolutely! Butterfly loveys look beautiful in pastel, rainbow, floral, or bright colors.
Can I make the wings more detailed?
Yes. Add additional circles, stripes, flowers, picots, or embroidered details to personalize the wings.
Is this lovey washable?
The finished lovey should be washed according to the care instructions of your yarn. A gentle wash and careful drying are usually appropriate for handmade baby items.
❤️ Final Thoughts
This Crochet Butterfly Lovey Pattern is a beautiful combination of a cuddly comfort blanket and a charming handmade butterfly. The soft purple wings, delicate pink and cream details, sweet face, and scalloped blanket border make it a memorable crochet project.
Whether you’re making a special baby shower gift, creating something beautiful for a nursery, or simply looking for a fun crochet project, this butterfly lovey offers plenty of opportunities for personalization.
Choose your favorite colors, experiment with the wing details, and make a one-of-a-kind handmade keepsake that can be treasured for years.
SEO Keywords: Crochet Butterfly Lovey Pattern, free crochet lovey pattern, butterfly crochet blanket, crochet baby lovey, butterfly baby blanket, crochet butterfly pattern, free crochet baby blanket, crochet security blanket, butterfly amigurumi, easy crochet lovey, baby shower crochet gift, crochet nursery gift, beginner crochet blanket, handmade baby gift, butterfly crochet tutorial.

