

Create a beautiful handmade accessory with this Pastel Rainbow Granny Square Bucket Bag Free Crochet Pattern. This charming bag combines colorful floral granny squares with a sturdy white crochet base, a drawstring closure, decorative tassels, and adjustable shoulder straps.
The soft pastel palette gives the bag a cheerful, vintage-inspired look that works beautifully for spring and summer outfits. It is also a wonderful project for using small amounts of leftover yarn in coordinating colors.
Pattern note: This is an original, adaptable tutorial inspired by the provided reference image. It is not a reproduction of the pattern shown in the original image. Adjust stitch counts and square quantities according to your preferred bag size and crochet tension.
🌈 Pastel Rainbow Granny Square Bucket Bag Details
- Project: Crochet bucket bag
- Skill Level: Intermediate
- Construction: Granny squares + crocheted base and upper section
- Shape: Bucket
- Closure: Drawstring
- Colors: Pastel rainbow + white
- Style: Boho / Vintage / Cottagecore
- Crochet Terms: US terminology
- Finished Size: Approximately 25–30 cm tall
🧶 Materials
Yarn
Choose a medium-weight cotton or cotton-blend yarn.
You will need:
- White or cream yarn – approximately 250–350 g
- Pastel pink yarn
- Pastel blue yarn
- Lavender yarn
- Mint green yarn
- Peach or coral yarn
- Soft yellow yarn
- Optional darker pastel shades for contrast
The exact amount depends on your bag size and the number of granny squares.
Additional Supplies
- 3.5–4 mm crochet hook
- Yarn needle
- Scissors
- Stitch markers
- Measuring tape
- Sewing needle
- Optional fabric lining
- 2 leather or fabric shoulder straps
- 2 swivel hooks or D-rings
- Small wooden beads
- Optional cord lock
✂️ Crochet Abbreviations
- MR – Magic Ring
- ch – Chain
- sc – Single Crochet
- hdc – Half Double Crochet
- dc – Double Crochet
- sl st – Slip Stitch
- inc – Increase
- FO – Fasten Off
- BLO – Back Loop Only
Granny Square Cluster
A basic cluster consists of:
3 dc worked into the same space.
📏 Gauge and Sizing
Before making the entire bag, crochet one granny square.
Measure the finished square after lightly blocking it.
For a bag similar in proportion to the inspiration image, squares measuring approximately 8–10 cm work well.
You can make the bag:
- Smaller with fewer squares
- Medium with standard-size squares
- Larger by increasing the square size or adding extra rows
Always check the width and height as you assemble the bag.
STEP-BY-STEP PASTEL GRANNY SQUARE
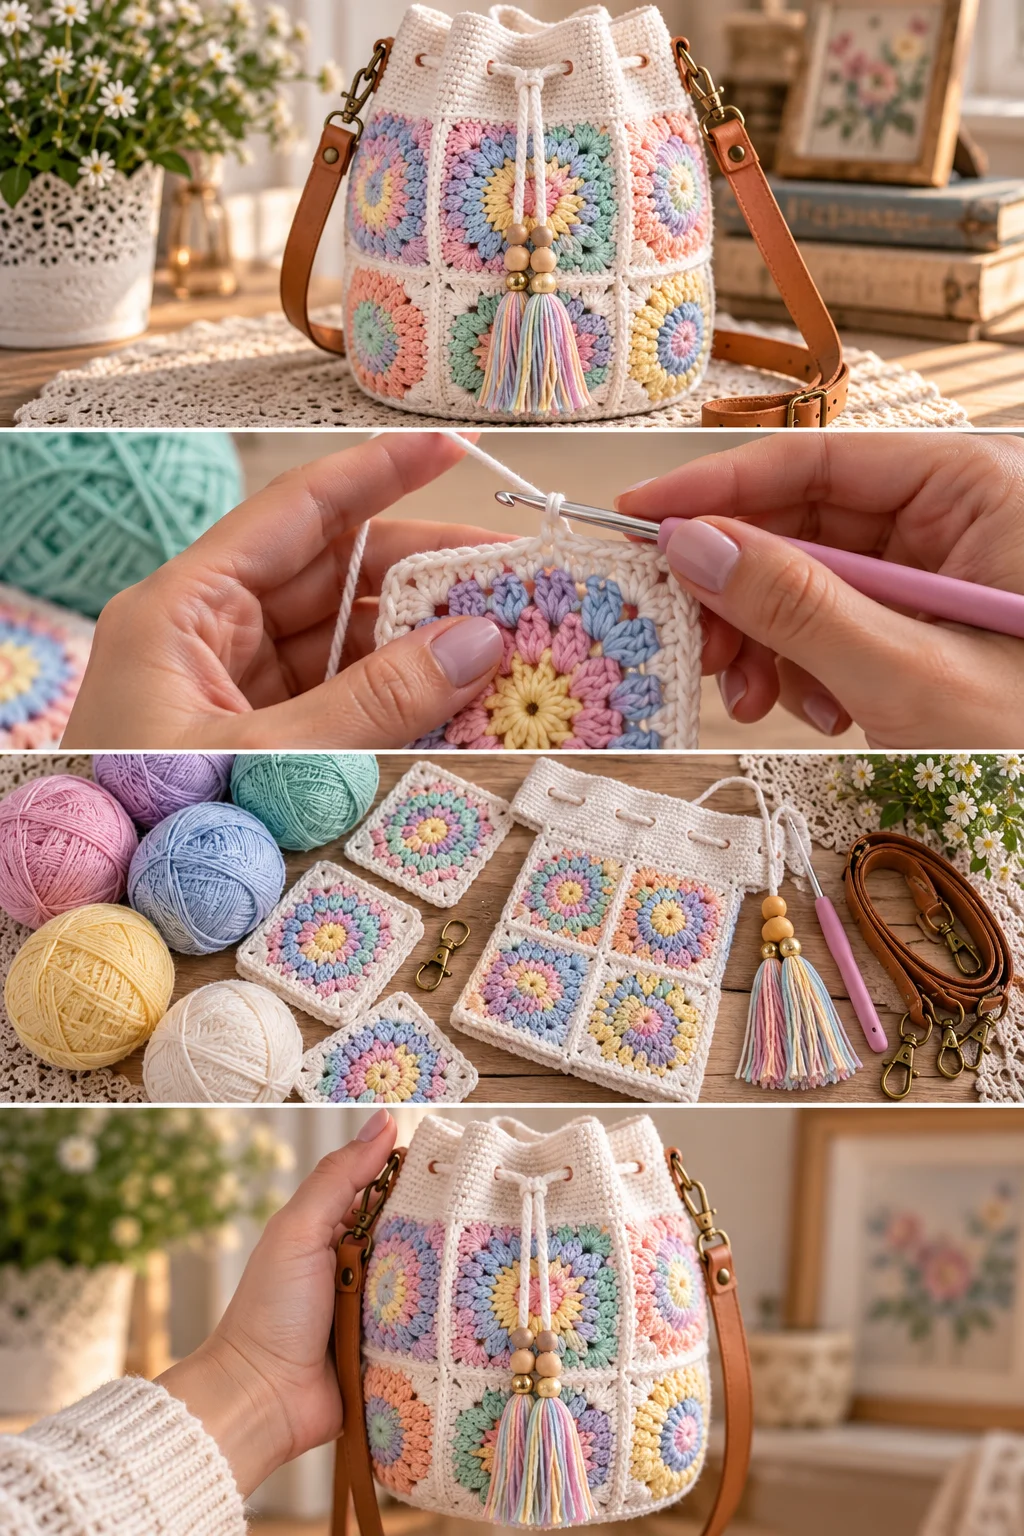
Step 1 — Create the Granny Square Center
Start with pastel pink, yellow, blue, or another color.
Make a magic ring.
Round 1
Chain 3.
Work 2 dc into the ring.
Chain 2.
Repeat the following sequence three more times:
3 dc, ch 2
Join with a slip stitch.
You now have a four-corner granny-square center.
🌼 Step 2 — Add the Flower Effect
Change to another pastel color.
In each corner space, work:
3 dc, ch 2, 3 dc
Between the corners, work:
3 dc
This creates the classic granny-square structure.
For a floral appearance, use contrasting colors for each round.
🌷 Step 3 — Continue Building the Square
Add another round using a new pastel color.
Work:
3 dc in each side space
and:
3 dc, ch 2, 3 dc in each corner space.
Continue until the square reaches approximately your desired size.
Finish with a round of white yarn if you want the colorful center to stand out from the bag body.
🧵 Step 4 — Make Your Granny Squares
Repeat the square pattern to create enough pieces for the bag.
A medium bucket bag can use approximately:
8–12 granny squares, depending on their size and how you arrange them.
You can make every square different or create repeating color combinations.
For example:
- Pink + lavender + cream
- Blue + yellow + white
- Mint + peach + pink
- Lavender + blue + yellow
🎨 Step 5 — Plan the Color Arrangement
Before joining the squares, lay them on a flat surface.
Arrange the colors so that no two very similar squares are directly beside each other.
A balanced arrangement could use:
Pink → Blue → Mint → Peach
in one row and:
Yellow → Lavender → Pink → Blue
in the next.
Take a quick photo before joining them.
🪡 Step 6 — Join the Granny Squares
Place two squares together with their right sides facing.
Using white yarn, join them with either:
- Slip stitches
- Single crochet
- Mattress stitch
A visible white crochet join creates the beautiful grid effect shown in the inspiration bag.
Continue joining the squares until you have your front and back panels.
👜 Step 7 — Build the Bag Body
Arrange your squares into a rectangular panel.
For example, you can use:
3 squares across × 3 squares tall
for a larger body, or fewer squares for a smaller bag.
Join the rows carefully.
The finished panel should be wide enough to comfortably hold your everyday essentials.
🤍 Step 8 — Crochet the Bottom
Using white yarn, create a flat circular or oval base.
Start with a magic ring.
Work 6 sc into the ring.
Increase evenly around each round.
For example:
Round 1
6 sc
Round 2
inc around
Round 3
1 sc, inc around
Round 4
2 sc, inc around
Continue increasing until the base matches the width of your granny-square body.
🧺 Step 9 — Add the First Side Round
Once the base is large enough, stop increasing.
Work one round of single crochet through the BLO.
This creates a defined edge between the bottom and sides.
🧶 Step 10 — Attach the Granny-Square Body
Place the joined granny-square panel around the base.
Align the bottom edge with the circular base.
Use white yarn to sew or crochet the two sections together.
Work slowly around the entire circumference.
Make sure the squares remain straight.
🤍 Step 11 — Crochet the Upper Section
The inspiration bag has a white crochet section above the colorful squares.
Continue working single crochet rounds in white yarn.
Work approximately 5–8 rounds, depending on the desired height.
Keep the stitches tight and even.
This section provides additional structure around the drawstring opening.
🎀 Step 12 — Create the Drawstring Holes
To make the drawstring channel, work a round with evenly spaced chain openings.
A simple repeat is:
sc, ch 2, skip 2 stitches
Repeat around.
On the following round, work sc into the chain spaces.
This creates small openings for the drawstring.
🧵 Step 13 — Make the Drawstring
Using white yarn, make a long crochet cord.
Chain approximately 100–140 stitches, depending on your bag size.
Work slip stitches back along the chain.
Fasten off.
You can make two cords if you want the drawstring to pull evenly from both sides.
🪵 Step 14 — Add Wooden Beads
Thread a small wooden bead onto each end of the drawstring.
Tie a secure knot underneath each bead.
For an extra decorative finish, add a small tassel below the bead.
🌈 Step 15 — Make the Tassel
Cut several strands of pastel yarn.
Combine colors such as:
- Pink
- Lavender
- Blue
- Mint
- Yellow
- Peach
Fold the strands in half.
Tie them together at the top.
Wrap a separate piece of yarn around the upper section to create the tassel head.
Trim the ends evenly.
Attach the tassel beneath the drawstring beads.
🎀 Step 16 — Make the Shoulder Strap
The bag can use a crochet strap or a ready-made leather strap.
Crochet Option
Chain enough stitches to reach your desired strap length.
Work several rows of single crochet.
Continue until the strap is approximately 3–4 cm wide.
Work tightly to make the strap strong.
👜 Step 17 — Attach the Strap
Sew each end of the strap securely to opposite sides of the bag.
If using leather straps, attach them using D-rings or swivel hooks.
Reinforce the attachment points with multiple passes of yarn.
The strap should be strong enough to support the weight of the bag and its contents.
🌸 Step 18 — Add Optional Decorative Flowers
For extra detail, crochet tiny flowers in pink, cream, or yellow.
Small flower pattern:
- Make a magic ring.
- Work 5–6 sc into the ring.
- Create small chain loops around the center.
- Work several stitches into each loop.
- Join and fasten off.
Sew the flowers onto selected granny squares.
🧵 Step 19 — Reinforce the Side Seams
Check the joins between the granny-square sections.
If any seam feels loose, reinforce it from the inside.
Pay particular attention to:
- Bottom corners
- Side seams
- Strap attachments
- Drawstring section
These areas experience the most stress during everyday use.
✂️ Step 20 — Weave in All Ends
Use a yarn needle to weave all loose ends through several stitches on the wrong side.
Secure each end.
Trim excess yarn carefully.
Because granny-square projects can create many yarn tails, completing this step carefully will make the inside of the bag look much neater.
💧 Step 21 — Block the Granny Squares
Lightly dampen the completed squares or finished bag.
Lay it flat.
Shape each square so the edges line up evenly.
Allow it to dry completely.
Blocking helps create the neat geometric appearance seen in the reference design.
🧺 Step 22 — Optional Bag Lining
If you want additional structure, add a fabric lining.
Measure the inside of the finished bag.
Cut fabric slightly larger than the bag dimensions to allow for seams.
Sew the lining into a simple pouch shape.
Attach it carefully to the inside of the crochet bag.
A lining also helps prevent small objects from slipping through the crochet stitches.
✨ Step 23 — Final Assembly
Before using your bag, check:
- All granny squares are firmly joined
- Bottom is secure
- Drawstring moves smoothly
- Tassel is attached
- Strap is reinforced
- Loose ends are hidden
- Lining is secure, if used
Pull the drawstring closed and gently test the strap.
Your Pastel Rainbow Granny Square Bucket Bag is complete!
🌈 Pastel Color Combinations
🌸 Soft Garden
- Blush pink
- Sage green
- Cream
- Lavender
- Soft yellow
🦋 Pastel Rainbow
- Pink
- Blue
- Purple
- Mint
- Yellow
- Peach
🍑 Warm Pastels
- Peach
- Coral
- Cream
- Soft pink
- Butter yellow
💜 Lavender Dream
- Lavender
- Lilac
- Blush
- Cream
- Pale blue
🧶 Tips for a Strong Crochet Bag
Use cotton yarn
Cotton provides good stitch definition and holds its shape well.
Keep your tension firm
Loose stitches can make the bag stretch too much.
Reinforce the bottom
The base carries the weight of everything inside the bag.
Strengthen the handles
Sew through the attachment points several times.
Block the squares
Consistent square dimensions make assembly much easier.
Add a lining
A fabric lining is especially useful for everyday bags.
👗 How to Style Your Pastel Granny Square Bag
This colorful bucket bag pairs beautifully with:
- White summer dresses
- Denim jeans
- Linen outfits
- Neutral tops
- Cottagecore dresses
- Sandals
- Woven accessories
- Pastel cardigans
Because the bag already contains several colors, it works particularly well with simple neutral clothing.
🎁 Great Handmade Gift Idea
A crochet bucket bag makes a thoughtful handmade gift for:
- Birthdays
- Mother’s Day
- Christmas
- Graduation
- Bridesmaid gifts
- Craft lovers
- Crochet enthusiasts
Customize the colors to match the recipient’s favorite shades.
❓ Frequently Asked Questions
Is this granny square bucket bag beginner-friendly?
The individual granny squares are beginner-friendly, but assembling the bag, creating the base, adding the drawstring, and attaching the strap require some additional crochet experience.
What yarn is best for a crochet bag?
Cotton and cotton-blend yarn are excellent choices because they are durable, washable, and provide good stitch definition.
How many granny squares do I need?
It depends on the size of your squares and the finished bag. A medium design can use approximately 8–12 squares, while a larger bag may require more.
Can I use leftover yarn?
Absolutely! Granny-square bags are perfect for using small amounts of leftover yarn. Choose colors with similar weight and texture for a more consistent result.
Can I make the bag without leather straps?
Yes. A crocheted strap works beautifully and keeps the entire project handmade.
How do I make the bag more structured?
Use tighter stitches, a firm cotton yarn, a reinforced base, and an optional fabric lining.
Can I make the bucket bag larger?
Yes. Increase the number of granny squares, enlarge the base, and add additional rounds to the upper section.
💕 Final Thoughts
This Pastel Rainbow Granny Square Bucket Bag Free Crochet Pattern is a beautiful way to turn classic crochet squares into a practical everyday accessory. The combination of colorful floral motifs, crisp white joins, a simple drawstring closure, and a playful multicolored tassel creates a charming handmade bag with plenty of personality.
The design is easy to personalize. Change the color palette, use larger or smaller squares, add flowers or leaves, choose a crochet strap instead of leather, or add a fabric lining for extra durability.
Whether you’re making a colorful summer bag for yourself or creating a special handmade gift, this granny-square bucket bag is a fun project that brings traditional crochet techniques into a fresh and stylish design.
SEO Keywords: Pastel Rainbow Granny Square Bucket Bag, granny square bucket bag, free crochet bag pattern, crochet bucket bag pattern, pastel crochet bag, granny square purse, crochet summer bag, crochet shoulder bag, handmade crochet bag, colorful granny square bag, crochet tote bag, easy crochet bag pattern, crochet purse tutorial, pastel rainbow crochet, crochet accessories.

