

Create a fun and spooky Halloween Crochet Wind Spinner featuring a smiling jack-o’-lantern, black witch hat, striped scarf, hanging ghost, bats, black cat, pumpkin, and spider decorations.
This festive crochet decoration is designed to hang and gently twist into a spiral shape, making it perfect for porches, windows, Halloween parties, entryways, craft fairs, and seasonal home décor.
The project combines simple amigurumi pieces with a long spiral crochet strip and several small Halloween motifs. You can customize the colors, decorations, and length to create your own unique Halloween wind spinner.
This pattern uses US crochet terminology.
PROJECT OVERVIEW
The main structure consists of a long crocheted spiral strip made in black and orange.
A jack-o’-lantern head sits at the top and acts as the main focal point.
The spiral can then be decorated with:
A small ghost
Crochet bats
A black cat
A small pumpkin
A spider
Orange and black beads
A witch hat
A decorative scarf
Small hanging charms
The completed decoration can be suspended from a ceiling hook, porch, doorway, window, or sturdy indoor hanging point.
MATERIALS NEEDED
Black worsted-weight yarn
Orange worsted-weight yarn
White yarn
Small amount of green yarn
Small amount of pink yarn
Small amount of gray or purple yarn
3 mm or 3.5 mm crochet hook
Polyester fiberfill
Black embroidery thread
White embroidery thread
Small safety eyes
Tapestry needle
Scissors
Stitch marker
Strong craft wire or a sturdy hanging cord
Metal hanging hook or swivel ring
Optional black, orange, and white beads
Optional small bells
Optional pipe cleaner or flexible craft wire for shaping the spiral
CROCHET ABBREVIATIONS
MR – Magic Ring
CH – Chain
SC – Single Crochet
HDC – Half Double Crochet
DC – Double Crochet
SL ST – Slip Stitch
INC – Increase
DEC – Decrease
BLO – Back Loop Only
FLO – Front Loop Only
ST – Stitch
STS – Stitches
SKILL LEVEL
Intermediate beginner.
The individual motifs are relatively simple, but the project requires several small pieces to be assembled together.
FINISHED SIZE
The finished size depends on the length of the spiral strip and the number of decorations added.
A medium version can measure approximately 60–90 cm from top to bottom.
For a larger porch decoration, simply make the spiral strip longer and add additional hanging motifs.
IMPORTANT PATTERN NOTE
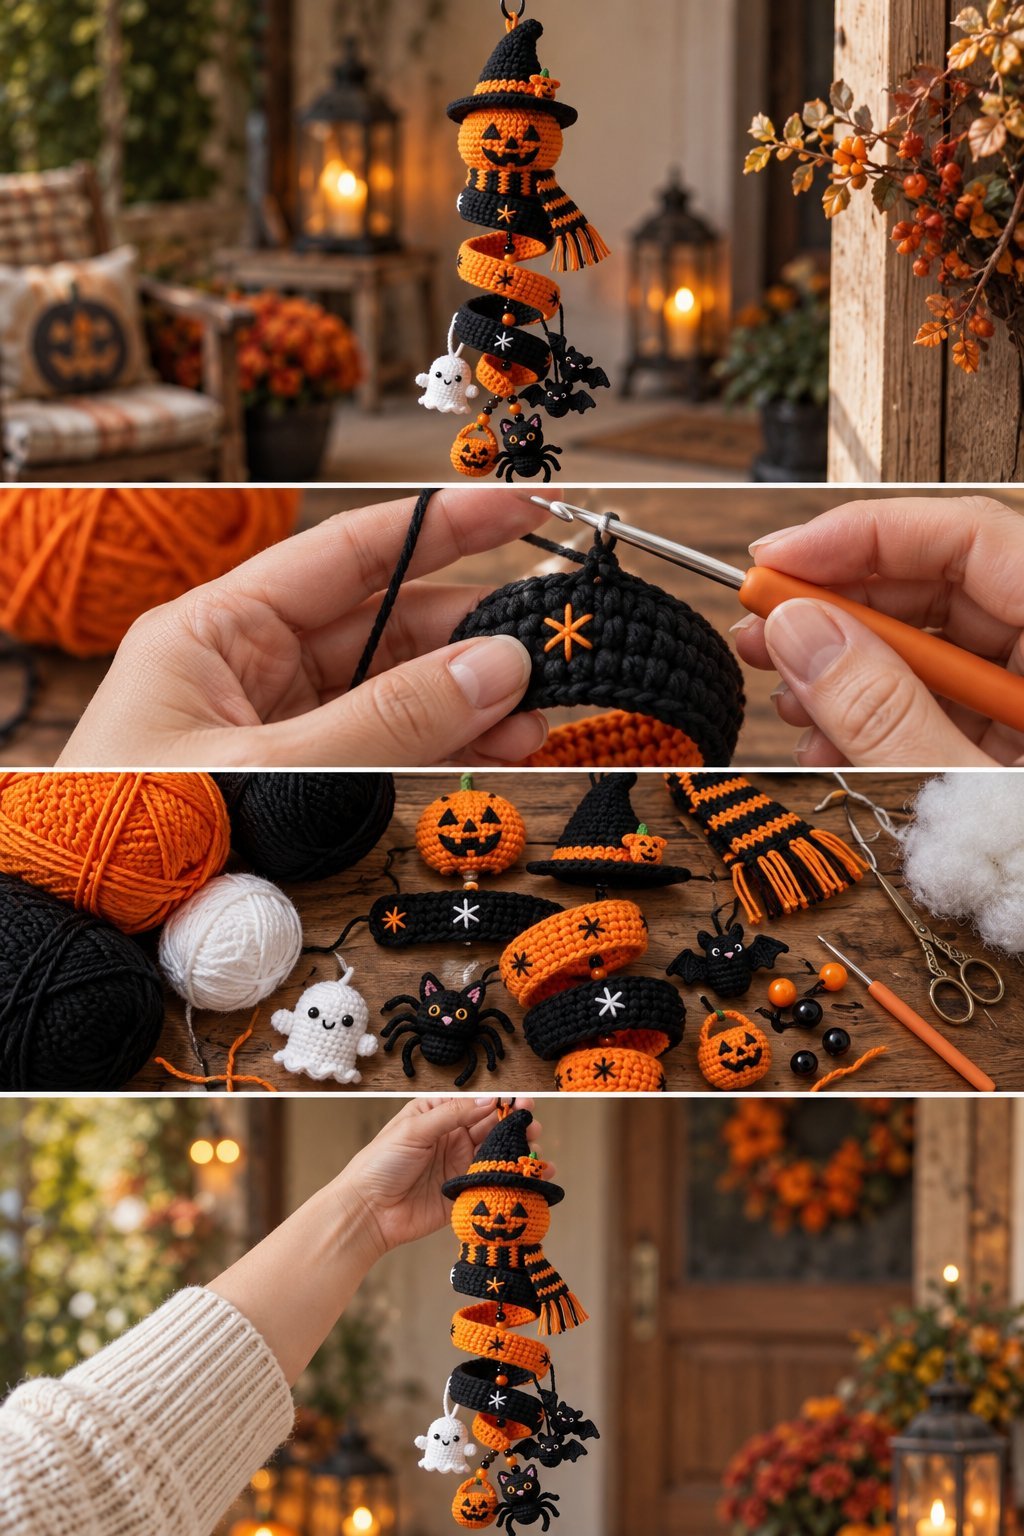
The supplied photograph shows a finished Halloween wind-spinner design but does not provide the original written pattern or exact stitch counts.
The instructions below are an original adaptable construction inspired by the visual design. Stitch counts can be adjusted according to your yarn, hook size, tension, and desired finished size.
PART 1 — CROCHET THE JACK-O’-LANTERN HEAD
STEP 1 — START THE PUMPKIN
Use orange yarn.
Make a magic ring.
Round 1:
Work 6 SC into the magic ring.
6 STS
Round 2:
Work 2 SC in each stitch around.
12 STS
Round 3:
SC in the next stitch.
INC in the next stitch.
Repeat around.
18 STS
Round 4:
SC in the next 2 stitches.
INC in the next stitch.
Repeat around.
24 STS
Round 5:
SC in the next 3 stitches.
INC in the next stitch.
Repeat around.
30 STS
Continue increasing evenly until the pumpkin reaches approximately 7–9 cm wide.
STEP 2 — BUILD THE PUMPKIN BODY
Work several rounds of SC without increasing.
Continue until the pumpkin reaches the desired height.
Begin adding polyester fiberfill as you work.
Do not overstuff the pumpkin.
The finished piece should remain slightly rounded rather than completely firm.
STEP 3 — SHAPE THE PUMPKIN
Begin decreasing gradually.
SC in the next 3 stitches.
DEC in the next stitch.
Repeat around.
Continue decreasing until the opening becomes small.
Add additional stuffing if necessary.
Close the opening securely.
Weave the yarn tail inside.
STEP 4 — CREATE THE PUMPKIN RIDGES
Use orange yarn and a tapestry needle.
Insert the needle from the bottom center of the pumpkin and bring it out near the top.
Pull gently along the outside of the pumpkin.
Repeat around the pumpkin several times.
This creates vertical sections that give the pumpkin its characteristic ridged appearance.
Do not pull too tightly.
STEP 5 — ADD THE JACK-O’-LANTERN FACE
Use black yarn or embroidery thread.
Create two triangular eyes.
Add a small triangular or curved nose.
Embroider a wide smiling mouth.
Add small vertical stitches inside the mouth to represent teeth.
For a cleaner appearance, lightly sketch the face placement before embroidering.
PART 2 — CROCHET THE WITCH HAT
STEP 6 — MAKE THE HAT
Use black yarn.
Make a magic ring.
Work 6 SC into the ring.
Continue crocheting in rounds.
Increase gradually until the bottom of the hat is wide enough to sit over the pumpkin head.
Continue working without increases to create the pointed cone.
Shape the top slightly to one side.
This creates the crooked witch-hat appearance shown in the reference.
STEP 7 — ADD THE ORANGE HAT BAND
Attach orange yarn around the bottom of the black hat.
Work 1–2 rounds of SC.
For a more decorative finish, use a small shell or slip-stitch edging.
Add a tiny orange pumpkin or buckle to one side of the band.
STEP 8 — ATTACH THE HAT
Place the hat over the pumpkin head.
Sew it securely using black yarn.
Make several stitches around the base.
Leave the top slightly tilted for a playful Halloween appearance.
PART 3 — MAKE THE SPIRAL WIND STRIP
STEP 9 — CREATE THE FOUNDATION CHAIN
Use black yarn.
Chain approximately 100–160 stitches depending on the desired length.
For a longer wind spinner, increase the chain length.
For a smaller indoor decoration, use fewer chains.
STEP 10 — CROCHET THE SPIRAL
Work into the chain using DC stitches.
A simple spiral structure can be created by working multiple DC stitches into selected chain spaces.
For example:
Work 2 DC into the first chain.
Work 3 DC into the next chain.
Repeat this increase pattern across the chain.
As the increases accumulate, the strip naturally begins to curl.
Continue until the entire chain has been crocheted.
The exact amount of curling will depend on your stitch height and increase frequency.
STEP 11 — CREATE THE BLACK AND ORANGE STRIPES
Change colors every few rows.
A simple color sequence is:
Black
Orange
Black
Orange
Black
Continue alternating colors until the spiral reaches the desired length.
For a more Halloween-inspired appearance, use thicker orange sections between narrow black sections.
STEP 12 — STRENGTHEN THE SPIRAL
Because the finished decoration will hang vertically, reinforce the top of the spiral.
Sew a strong hanging loop through the uppermost stitches.
For larger decorations, insert flexible craft wire along the center or inside edge of the spiral.
This can help the spiral maintain its shape.
PART 4 — CROCHET THE SCARF
STEP 13 — MAKE THE SCARF
Use black and orange yarn.
Chain approximately 35–45 stitches.
Work SC across.
Continue for 3–5 rows.
Change colors every 1–2 rows to create stripes.
Fasten off.
STEP 14 — ADD THE FRINGE
Cut several pieces of orange and black yarn.
Fold each piece in half.
Pull the folded loop through the end of the scarf.
Pull the loose ends through the loop.
Repeat across both ends.
Trim the fringe evenly.
Attach the scarf around the pumpkin neck.
PART 5 — CROCHET THE MINI GHOST
STEP 15 — MAKE THE GHOST BODY
Use white yarn.
Make a magic ring.
Work 6 SC into the ring.
Increase evenly over the next several rounds.
Continue working SC rounds until you have a small rounded body.
Add a small amount of stuffing.
Begin decreasing.
Close the opening.
STEP 16 — MAKE THE GHOST ARMS
For each arm, attach white yarn to the side of the body.
Chain 5–7 stitches.
Work SL ST back along the chain.
Fasten off.
Repeat on the other side.
STEP 17 — ADD THE GHOST FACE
Use black embroidery thread.
Add two small eyes.
Embroider a tiny smiling mouth.
The ghost can then be attached to the spiral using a strong piece of yarn.
PART 6 — CROCHET THE BATS
STEP 18 — MAKE A SMALL BAT BODY
Use black yarn.
Make a magic ring.
Work 6 SC into the ring.
Increase to approximately 12 stitches.
Work several rounds.
Add a small amount of stuffing.
Decrease and close.
STEP 19 — MAKE THE BAT WINGS
For each wing, attach black yarn to the side of the body.
Chain 5.
Work back using a combination of SC and DC.
Create several pointed sections.
Fasten off.
Repeat on the opposite side.
Sew the wings securely to the body.
Add small yellow, white, or orange eyes.
Make several bats in different sizes.
PART 7 — CROCHET THE BLACK CAT
STEP 20 — MAKE THE CAT HEAD
Use black yarn.
Make a magic ring.
Work 6 SC.
Increase gradually to create a small round head.
Work several rounds without increases.
Decrease and close.
Add stuffing before closing completely.
STEP 21 — ADD CAT EARS
At the top of the head, shape two triangular ears.
You can crochet small triangles separately and sew them onto the head.
Use pink yarn to add tiny inner-ear details.
STEP 22 — ADD THE CAT FACE
Use yellow or gold safety eyes.
Add a small pink nose.
Embroider thin whiskers using white thread.
Create a small curved mouth using black embroidery thread.
PART 8 — CROCHET THE MINI PUMPKIN
STEP 23 — MAKE THE SMALL PUMPKIN
Use orange yarn.
Make a magic ring.
Work 6 SC.
Increase to 12 stitches.
Work several rounds evenly.
Decrease gradually.
Add a small amount of stuffing.
Close the opening.
Create pumpkin ridges using orange yarn.
Add a small green stem.
PART 9 — CROCHET THE SPIDER
STEP 24 — MAKE THE SPIDER BODY
Use black yarn.
Make a small oval or round body.
Work approximately 6–12 stitches in the first rounds.
Add a small amount of stuffing.
Decrease and close.
STEP 25 — MAKE THE SPIDER LEGS
Cut or crochet eight small legs.
For crocheted legs, chain approximately 5–7 stitches and work SL ST back along each chain.
Attach four legs to each side.
Bend them slightly to create a natural spider shape.
Add small eyes using yellow, white, or red thread.
PART 10 — ASSEMBLE THE WIND SPINNER
STEP 26 — ATTACH THE PUMPKIN
Place the jack-o’-lantern at the top of the spiral.
Sew it securely to the upper section.
Reinforce the connection with several stitches.
STEP 27 — ATTACH THE GHOST
Use strong yarn or a small piece of crochet chain.
Connect the ghost to a lower section of the spiral.
Allow enough space between decorations so they can move freely.
STEP 28 — ATTACH THE BATS
Sew or tie the bats to different sections.
Use different hanging lengths.
This creates movement when the wind spinner rotates.
STEP 29 — ATTACH THE CAT
Attach the black cat to a lower section of the spiral.
Use a small crochet chain or strong thread.
Position it so it hangs freely.
STEP 30 — ATTACH THE PUMPKIN AND SPIDER
Add the small pumpkin and spider near the bottom.
Place them at different heights.
The varying lengths make the finished decoration more dynamic.
STEP 31 — ADD DECORATIVE BEADS
Thread black and orange beads onto strong cord.
Add a few beads between the crochet motifs.
Do not make the hanging sections too heavy.
For an indoor decoration, you can also add small wooden beads for a rustic appearance.
STEP 32 — ADD THE HANGING LOOP
Create a strong loop at the top of the wind spinner.
A metal swivel ring can be attached if you want the decoration to rotate freely.
For outdoor use, choose hardware appropriate for the location and weight of the decoration.
FINAL ASSEMBLY
Lay the entire wind spinner flat before hanging it.
Check that all decorations are securely attached.
Make sure the spiral hangs evenly.
Adjust the position of the ghost, bats, cat, pumpkin, and spider.
Trim all loose yarn ends.
Shape the spiral gently with your hands.
Hang it from a secure hook and allow the pieces to settle naturally.
HALLOWEEN COLOR IDEAS
Traditional Halloween
Black, orange, white, and small amounts of green.
Purple Witch
Black, purple, orange, and lime green.
Cute Halloween
Pastel orange, cream, lavender, pink, and black.
Gothic Halloween
Black, burgundy, charcoal gray, and deep purple.
Pumpkin Patch
Orange, cream, brown, green, and black.
HOW TO MAKE THE WIND SPINNER LONGER
Increase the foundation chain length.
Add additional black and orange sections.
Make more bats and pumpkins.
Add additional hanging charms.
Use longer hanging cords between each decoration.
For a large porch decoration, create a spiral several feet long.
HOW TO MAKE A SMALLER VERSION
Use lightweight yarn.
Use a 2.5–3 mm crochet hook.
Create a shorter foundation chain.
Make miniature decorations.
Use smaller beads.
A small version works well for a bedroom, craft room, window, or Halloween party.
TIPS FOR A BETTER FINISHED SPINNER
Keep the spiral increases consistent.
Use a stitch marker when working small amigurumi pieces.
Stuff small motifs lightly.
Reinforce every hanging point.
Use strong yarn for the top loop.
Make sure metal hardware is securely attached.
Leave enough space between hanging decorations so they can move freely.
Use different hanging lengths to create a layered appearance.
COMMON PROBLEMS AND SOLUTIONS
The spiral does not curl
Add more increases.
If using DC stitches, increase the number of stitches placed into each section.
The spiral curls too tightly
Reduce the number of increases.
Use fewer stitches in each chain section.
The pumpkin looks flat
Add more stuffing and check the decrease placement.
The decorations keep twisting
Use slightly longer hanging cords and distribute the weight evenly.
The wind spinner is too heavy
Reduce the number of beads and large motifs.
Use lighter yarn.
The hanging loop feels weak
Reinforce it with several passes of strong yarn.
For a large decoration, use a metal ring or stronger cord.
WHERE TO DISPLAY YOUR HALLOWEEN WIND SPINNER
This crochet Halloween wind spinner can be displayed in many places.
Hang it near a front door.
Place it beside a Halloween display.
Hang it from a porch.
Decorate a window.
Use it as a party backdrop.
Hang it in a craft room.
Add it to a Halloween photo booth.
Use several small versions to create a spooky hanging installation.
CARE INSTRUCTIONS
Keep the crochet decoration away from open flames.
Store it in a dry place after Halloween.
Remove dust gently with a soft brush.
Avoid soaking the finished decoration if it contains metal hardware.
Check the hanging loop before displaying it again.
Store the spiral loosely rather than compressing it tightly.
FREQUENTLY ASKED QUESTIONS
What yarn is best for a Halloween crochet wind spinner?
Worsted-weight cotton or acrylic yarn works well for decorative versions. Cotton gives clear stitches, while acrylic is lightweight and available in many Halloween colors.
How long should the wind spinner be?
A medium version can be around 60–90 cm long, but the length is completely customizable.
Can I make this decoration outdoors?
You can display it outdoors in a protected location, but prolonged exposure to rain, moisture, wind, and sunlight may damage the yarn and metal components.
Can I add more Halloween characters?
Yes. You can add witches, pumpkins, spiders, ghosts, skulls, owls, candy corn, or additional bats.
Can I use this pattern for a Halloween craft fair?
Yes. Finished handmade decorations can be made as individual pieces for personal use or sale. Do not present the written instructions as an original copy of another designer’s pattern.

