

Create a beautiful handmade baby outfit with this Crochet Baby Outfit Pattern. This adorable set features a soft crochet top with ruffled shoulder straps, a matching pair of bloomers, scalloped edges, and delicate crochet daisy flowers.
The design is inspired by a soft sage-green vintage garden style, making it perfect for baby photos, special occasions, handmade gifts, and everyday wear.
The pattern below is an original adaptable crochet construction inspired by the reference image. Exact stitch counts may need to be adjusted according to the yarn, hook size, crochet tension, and baby’s measurements.
PROJECT DETAILS
Pattern Type: Baby Crochet Outfit
Included Pieces: Crochet Top and Matching Bloomers
Suggested Size: 6–12 Months
Skill Level: Beginner to Intermediate
Yarn Weight: DK / Light Worsted
Main Hook: 3.5 mm
Design Style: Vintage Floral
Main Features: Ruffled straps, scalloped edges, daisy flowers, adjustable waist
MATERIALS NEEDED
Sage green DK-weight yarn: approximately 200–300 g
White DK-weight yarn: small amount for flowers
Yellow yarn: small amount for flower centers
3.5 mm crochet hook
4.0 mm crochet hook, optional
Tapestry needle
Scissors
Stitch markers
Measuring tape
Soft elastic, optional
Blocking mat and pins, optional
Choose a soft, washable yarn suitable for baby clothing.
CROCHET ABBREVIATIONS
ch — chain
sc — single crochet
hdc — half double crochet
dc — double crochet
sl st — slip stitch
st — stitch
sts — stitches
inc — increase
dec — decrease
sk — skip
BLO — back loop only
FLO — front loop only
rep — repeat
rnd — round
SIZE AND MEASUREMENTS
The basic instructions are designed around a 6–12 month size.
For the best fit, measure the baby before beginning.
Important measurements include:
Chest circumference
Waist circumference
Hip circumference
Shoulder width
Armhole depth
Top length
Bloomer length
If you are making another size, adjust the foundation chain and number of rounds according to the measurements rather than simply adding or removing random rows.
GAUGE
Make a small gauge swatch before starting.
Approximate gauge:
18–20 stitches = 10 cm
18–22 rows = 10 cm
Your gauge may vary depending on yarn and tension.
If your stitches are too tight, use a larger hook.
If your stitches are too loose, use a smaller hook.
PART 1: CROCHET BABY TOP
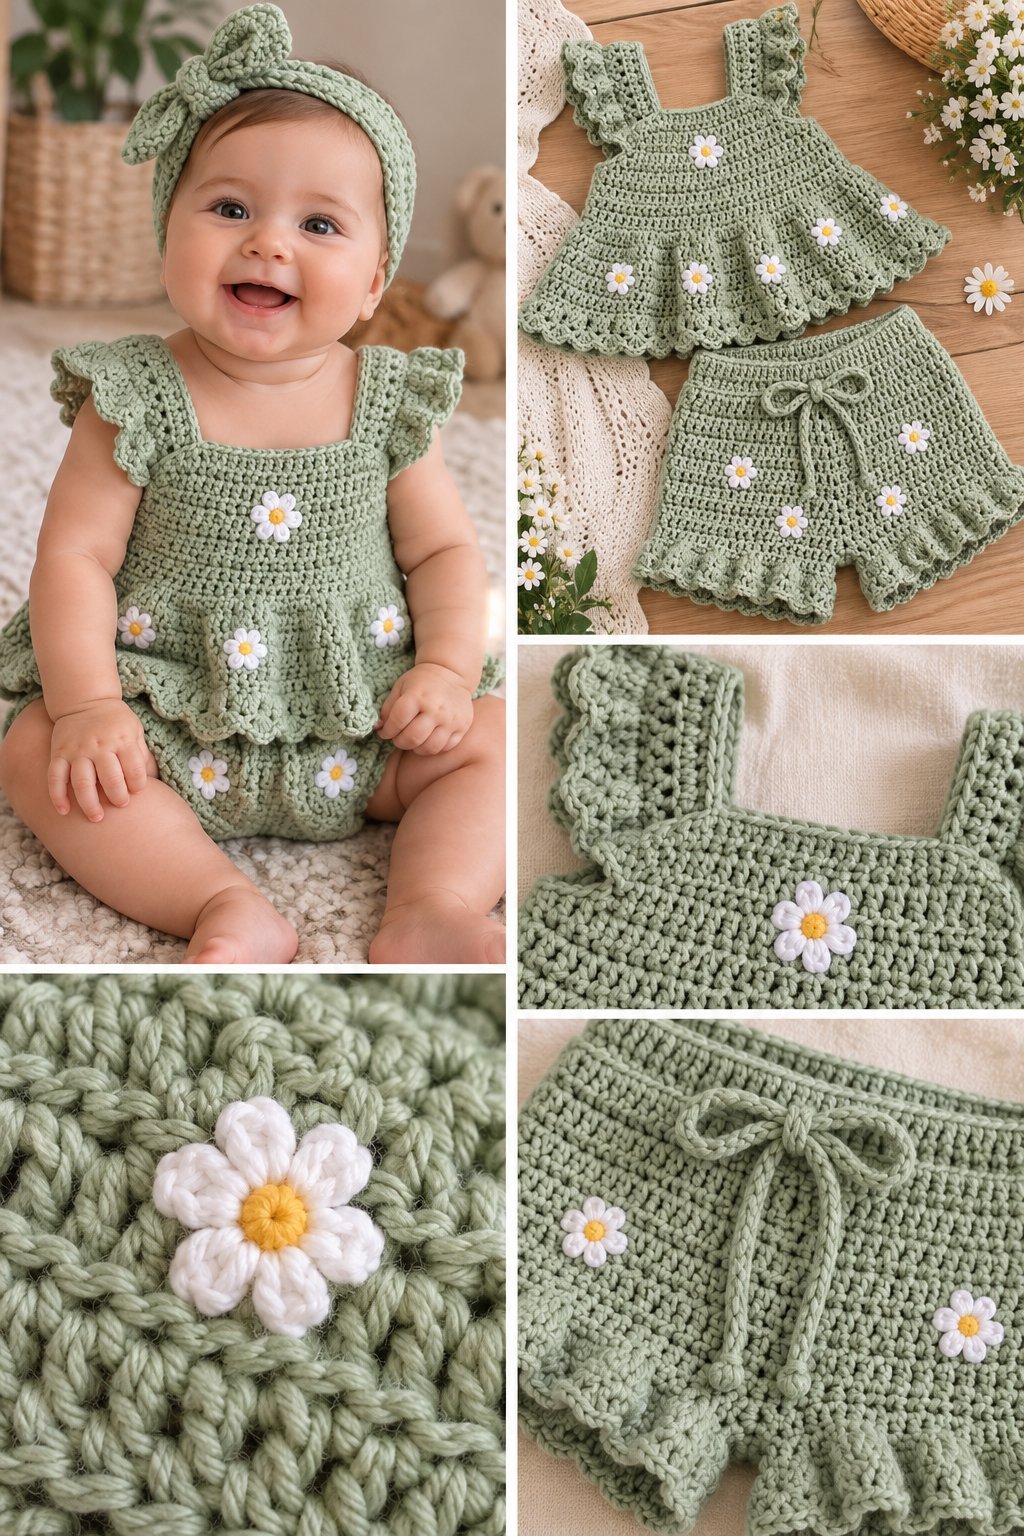
The top is worked from the bodice downward. The lower section is gradually increased to create the soft flared shape shown in the reference.
STEP 1: MAKE THE BODICE
Using sage green yarn, chain approximately 50–56 stitches for a 6–12 month size.
Adjust the number of chains according to the baby’s chest measurement.
Row 1
Sc in the second chain from the hook.
Continue working sc across.
Ch 1 and turn.
Row 2
Sc in every stitch across.
Ch 1 and turn.
Continue working approximately 12–16 rows, or until the bodice reaches the desired height.
The fabric should fit comfortably around the chest without being tight.
STEP 2: SHAPE THE ARMHOLES
Divide the upper bodice into front and back sections.
Leave enough space on both sides for the armholes.
Work the front section first.
Continue crocheting across the front while leaving the armhole stitches unworked.
Work approximately 4–6 rows.
Fasten off.
Repeat for the back section.
The shoulder sections should remain wide enough for the decorative straps.
STEP 3: MAKE THE SHOULDER STRAPS
Attach yarn to the top of the front bodice.
Chain approximately 18–24 stitches.
Adjust the chain length according to the baby’s shoulder measurement.
Work 2–4 rows of sc or hdc.
Fasten off.
Repeat for the second strap.
Repeat the same process for the back straps if desired.
STEP 4: ADD THE RUFFLED STRAPS
Attach yarn around one shoulder strap.
Work sc evenly around the edge.
For the ruffle:
Ch 3.
Work 2 dc into the same stitch.
Work 3 dc into the next stitch.
Repeat across the strap.
Finish with a sl st.
Fasten off.
Repeat on all remaining straps.
For a smaller ruffle, work fewer dc into each stitch.
STEP 5: START THE FLARED BODY
Attach yarn around the bottom edge of the bodice.
Round 1
Work hdc evenly around.
Join with a sl st.
Round 2
Ch 2.
Hdc in the next stitch.
Work 2 hdc in the following stitch.
Repeat around.
Join with a sl st.
Round 3
Ch 2.
Hdc in every stitch around.
Join with a sl st.
Continue alternating increase rounds with plain rounds until the lower section reaches approximately 10–14 cm.
Adjust the length according to the desired fit.
STEP 6: ADD THE SCALLOPED HEM
Attach yarn to the bottom edge if necessary.
Work:
Sc in the first stitch.
Skip 2 stitches.
Work 5 dc in the next stitch.
Skip 2 stitches.
Sc in the next stitch.
Repeat around the entire hem.
Join with a sl st.
Fasten off.
Weave in the yarn ends.
PART 2: CROCHET BABY BLOOMERS
The matching bloomers are worked from the waistband downward.
The waistband can be finished with either a crochet drawstring or soft elastic.
STEP 7: MAKE THE WAISTBAND
Chain approximately 10–12 stitches.
Row 1
Sc in the second chain from the hook and across.
Ch 1 and turn.
Following Rows
Work sc through the BLO.
Continue until the band reaches approximately 42–48 cm for the base size.
Adjust the length according to the baby’s waist measurement.
Bring the two ends together.
Slip stitch them together to create the waistband.
STEP 8: WORK THE BLOOMER BODY
Attach yarn around the lower edge of the waistband.
Work approximately 60–72 sc around.
Join with a sl st.
Continue working in rounds.
Work approximately 5–8 rounds of sc or hdc.
Begin adding increases gradually around the hip area.
Continue until there is enough room for comfortable diaper coverage.
STEP 9: SHAPE THE CROTCH
Divide the stitches into front and back sections.
Work additional rows across the back section to create a slightly higher rise.
Use decreases near the crotch area if necessary.
Keep the crotch comfortable and roomy enough for a diaper.
STEP 10: CREATE THE TWO LEGS
Place stitch markers at the center front and center back.
Divide the remaining stitches into two sections.
Work the first leg in rounds.
Continue for approximately 8–10 rounds.
Fasten off.
Attach yarn to the second leg.
Work the same number of rounds.
Check that both legs have the same length.
STEP 11: ADD THE BLOOMER RUFFLES
Attach yarn around one leg opening.
Work one round of sc.
Next round:
Sc in the first stitch.
Skip 2 stitches.
Work 5 dc into the next stitch.
Skip 2 stitches.
Sc in the next stitch.
Repeat around.
Join with a sl st.
Fasten off.
Repeat for the second leg.
STEP 12: ADD THE WAIST TIE
Chain approximately 70–90 cm.
Work sl sts or sc across the chain.
Fasten off.
Weave the tie through the waistband.
Tie it securely at the front or side.
Keep the tie short enough to avoid creating a long loose loop.
PART 3: CROCHET DAISY FLOWERS
The small daisy flowers give the outfit its main decorative detail.
Make approximately 8–14 flowers depending on how many decorations you want.
STEP 13: MAKE THE FLOWER CENTER
Using yellow yarn:
Make a magic ring.
Work 8 sc into the ring.
Pull the ring closed.
Join with a sl st.
Fasten off.
STEP 14: MAKE THE FLOWER PETALS
Attach white yarn to the yellow center.
Ch 3.
Work 2 dc into the same stitch.
Ch 2.
Sl st into the next stitch.
Repeat around the center.
Continue until you have approximately 6–8 petals.
Fasten off.
Shape the petals gently with your fingers.
STEP 15: ATTACH THE FLOWERS
Arrange the flowers before sewing them permanently.
Suggested locations:
Bodice center
Lower top
Shoulder straps
Bloomers
Sides of the outfit
Sew each flower securely using a tapestry needle.
Make sure every decorative piece is firmly attached.
STEP 16: ADD CROCHET LEAVES
Using green yarn:
Ch 6.
Sl st in the second chain.
Sc in the next stitch.
Hdc in the next stitch.
Dc in the next stitch.
Hdc in the next stitch.
Sc in the final stitch.
Continue around the opposite side of the chain with sl sts.
Fasten off.
Sew the leaves next to selected flowers.
STEP 17: FINISH THE NECKLINE
Work one round of sc around the neckline.
For a decorative finish, use the same scalloped edging as the bottom hem.
Work:
Sc.
Skip 2 stitches.
5 dc in the next stitch.
Skip 2 stitches.
Sc.
Repeat around the neckline.
Finish with a sl st.
PART 4: FINISHING
STEP 18: WEAVE IN THE ENDS
Turn the outfit inside out.
Use a tapestry needle to weave every yarn tail securely through several stitches.
Trim the excess yarn.
Check the seams and decorative flowers.
STEP 19: BLOCK THE OUTFIT
Lightly dampen the crochet pieces.
Lay them flat on a blocking mat or clean towel.
Gently shape:
The bodice
The ruffled straps
The lower top
The scalloped hem
The bloomers
The leg ruffles
Allow everything to dry completely.
Avoid stretching the baby clothing excessively.
STEP 20: FINAL FIT CHECK
Before the outfit is worn, check:
The neckline fits comfortably.
The armholes are not tight.
The straps are even.
The top sits correctly around the chest.
The lower section hangs evenly.
The bloomers provide enough diaper room.
Both legs are equal.
The waistband is comfortable.
All flowers are securely attached.
All yarn ends are properly woven in.
HOW TO CUSTOMIZE THE OUTFIT
MAKE IT SMALLER
Reduce the foundation chain according to the baby’s chest measurement.
Reduce the number of rows in the bodice.
Adjust the waistband to the baby’s waist.
MAKE IT LARGER
Increase the foundation chain.
Add additional bodice rows.
Increase the number of stitches around the skirt section.
Increase the waistband length.
Add additional rounds to the bloomers.
MAKE THE SKIRT FULLER
Add more increase rounds to the lower section.
MAKE THE SKIRT LONGER
Continue working additional rounds before adding the scalloped hem.
CHANGE THE FLOWERS
Instead of daisies, add small crochet roses, simple five-petal flowers, hearts, or leaves.
COLOR IDEAS
Sage Green + White + Yellow
Cream + Dusty Pink + Green
Lavender + White + Yellow
Baby Blue + Cream
Peach + Ivory
Soft Pink + Sage Green
Butter Yellow + White
CROCHET TIPS
Always make a gauge swatch before starting the complete outfit.
Measure the baby whenever possible.
Keep the fabric soft and flexible.
Check the fit as you work.
Do not make the neckline or armholes too tight.
Use washable yarn for easier care.
Secure all decorative pieces firmly.
Inspect the finished outfit before every use.
BABY SAFETY
Make sure flowers and other decorative elements are securely sewn onto the garment.
Check regularly for loose yarn, damaged stitches, loose buttons, or detached decorations.
Avoid long loose cords or ties.
Never leave a baby unattended while wearing clothing with detachable or loose decorative elements.
CARE INSTRUCTIONS
Hand wash or use the gentle cycle according to the yarn manufacturer’s instructions.
Use mild detergent.
Avoid harsh bleach.
Reshape while damp.
Lay flat to dry.
Avoid high heat unless recommended by the yarn manufacturer.
FREQUENTLY ASKED QUESTIONS
WHAT YARN IS BEST FOR A CROCHET BABY OUTFIT?
Soft cotton, cotton blends, and washable baby yarn are good choices for this type of project.
WHAT SIZE CROCHET HOOK SHOULD I USE?
A 3.5 mm hook is a useful starting point with DK yarn. Adjust the hook according to your personal tension and gauge.
CAN I MAKE THIS OUTFIT IN DIFFERENT SIZES?
Yes. Adjust the chest, waist, hip, and length measurements to create a different size.
CAN I CHANGE THE COLORS?
Yes. The entire outfit can be customized with different yarn colors.
IS THIS PATTERN GOOD FOR BEGINNERS?
The basic stitches are beginner-friendly, but shaping the outfit and creating the ruffles and bloomers makes it more suitable for a confident beginner or intermediate crocheter.


1 thought on “CROCHET BABY OUTFIT PATTERN”