

A small blue bear, cream muzzle and inner ears and paws, black safety eyes, an embroidered nose and mouth, and two little pink cheek blushes — all small enough to sit comfortably in a palm, finished off with a keyring and chain clipped at the top of the head. The flat-lay of pieces in the process shots is the most useful part of this photo set: head, body, two arms, two legs, and two ear circles, all made separately before assembly, which is exactly how a project this small needs to be approached.
Scale is really the whole story with a keychain amigurumi. Every piece here is tiny compared to a standard amigurumi toy, which changes the practical considerations more than it changes the actual techniques — you’re still doing magic rings, increases, and decreases, just with far fewer stitches per round and far less margin for error in such a small space.
This is a good project for practicing the fundamentals of amigurumi at a forgiving scale, since a mistake costs you a few minutes of frogging rather than hours of work on something much bigger. It also suits anyone who wants a quick, finishable project rather than a multi-week commitment.
Reading the Construction
The flat-lay photo makes the piece breakdown clear: a round head, a slightly larger round body, two short cylindrical arms, two slightly flatter leg pieces with a cream paw pad color-changed in, and two small ear circles with a cream center worked as a color change rather than a separate applique. That cream-center ear technique — color-changing mid-round rather than attaching a tiny separate circle — is a cleaner approach at this scale than trying to stitch on a separate piece that small.
The muzzle looks like its own small oval or circle, worked separately in cream and stitched onto the face, with the nose and mouth added afterward using embroidery rather than crochet stitches. That’s standard for amigurumi faces at any scale, but it matters even more here, since trying to crochet a nose shape this small would be far more difficult than simply embroidering a few stitches over the muzzle piece once it’s attached.
The cheek blushes appear to be a bit of pink yarn or thread stitched on in a small cluster, or possibly a dab of blush makeup applied directly to the yarn — either is a common amigurumi technique for adding that flushed look without any actual crochet construction involved.
Materials You’ll Need
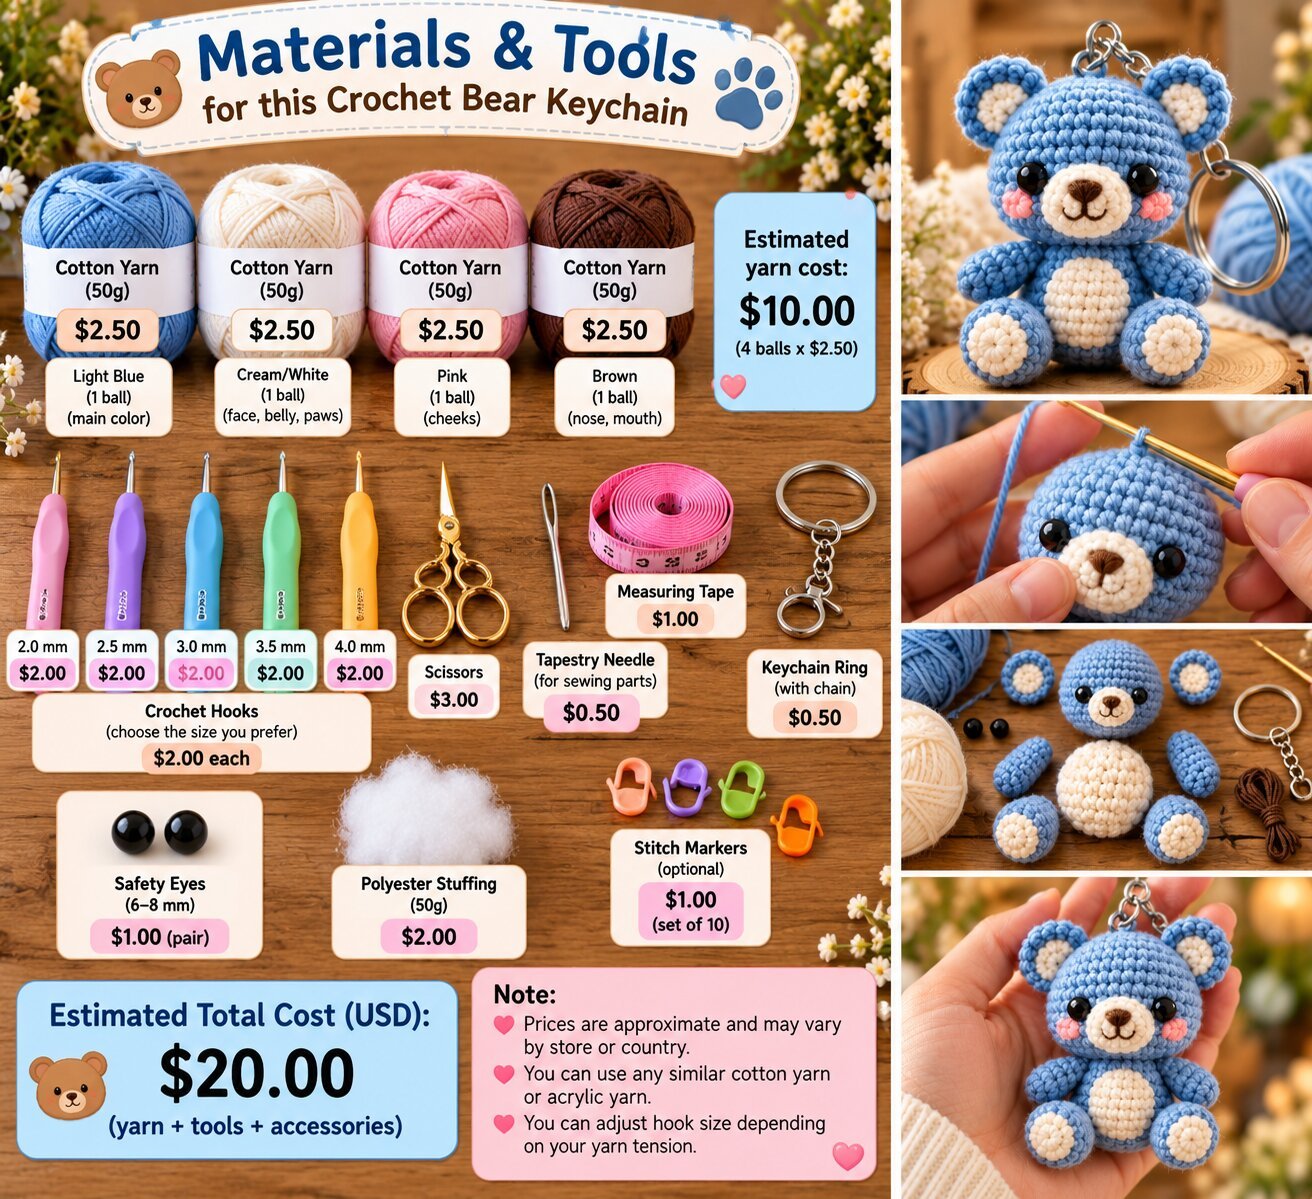
- Blue yarn for the main body, head, ears, and arms (a fine or fingering weight cotton or acrylic is a reasonable suggestion, given how small the finished pieces are relative to visible stitch count)
- Cream yarn for the muzzle, ear centers, and paw pads
- A small amount of brown yarn or embroidery floss for the nose and mouth
- A touch of pink yarn, thread, or craft blush for the cheeks
- A crochet hook sized to your yarn (see below)
- Small safety eyes, sized appropriately for a piece this tiny
- A small amount of stuffing
- A keyring and chain, available at most craft stores
- Yarn needle, for seaming and attaching pieces
- Scissors
- Stitch markers, useful even at this scale for tracking rounds in such a small, easy-to-lose-count spiral
Yarn and Hook Notes
Given how many visible stitches fit into such a small finished piece, this looks like fine or fingering weight yarn rather than anything bulkier — a worsted weight yarn would likely produce a bear too large to function well as a keychain. A hook somewhere around 2mm to 2.75mm is a reasonable starting point for that weight, worked snugly so the stuffing doesn’t peek through at this reduced scale.
Cotton yarn is worth considering for a keychain specifically, since it holds up better to the handling, bag friction, and occasional damp pocket that a keychain accessory encounters compared to a shelf-sitting toy.
Skill Level
This is a confident beginner project, assuming you’ve already made one or two amigurumi pieces at a standard size and are comfortable with the basic rhythm of magic rings, increases, and decreases. The techniques themselves aren’t advanced — what’s different is the precision required at a reduced scale, where losing count by even one stitch is more noticeable on a piece this small than it would be on a larger toy. Someone completely new to amigurumi might find practicing at standard size first makes this a smoother second project.
Stitches Likely Involved
- Magic ring — starting point for the head, body, each ear, and each limb
- Single crochet (sc) — the primary stitch throughout, given the tight, even texture visible in the photos
- Increase (inc) and decrease (dec) — shaping the rounded head, body, and limb pieces
- A simple color-change technique for the ear centers and paw pads, switching from blue to cream mid-piece
- Basic embroidery stitches — for the nose, mouth, and possibly the cheek details, worked after crochet assembly is complete
Building It: A Practical Sequence
Crochet all the pieces first, following the flat-lay approach, making the head, body, two ears, two arms, and two legs as separate small pieces before assembling anything. At this scale, having everything made ahead of time makes final assembly much more manageable than building piece by piece.
Work the ear color change carefully, switching to cream partway through each ear’s rounds to create the lighter center, and keep both ears as close to identical in size as you can manage, since any size mismatch is very visible on a piece this small.
Place the safety eyes on the head before stuffing, checking symmetry closely — at this scale, even a slight misplacement reads as more off-center than it would on a larger project.
Attach the muzzle, then embroider the nose and mouth on top of it, using small, neat stitches given how little space you’re working with. A simple straight stitch for the nose with a short line down into a small V or curve for the mouth is typically enough.
Stuff each piece lightly rather than densely, since overstuffing small amigurumi parts can distort their shape and make seaming harder.
Assemble head to body first, then attach arms, legs, and ears, working around each attachment point securely since a keychain gets handled and tugged more than a toy that mostly sits still.
Add the cheek blushes last, using a few small stitches in pink yarn or thread, or a light dab of blush if you prefer that approach.
Attach the keyring hardware at the top of the head, looping it through a sturdy stitch or a small crocheted loop left at the crown for that purpose.
Adjusting the Fit and Look
Size here is really just a function of yarn weight and hook size — moving up to a sport or DK weight yarn with a slightly larger hook would scale the whole bear up into more of a small toy than a keychain, while staying with fine or fingering weight keeps it pocket-sized. Color is easy to swap entirely; the same construction works with any main color paired with a cream or white muzzle and paw accents.
If embroidering a face at this scale feels difficult, using a slightly larger hook and yarn for a bigger version first, then sizing down once you’re comfortable with the proportions, is a reasonable way to build confidence before committing to the smallest size.
Where It’s Easy to Go Wrong
Mismatched ear or limb sizes. Because the pieces are so small, even a round or two of difference between the left and right side is immediately noticeable. Count rounds carefully and make matching pieces back to back rather than days apart, so your tension stays consistent.
Safety eyes placed too close together or too far apart. At this scale, the margin of acceptable placement is much smaller than on a standard amigurumi. Mark your intended eye spots with removable pins before inserting anything permanently.
Overstuffing small pieces until they lose their shape. It’s tempting to pack a tiny piece firmly, but overstuffing at this scale can actually distort the rounded shape rather than reinforcing it. Stuff just enough to fill out the form without straining the stitches.
A keyring attachment point that isn’t secure. Since this is meant to be handled, clipped, and tugged on a daily basis, a loosely attached keyring is the most likely failure point. Reinforce the attachment loop with extra stitching rather than relying on a single pass of yarn.
Care
Hand washing in cool water, if needed, is the gentler approach for a small accessory like this, since a washing machine’s agitation can easily lose or damage something this size. Air dry fully away from direct heat, which can warp the safety eyes or shrink the yarn. Given that this piece will likely live on a keyring and encounter pocket lint, bag interiors, and general handling, expect it to need occasional spot cleaning rather than full washing.
Common Questions
Is this a good first amigurumi project?
It’s a reasonable project for someone who has made at least one standard-sized amigurumi already, since the reduced scale asks for more precision than a beginner’s first attempt typically allows for.
What yarn weight works best for a keychain this size?
A fine or fingering weight yarn with a small hook keeps the finished bear appropriately pocket-sized; moving up to a thicker yarn will produce a larger result that may not function as well as a keychain.
Can I skip the safety eyes for a child-safe version?
Yes, embroidered eyes using black thread are a safer substitute, particularly important for a small accessory that could end up within reach of a very young child.
How do I attach the keyring securely?
Looping the keyring through a small, sturdy crocheted loop or chain left at the top of the head, then reinforcing that attachment point with extra stitching, holds up better than a single loose pass of yarn.

