
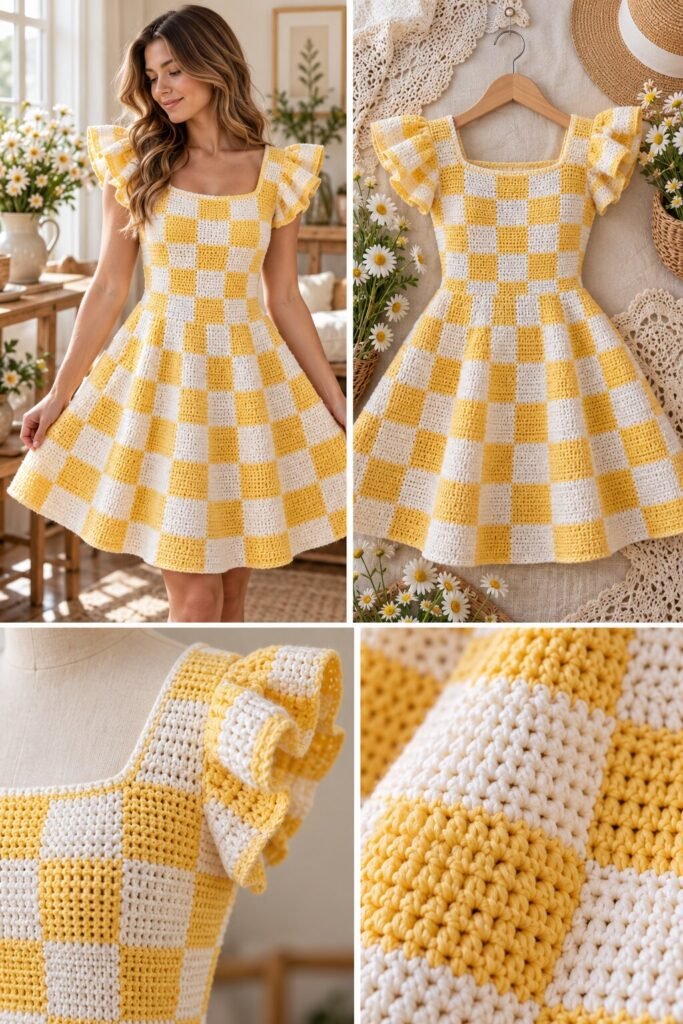
A yellow-and-cream checkerboard dress with a square neckline, a fitted waist, and a full skirt that flares to a short hem. Each check is a crisp block of color, and the squares grow wider toward the bottom, so the grid fans out along with the skirt. The sleeves are layered ruffles, also worked in checks, that stand up off the shoulders like small wings.
The checks are what carry this dress, and what’s interesting is how the grid behaves on a shaped garment. A checkerboard on a flat blanket is simple. Here the blocks have to follow the bodice’s curve, widen through the skirt, and still line up cleanly at every seam. That is where the planning goes.
It suits someone who has made color-block or tapestry crochet and wants to put it into a garment. Fitted dresses are a step up from blankets, so expect to think about measurements.
Reading the Construction
The close-up shows tight, dense stitches in each block, probably single crochet or a similar compact stitch, with no gaps between colors. The edges between squares look sharp, which suggests the colors were carried or switched at the end of each block, either by changing color within the row (tapestry or intarsia style) or by working in blocks and joining them.
Because the bodice squares look small and the skirt squares look larger, the dress was likely worked in rows or rounds with the block width increasing gradually from waist to hem. The skirt’s fullness seems to come from adding stitches within the blocks rather than gathering the fabric. That keeps the grid intact and explains why the checks flare smoothly.
The sleeves look like two ruffle layers, with extra stitches worked into each stitch along the edge, still in the yellow and cream blocks. The square neckline has a thin yellow or cream trim round.
Materials You’ll Need
- Pale yellow and cream yarn in the same weight (a cotton or cotton blend is a reasonable suggestion, since it gives crisp, clean block edges)
- A crochet hook sized to your yarn (see below)
- Yarn needle for weaving in ends and seaming
- Scissors
- Stitch markers, useful for marking block widths and increase points
- Yarn bobbins or small clips, if you use intarsia-style color changes
- A tape measure, since fit depends on your own measurements
- A zipper or buttons if the fitted bodice does not stretch enough to pull on
Yarn and Hook Notes
The fabric looks fine to medium and very even, so a DK or light worsted cotton is a sensible starting point, with a hook roughly in the 3mm to 4mm range. A tight, consistent gauge matters more here than in most dresses, because uneven tension will distort the squares. Swatch a few blocks in both colors, block the swatch, and measure again.
Use two yarns of the same fiber and weight. If the cream is thicker than the yellow, the blocks will look uneven.
Skill Level
Intermediate. The stitch is basic, but managing two colors across a shaped garment takes attention. The harder parts are keeping block sizes consistent, adding fullness without breaking the grid, avoiding gaps at color changes, and fitting the bodice.
Stitches Likely Involved
- Chain (ch): foundation and turning chains
- Slip stitch (sl st): joining and neat color changes
- Single crochet (sc): the check blocks
- Half double crochet (hdc): possible alternative for faster blocks
- Increase (inc) and decrease (dec): shaping the bodice and widening the skirt
- Color-change technique: switching yarn mid-row, either carrying or using separate balls
- A ruffle technique: several stitches worked into each base stitch for the sleeves
Building It: A Practical Sequence
Chart the grid before you start. Draw the checkerboard on graph paper, decide how many blocks wide the bodice is, and how block width increases toward the hem.
Swatch and decide the block size so the finished squares match your plan.
Work the bodice. Follow your chart and shape the waist and neckline with decreases that happen inside the blocks, not between them.
Join at the waist and begin the skirt. Increase stitches within each block so the grid widens evenly.
Check color changes. Pull the new color through on the last yarn-over of the old color to avoid gaps, and keep yarn tension even.
Add the sleeves. Work short caps in blocks, then add the ruffle layers around the lower edge.
Trim the neckline with a round of single crochet.
Weave in ends and block. Blocking helps square up the checks and flatten the seams.
Adjusting the Fit and Look
Bust and waist fit come from your own measurements and gauge. Skirt length is easy to change by adding or skipping rows of blocks. For a simpler dress, skip the ruffles and use plain cap sleeves. A pink-and-white or blue-and-white version would keep the same structure. A smaller check makes the dress look more delicate, and a larger one looks bolder.
Where It’s Easy to Go Wrong
Blocks that drift out of square. Count stitches and rows in every block, and use markers at the block edges.
Gaps at color changes. Change colors on the last pull-through of the previous stitch and tug gently to close the gap.
Skirt increases that break the pattern. Spread them evenly inside each block so one check does not get wider than its neighbor.
Different yarn weights. Cream and yellow from different brands can vary. Compare them side by side before starting.
Too many loose ends. Weave ends in as you go, since a checkerboard generates many.
Care
Hand wash in cool water and lay flat to dry, reshaping while damp. Wash separately for the first few times in case the yellow dye runs onto the cream. Avoid high heat, and follow the yarn label.
Common Questions
Is this a beginner project?
Not really. The stitch is simple, but shaping a two-color grid on a fitted dress is better for intermediate crocheters.
Can I make it with a different stitch?
Yes, half double crochet works up faster, though the squares will look slightly softer.
Do I need to carry the yarn across the back?
Not necessarily. Using separate balls or bobbins for each block gives a cleaner back and avoids long floats.
Can I make it longer or shorter?
Yes. Change the number of block rows in the skirt.

