
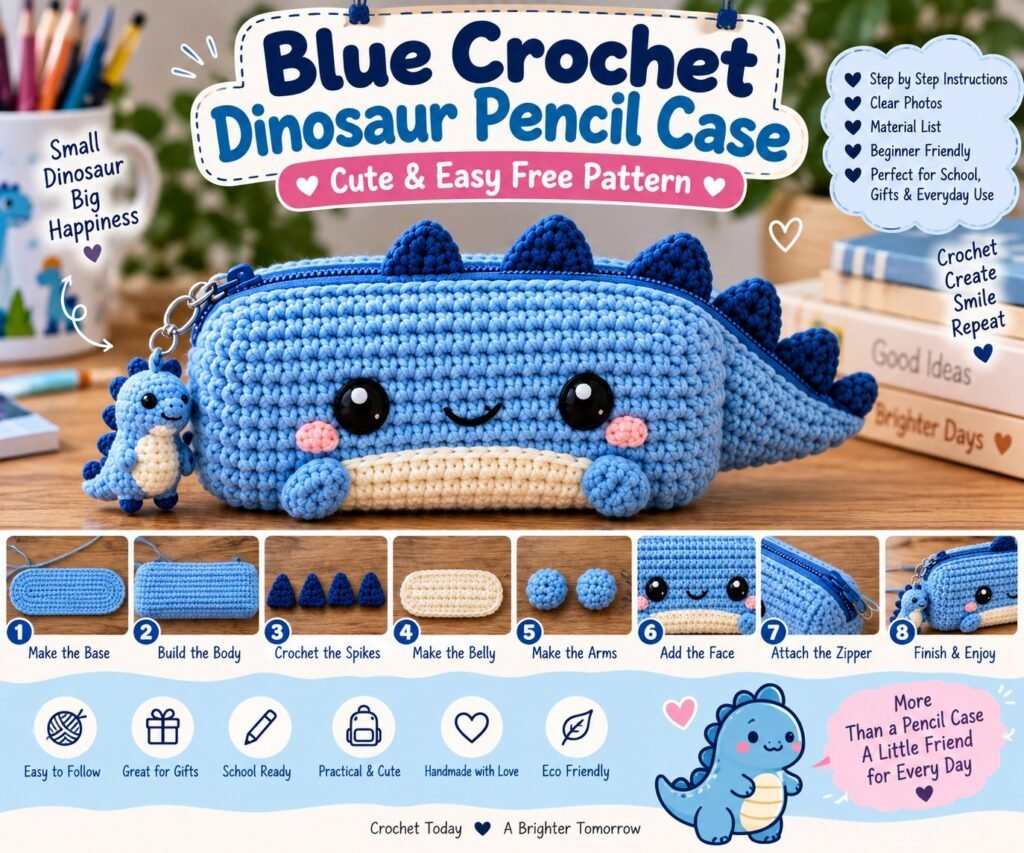
Create an adorable Blue Crochet Dinosaur Pencil Case with this easy step-by-step crochet pattern. This cute dinosaur pouch combines a soft blue crocheted body, dark blue spikes, a cream belly, rosy cheeks, little arms, and a matching mini dinosaur keychain.
The finished pencil case is perfect for school supplies, crochet gifts, children’s rooms, travel accessories, makeup, small craft supplies, or anyone who loves cute dinosaur designs.
This project is worked mainly with single crochet stitches and can be customized in different colors and sizes.
This pattern uses US crochet terminology.
BLUE CROCHET DINOSAUR PENCIL CASE OVERVIEW
The pencil case is constructed as a rectangular crochet pouch with rounded corners.
A zipper is installed along the top opening.
Dark blue crochet spikes are attached along the upper edge and back to create the dinosaur silhouette.
A cream-colored belly panel is added to the front.
Small crocheted arms, rosy cheeks, safety eyes, and an embroidered smile complete the face.
A miniature dinosaur charm can also be crocheted and attached to the zipper as shown in the reference.
The pattern below is an original adaptable construction inspired by the supplied reference image. The photograph does not contain the original designer’s stitch counts, so measurements and stitch counts may need to be adjusted according to yarn weight, hook size, zipper length, and personal tension.
MATERIALS NEEDED
Light blue worsted-weight yarn for the main body
Dark blue yarn for the dinosaur spikes
Cream or ivory yarn for the belly
Small amount of pink yarn for the cheeks
Small amount of black embroidery thread for the smile
Small amount of white or black yarn for details
3 mm or 3.5 mm crochet hook
Matching zipper approximately 18–22 cm long
Tapestry needle
Sewing needle
Matching sewing thread
Polyester fiberfill
Two safety eyes
Scissors
Stitch marker
Optional metal keychain ring
Optional lobster clasp
SKILL LEVEL
Beginner to intermediate.
The main pouch uses simple stitches, but attaching the zipper and assembling the decorative pieces requires careful sewing.
FINISHED SIZE
Using medium-weight yarn and a 3–3.5 mm crochet hook, the finished pencil case can measure approximately:
Length: 18–22 cm
Height: 7–9 cm
Depth: approximately 4–6 cm
The final size will depend on your yarn, hook size, stitch tension, and zipper length.
CROCHET ABBREVIATIONS
CH – Chain
SC – Single Crochet
HDC – Half Double Crochet
DC – Double Crochet
SL ST – Slip Stitch
INC – Increase
DEC – Decrease
BLO – Back Loop Only
FLO – Front Loop Only
ST – Stitch
STS – Stitches
IMPORTANT PATTERN NOTES
Keep your stitches fairly tight so that the pencil case maintains its shape.
Use a stitch marker when working in continuous rounds.
Check the length of your crochet panel against your zipper before sewing.
If your crochet fabric is wider or narrower than the zipper, adjust the number of starting chains.
Do not overstuff the pencil case.
The stuffing is mainly useful for shaping the decorative dinosaur details.
PART 1 — CROCHET THE MAIN PENCIL CASE BODY

STEP 1 — CREATE THE FOUNDATION CHAIN
Use light blue yarn.
Chain approximately 45 stitches for a medium pencil case.
The exact number of chains depends on your desired length and zipper size.
For a smaller pencil case, use fewer chains.
For a larger pencil case, increase the foundation chain.
STEP 2 — CROCHET THE FIRST ROW
Work SC into the second chain from the hook.
Continue working SC across the chain.
When you reach the final chain, place several SC stitches into the same end space.
Continue crocheting along the opposite side of the foundation chain.
Work SC back toward the beginning.
You should now have an elongated oval.
This forms the base of the pencil case.
STEP 3 — BUILD THE SIDES
Continue working SC around the oval.
Do not increase heavily after the base has reached the desired width.
Work approximately 8–12 rounds of SC.
Keep checking the height of the pouch.
The sides should gradually form a rounded rectangular shape.
STEP 4 — SHAPE THE CORNERS
The corners should remain softly rounded.
If your corners become too pointed, add an extra SC into the corner area.
If the piece becomes too wide, reduce the number of increases.
Continue until the pouch reaches approximately 7–9 cm high.
Fasten off if you are making two separate panels.
Alternatively, continue working the body as one continuous piece if you prefer a seamless construction.
PART 2 — CREATE THE SECOND PANEL
STEP 5 — MAKE THE BACK PANEL
Repeat the same construction using light blue yarn.
Create a second rectangular panel matching the first panel.
Place the two pieces together.
Check that the edges line up evenly.
The two panels should be approximately the same size.
PART 3 — ADD THE DINOSAUR SPIKES
STEP 6 — CROCHET THE FIRST SPIKE
Use dark blue yarn.
Make a small magic ring.
Work 6 SC into the ring.
Round 2:
SC around.
Round 3:
SC in the next stitch.
INC in the next stitch.
Repeat around.
Continue increasing gradually until the spike reaches approximately 2–3 cm wide.
Begin decreasing.
SC in the next stitch.
DEC in the next stitch.
Repeat until the opening becomes small.
Add a tiny amount of stuffing.
Close the opening.
Fasten off, leaving a long sewing tail.
STEP 7 — MAKE MORE SPIKES
Create several spikes in different sizes.
For example, make:
2 small spikes
4 medium spikes
2 larger spikes
The spikes can gradually become larger toward the center of the pencil case and smaller toward the ends.
This creates a natural dinosaur back silhouette.
STEP 8 — ATTACH THE SPIKES
Place the spikes along the upper back edge of the pencil case.
Sew each spike securely into position.
Leave the top portion of each spike visible.
Space the spikes evenly.
Make sure they do not interfere with the zipper.
PART 4 — CROCHET THE DINOSAUR BELLY
STEP 9 — CREATE THE BELLY PANEL
Use cream yarn.
Chain approximately 12–15 stitches.
Work SC across.
Turn.
Continue working rows of SC until the piece reaches approximately 5–7 cm in height.
The exact size should correspond to the front of your pencil case.
Round or soften the corners by decreasing slightly near the upper edges.
Fasten off.
STEP 10 — ATTACH THE BELLY
Place the cream panel on the center front of the blue pencil case.
Sew around the outer edge using cream or matching blue yarn.
Keep the stitching neat and evenly spaced.
The belly should remain flat against the pouch.
PART 5 — MAKE THE DINOSAUR ARMS
STEP 11 — CROCHET ONE ARM
Use light blue yarn.
Make a magic ring.
Work 6 SC into the ring.
Work several rounds of SC.
Add a tiny amount of stuffing.
Flatten the opening.
Close with a few stitches.
Leave a long yarn tail.
STEP 12 — MAKE THE SECOND ARM
Repeat the same instructions.
Make sure both arms are approximately the same size.
STEP 13 — ATTACH THE ARMS
Position the arms on either side of the cream belly.
Sew them securely to the front panel.
For a more playful appearance, angle the arms slightly upward.
PART 6 — MAKE THE DINOSAUR FACE
STEP 14 — ATTACH THE EYES
Place two safety eyes above the cream belly.
Leave enough space between them to create a friendly expression.
Press the safety-eye backs securely into place.
If the pencil case will be used by a very young child, embroidered eyes are a safer alternative.
STEP 15 — ADD THE ROSY CHEEKS
Use pink yarn.
Make two small circles or embroidered cheek patches.
Sew one cheek beneath each eye.
Keep them approximately symmetrical.
STEP 16 — EMBROIDER THE SMILE
Use black embroidery thread.
Bring the needle out beneath the eyes.
Create a small curved smile.
Add a tiny upward curve at each side.
Keep the expression simple and friendly.
PART 7 — ADD THE ZIPPER
STEP 17 — PREPARE THE ZIPPER
Choose a zipper that matches the length of your crochet panels.
Place the zipper between the front and back panels.
Use sewing clips or pins to hold everything in position.
Make sure the zipper pull moves freely before sewing.
STEP 18 — SEW THE FIRST SIDE
Place one side of the zipper against the top edge of the front crochet panel.
Sew carefully using small stitches.
Keep the zipper tape straight.
Do not sew through the zipper teeth.
Open and close the zipper several times as you work.
STEP 19 — SEW THE SECOND SIDE
Attach the second crochet panel to the opposite side of the zipper.
Make sure both sides are aligned.
Close the zipper and check the shape.
If necessary, adjust the stitching before completing the side seams.
PART 8 — JOIN THE PENCIL CASE
STEP 20 — SEW THE SIDE EDGES
Turn the pencil case inside out.
Align the side edges.
Sew the two panels together using SC slip stitching or a tapestry needle.
Work carefully around the corners.
STEP 21 — CLOSE THE BOTTOM
Continue sewing around the bottom edge.
Make sure there are no large gaps.
Reinforce both corners.
Turn the pencil case right side out.
Push the corners gently outward using the rounded end of a crochet hook.
PART 9 — ADD THE DINOSAUR TAIL
The reference design includes a pointed tail-like shape extending from one side of the dinosaur.
STEP 22 — MAKE THE TAIL
Use light blue yarn.
Chain approximately 15–20 stitches.
Work SC back along the chain.
Continue working rows while gradually decreasing.
Decrease one stitch at the beginning and end of selected rows.
Continue until the piece forms a tapered triangular shape.
Fasten off.
STEP 23 — ADD TAIL SPIKES
Use dark blue yarn.
Create several tiny triangular spikes.
Sew them along the upper edge of the tail.
Space them evenly.
STEP 24 — ATTACH THE TAIL
Place the tail at one side of the pencil case.
Sew it firmly to the body.
Reinforce the attachment with several passes of yarn.
PART 10 — MAKE THE MINI DINOSAUR KEYCHAIN
STEP 25 — CROCHET THE MINI DINOSAUR BODY
Use light blue yarn.
Make a magic ring.
Work 6 SC.
Increase gradually to approximately 12–18 stitches.
Continue for several rounds.
Decrease gradually.
Add a tiny amount of stuffing.
Close the body.
STEP 26 — ADD THE MINI DINOSAUR BELLY
Use cream yarn.
Make a tiny oval.
Sew it onto the front of the miniature dinosaur.
STEP 27 — ADD MINI SPIKES
Use dark blue yarn.
Create several tiny triangular spikes.
Sew them along the back of the mini dinosaur.
STEP 28 — ADD THE MINI FACE
Add two tiny black eyes.
Embroider a small smile.
Add tiny pink cheeks if desired.
PART 11 — ATTACH THE KEYCHAIN
STEP 29 — MAKE A SMALL ATTACHMENT LOOP
Use strong yarn.
Create a small crochet chain at the top of the mini dinosaur.
Slip stitch back along the chain.
Sew the loop securely.
STEP 30 — ADD THE METAL HARDWARE
Attach the crochet loop to a small metal keychain ring.
Connect the ring to the zipper pull.
Check the connection by gently pulling on the charm.
Reinforce the attachment if necessary.
FINISHING THE PENCIL CASE
Trim all loose yarn ends.
Weave the ends securely into the crochet fabric.
Check the zipper.
Check the spikes.
Check the arms.
Check the tail.
Check the eyes and facial details.
Make sure the keychain attachment is secure.
Gently shape the pencil case with your hands.
Your Blue Crochet Dinosaur Pencil Case is now complete.
COLOR COMBINATIONS
Classic Blue Dinosaur
Light blue body
Dark blue spikes
Cream belly
Pink cheeks
Black eyes
Ocean Dinosaur
Sky blue body
Navy spikes
White belly
Coral cheeks
Pastel Dinosaur
Baby blue body
Lavender spikes
Cream belly
Soft pink cheeks
Green Dinosaur
Sage green body
Dark green spikes
Cream belly
Pink cheeks
Rainbow Dinosaur
Blue body
Rainbow-colored spikes
Cream belly
Multicolored cheeks
CUSTOMIZATION IDEAS
You can easily personalize this crochet dinosaur pencil case.
Make the body longer for larger school supplies.
Create a smaller version for makeup brushes.
Add a fabric lining for extra durability.
Use a contrasting zipper color.
Add a name tag.
Make several dinosaurs in different colors.
Replace the dinosaur spikes with colorful spikes.
Add embroidered stars or hearts.
Create a larger version as a crochet storage pouch.
TIPS FOR MAKING THE PENCIL CASE
Keep your SC stitches tight and consistent.
Measure your crochet panels against the zipper before assembly.
Do not attach the spikes too close to the zipper teeth.
Use a strong sewing thread for the zipper.
Reinforce the corners because they receive extra stress.
Keep the decorative pieces securely attached.
Use a smaller hook if your fabric is too loose.
Block the panels lightly before attaching the zipper if the edges are uneven.
COMMON CROCHET MISTAKES
The Pencil Case Is Too Small
Your tension may be tighter than expected.
Add more foundation chains or use a slightly larger hook.
The Pencil Case Is Too Large
Reduce the foundation chain length or use a smaller hook.
The Zipper Does Not Fit
Always measure the crochet opening against the actual zipper before sewing.
If necessary, add or remove a few stitches from the top edge.
The Spikes Look Uneven
Make a simple paper template for the desired spike sizes and use it as a guide while crocheting.
The Pencil Case Looks Flat
A slightly deeper pouch can be created by adding additional rounds to the side panels.
The Keychain Falls Off
Reinforce the attachment loop with several rows of stitching and use a strong metal ring.
CARE INSTRUCTIONS
Gently hand wash the crochet pencil case when necessary.
Use cool or lukewarm water.
Avoid harsh detergents.
Do not twist or wring the crochet fabric.
Press gently with a towel to remove excess water.
Allow it to air dry completely.
Keep the zipper dry and clean.
FREQUENTLY ASKED QUESTIONS
Is this dinosaur pencil case beginner-friendly?
Yes. The main body uses basic crochet stitches, while the decorative components introduce simple amigurumi techniques.
What yarn should I use?
Cotton, acrylic, or cotton-blend yarn can work well. Medium-weight yarn gives the pencil case a sturdy structure.
What size zipper should I use?
An 18–22 cm zipper is suitable for a medium pencil case. Choose the zipper according to the finished width of your crochet pouch.
Can I make the dinosaur in another color?
Absolutely. Blue is used for the pictured design, but green, purple, pink, yellow, or rainbow colors can create completely different dinosaurs.
Can I add a lining?
Yes. A fabric lining can make the pencil case stronger and prevent pens or pencils from catching on the crochet stitches.
Can I make this pencil case larger?
Yes. Increase the foundation chain length and add additional rounds to the body.
Can I sell finished pencil cases?
You can use this adaptable construction to make finished handmade pencil cases for personal use or sale. Do not copy or redistribute another designer’s written pattern or photographs.

