
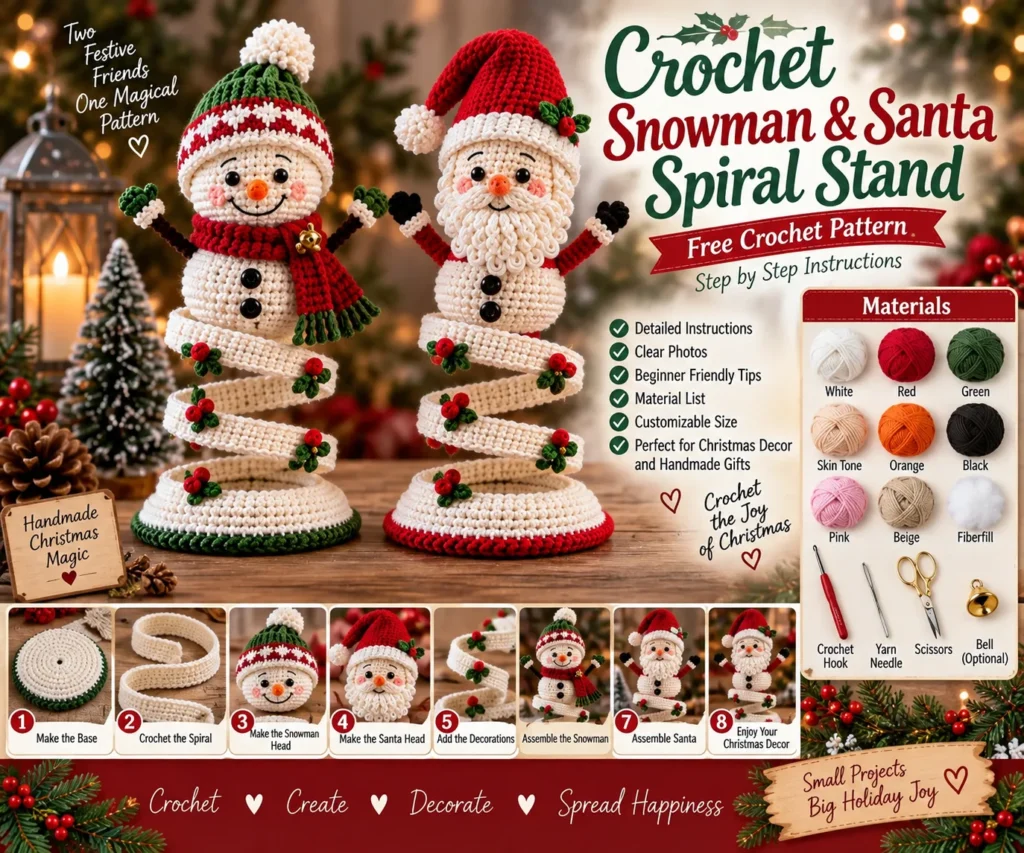
Bring festive handmade charm to your Christmas decorating with this Crochet Snowman & Santa Spiral Stand Pattern. These adorable spiral stands combine a classic snowman and Santa design with a unique curled crochet base, colorful Christmas details, and cheerful holiday faces.
The finished decorations are perfect for a Christmas mantel, tabletop, shelf, centerpiece, or holiday display. You can make the snowman and Santa as a matching pair or create several in different Christmas color combinations.
This is an original, adaptable pattern inspired by the reference design. Exact measurements may vary depending on yarn weight, hook size, stuffing, and crochet tension.
Crochet Snowman & Santa Spiral Stand Pattern
The decoration is made from several separate crochet components.
The main structure consists of a round base, a long spiral strip, and a small character positioned at the top. The snowman uses white, green, and red details, while Santa uses white, red, black, and skin-tone yarn.
Small holly leaves, berries, scarves, buttons, hats, and other details complete the Christmas look.
Materials Needed
Cream or white worsted-weight yarn
Red worsted-weight yarn
Green worsted-weight yarn
Black worsted-weight yarn
Skin-tone yarn
Orange yarn
Small amount of pink yarn
Small amount of beige yarn
Crochet hook suitable for your yarn
Fiberfill stuffing
Yarn needle
Scissors
Stitch marker
Black safety eyes or black embroidery thread
Small black buttons
Small orange bead or yarn for the snowman’s nose
Optional gold jingle bells
Optional fabric stiffener
Finished Size
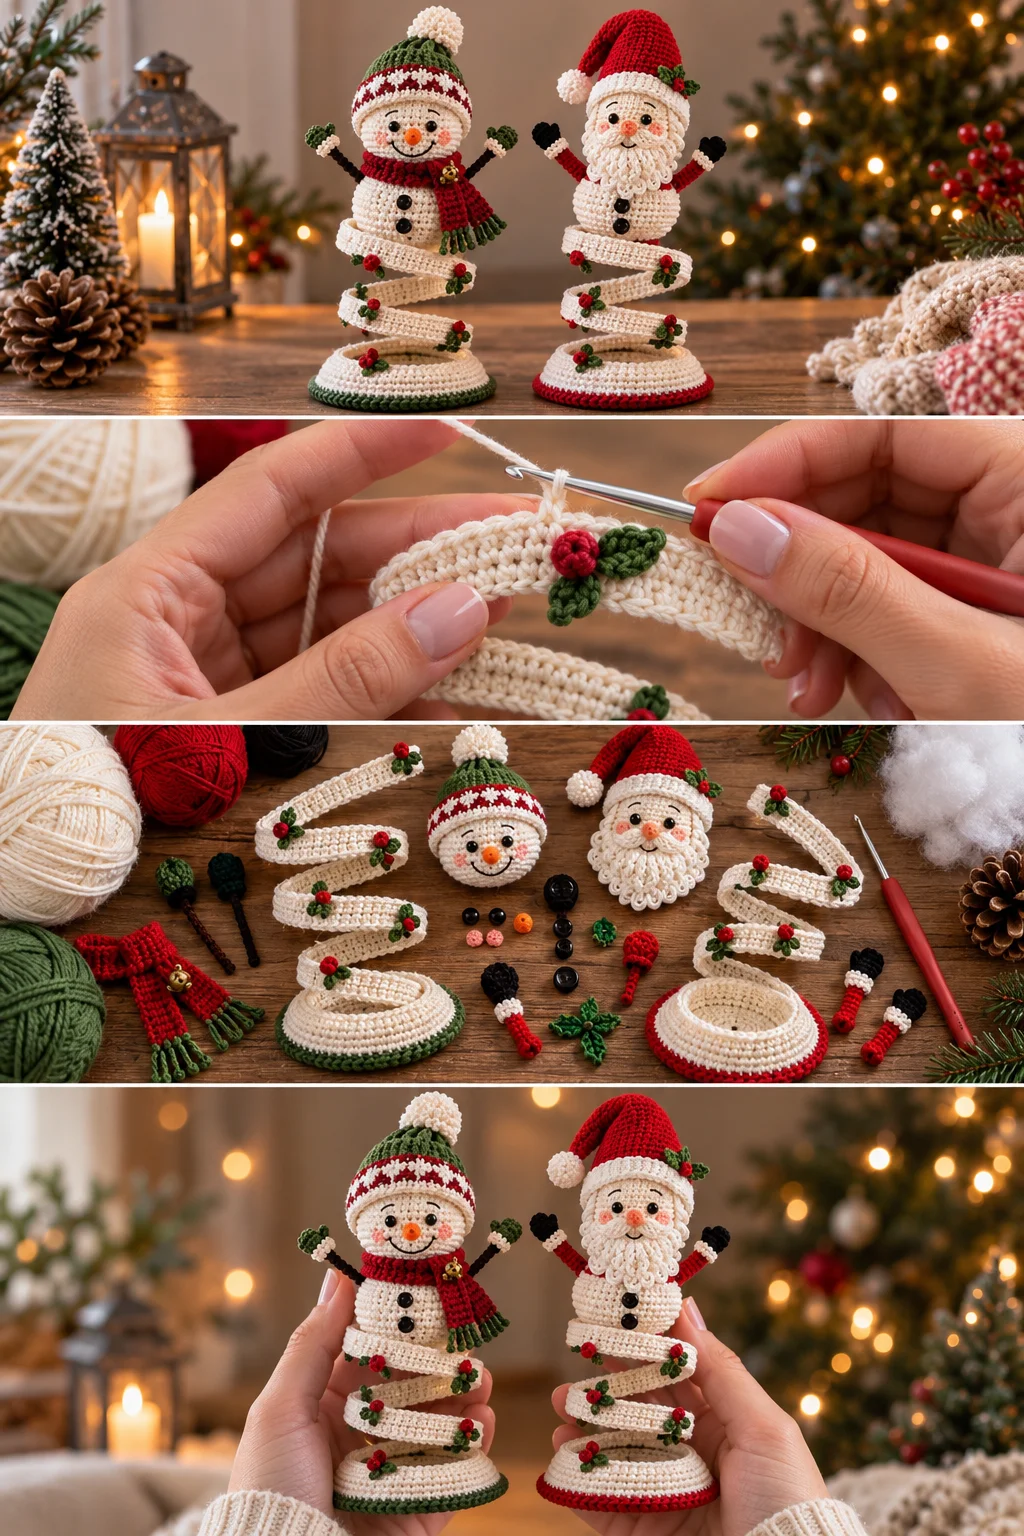
The completed spiral stand will generally measure approximately 20–30 cm tall, depending on the yarn and number of spiral rounds.
For a smaller decoration, use DK-weight yarn and a smaller hook.
For a larger Christmas centerpiece, use thicker yarn and increase the length of the spiral.
Crochet Abbreviations
MR — magic ring
ch — chain
sc — single crochet
hdc — half double crochet
dc — double crochet
sl st — slip stitch
inc — increase
dec — decrease
st — stitch
sts — stitches
BLO — back loop only
FO — fasten off
Skill Level
Intermediate
The individual crochet stitches are fairly simple, but the spiral construction and character assembly require careful shaping and sewing.
You should be comfortable with basic amigurumi techniques, increases, decreases, crocheting flat pieces, and attaching separate crochet components.
How to Crochet the Spiral Stand
The spiral stand is the most distinctive part of this Christmas decoration.
You will create a long crocheted strip and shape it into a gentle spiral.
Use cream or white yarn for the snowman stand.
Use cream and red yarn for the Santa stand.
Step 1: Crochet the Foundation Chain
Chain approximately 90–120 stitches.
The exact number depends on the desired height of your decoration.
For a shorter stand, use fewer chains.
For a taller stand, increase the chain length.
Step 2: First Row
Starting in the second chain from the hook, work 1 sc across the entire chain.
Chain 1 and turn.
Step 3: Second Row
Work 1 sc in every stitch across.
Chain 1 and turn.
Step 4: Create the Spiral Effect
Continue working rows of sc until the strip reaches approximately 4–6 cm wide.
To encourage the strip to curl naturally, work increases gradually along selected rows.
For example:
Work 2 sc in the first stitch.
Work 1 sc across the next several stitches.
Repeat the increase pattern periodically.
The slight difference in stitch count creates the curved shape.
Step 5: Shape the Strip
Lay the finished strip on a flat surface.
Gently curve it into a spiral.
Do not fold the crochet too sharply.
The spiral should create several horizontal levels between the base and the character.
If the strip does not hold its shape, lightly block it or use a small amount of fabric stiffener.
How to Crochet the Round Base
The base supports the entire Christmas decoration.
Use the main color for your character.
Round 1
Make a magic ring.
Work 6 sc into the ring.
6 sts
Round 2
Work 2 sc in every stitch around.
12 sts
Round 3
Repeat:
1 sc, inc.
18 sts
Round 4
Repeat:
2 sc, inc.
24 sts
Round 5
Repeat:
3 sc, inc.
30 sts
Round 6
Repeat:
4 sc, inc.
36 sts
Continue increasing until the base reaches approximately 8–10 cm in diameter.
Base Edging
For the snowman, switch to green yarn for the final round.
For Santa, use red yarn.
Work 1 sc in every stitch around.
Fasten off.
Weave in the yarn tail.
This colored border creates the festive contrast visible around the bottom of the stand.
Attaching the Spiral to the Base
Position one end of the spiral strip near the center of the base.
Sew it securely using matching yarn.
Continue positioning the spiral upward in a gentle curve.
Sew only the necessary points so the spiral remains dimensional.
Make sure the lower section is firmly attached because it supports the weight of the character.
Adding Extra Support
If the finished stand feels too flexible, place a thin flexible support inside the spiral.
A suitable craft support can be inserted carefully inside the crocheted strip.
Another option is to lightly stiffen the crochet fabric.
Make sure any internal support is completely enclosed and cannot poke through the yarn.
Crochet Snowman Head
Use white or cream yarn.
Round 1
Make a magic ring.
Work 6 sc.
6 sts
Round 2
Work 2 sc in every stitch.
12 sts
Round 3
Repeat:
1 sc, inc.
18 sts
Round 4
Repeat:
2 sc, inc.
24 sts
Round 5
Repeat:
3 sc, inc.
30 sts
Rounds 6–10
Work 1 sc in each stitch around.
30 sts
Begin stuffing.
Round 11
Repeat:
3 sc, dec.
24 sts
Round 12
Repeat:
2 sc, dec.
18 sts
Add more stuffing.
Round 13
Repeat:
1 sc, dec.
12 sts
Round 14
Dec around.
6 sts
Fasten off and close the opening.
Snowman Face
Add two black eyes.
Use a small amount of orange yarn to create the carrot nose.
The nose can be embroidered directly onto the face or made as a tiny triangular crochet piece.
Use black embroidery thread to create a smiling mouth.
Add small pink stitches to the cheeks for a soft, cheerful appearance.
Snowman Hat
Use green yarn.
Round 1
Make a magic ring.
Work 6 sc.
Round 2
Increase around.
12 sts
Rounds 3–7
Work 1 sc around.
Continue until the hat is long enough to cover the top of the snowman’s head.
Switch to red yarn for a decorative band if desired.
Finish with a small white pom-pom.
Sew the hat securely onto the snowman’s head.
Snowman Scarf
Use red yarn.
Chain approximately 35–45 stitches.
Work 2–3 rows of sc.
Fasten off.
Add small green tassels to each end.
Wrap the scarf around the snowman’s neck.
Secure it with a few stitches.
A small gold bell can be added to the scarf for extra Christmas detail.
Snowman Arms
Use black yarn for the arms.
Chain approximately 12–15 stitches.
Work sl sts back along the chain.
Fasten off.
Create two arms.
Sew them to the sides of the snowman’s body.
For a mitten-style appearance, add small green or white crochet circles at the ends.
Snowman Body
The snowman’s body can be made as a small stuffed oval.
Round 1
Make a magic ring.
Work 6 sc.
Round 2
Increase around.
12 sts
Round 3
Repeat:
1 sc, inc.
18 sts
Rounds 4–8
Work 1 sc around.
18 sts
Round 9
Repeat:
1 sc, dec.
12 sts
Stuff lightly.
Round 10
Dec around.
6 sts
Close the opening.
Sew the body securely to the top section of the spiral stand.
Snowman Buttons
Sew two or three small black buttons vertically down the front of the snowman.
If the decoration will be handled by young children, embroidered buttons are a safer alternative.
Crochet Santa Head
Use skin-tone yarn.
Round 1
Make a magic ring.
Work 6 sc.
Round 2
Increase around.
12 sts
Round 3
Repeat:
1 sc, inc.
18 sts
Round 4
Repeat:
2 sc, inc.
24 sts
Round 5
Repeat:
3 sc, inc.
30 sts
Rounds 6–10
Work 1 sc around.
30 sts
Begin stuffing.
Round 11
Repeat:
3 sc, dec.
24 sts
Round 12
Repeat:
2 sc, dec.
18 sts
Add more stuffing.
Round 13
Repeat:
1 sc, dec.
12 sts
Round 14
Dec around.
6 sts
Fasten off and close.
Santa’s Face
Attach two black eyes.
Embroider small eyebrows using black thread.
Use pink or peach yarn to create subtle cheeks.
Create a small red or skin-tone nose.
The face can be kept simple because Santa’s beard will cover much of the lower portion.
How to Crochet Santa’s Beard
Use white yarn.
Row 1
Chain approximately 14 stitches.
Work sc across.
Row 2
Ch 1 and turn.
Work sc across.
Row 3
Increase at both ends.
Rows 4–7
Continue increasing toward the outer edges.
For a textured beard, add small clusters of chains along the bottom edge.
Fasten off.
Sew the beard underneath Santa’s nose.
For a fuller beard, create a second smaller piece and layer it over the first.
Santa’s Hat
Use red yarn.
Round 1
Make a magic ring.
Work 6 sc.
Round 2
Increase around.
12 sts
Round 3
Work 1 sc in each stitch.
Round 4
Repeat:
1 sc in the next stitch, inc.
Continue increasing gradually.
Main Hat
Work several rounds of sc while gradually reducing the increases.
The hat should become narrower toward the top.
Finish with a white crochet border.
Add a white pom-pom to the tip.
Sew the hat onto Santa’s head.
Santa’s Body
Use white yarn.
Round 1
Make a magic ring.
Work 6 sc.
Round 2
Increase around.
12 sts
Round 3
Repeat:
1 sc, inc.
18 sts
Round 4
Repeat:
2 sc, inc.
24 sts
Rounds 5–9
Work 1 sc around.
24 sts
Round 10
Repeat:
2 sc, dec.
18 sts
Stuff lightly.
Round 11
Repeat:
1 sc, dec.
12 sts
Round 12
Dec around.
6 sts
Close the opening.
Santa’s Red Trim
Use red yarn around the lower section of the body.
Work a round of sc around the desired area.
You can also create a separate narrow strip and sew it around the body.
For a more traditional Santa appearance, add a thin black belt with a small gold buckle.
Santa’s Arms
Use red yarn.
Make two narrow arms using approximately 10–12 rounds of sc.
Switch to black or white yarn for the hands.
Lightly stuff.
Sew the arms onto the sides of Santa’s body.
Position them slightly upward for a cheerful waving pose.
Santa’s Boots
Use black yarn.
Create two small oval pieces.
Round 1
Magic ring with 6 sc.
Round 2
Increase around.
12 sts
Rounds 3–4
Work 1 sc around.
Fasten off.
Lightly stuff.
Sew the boots to the lower body.
Holly Decorations
The small holly decorations give the spiral stand its festive appearance.
Use green yarn.
Chain 5.
Starting from the second chain:
sl st
sc
hdc
sc
sl st
Fasten off.
Make several leaves.
Crochet Holly Berries
Use red yarn.
Make a magic ring.
Work 6 sc.
Pull the ring closed.
Fasten off.
Create several small red berries.
Sew the berries and leaves onto the spiral strip.
Space the decorations evenly along the curls.
Step-by-Step Assembly
Step 1: Make the Base
Crochet the round base and finish it with a red or green decorative border.
Step 2: Crochet the Spiral
Create the long crochet strip and shape it into a gentle spiral.
Step 3: Attach the Spiral
Secure the lower end of the spiral firmly to the center of the base.
Step 4: Make the Character
Crochet the snowman or Santa head, body, arms, and other components.
Step 5: Add the Face
Attach the eyes and embroider the facial details.
Step 6: Add the Hat
Place the finished Christmas hat securely on the character’s head.
Step 7: Add Accessories
Attach the scarf, beard, buttons, belt, mittens, boots, or other details.
Step 8: Attach the Character
Sew the finished character securely to the upper section of the spiral.
Step 9: Add Holly
Attach green leaves and red berries along the spiral.
Step 10: Shape the Stand
Arrange the spiral sections so that they create an even decorative curve.
Step 11: Final Inspection
Check every seam and decorative element.
Weave in all loose yarn ends.
Make sure the stand sits level on a flat surface.
How to Keep the Spiral Stand Upright
A stable base is important for this project.
Make the bottom base wide enough to support the character.
Keep the character lightweight.
Attach the spiral securely at the center of the base.
If needed, add a small amount of weight inside the base before closing it.
For a permanent display decoration, light fabric stiffening can also help maintain the spiral shape.
Christmas Color Variations
Traditional Snowman
White
Green
Red
Black
Orange
Classic Santa
Red
White
Black
Skin tone
Gold
Rustic Christmas
Cream
Forest green
Burgundy
Brown
Gold
Modern Christmas
White
Deep red
Sage green
Gold
Winter Wonderland
White
Light blue
Silver
Cream
Tips for a Beautiful Crochet Spiral Stand
Keep stuffed pieces tightly crocheted.
Use stitch markers when working in continuous rounds.
Stuff small pieces gradually.
Avoid overstuffing the head.
Make the spiral strip consistent in width.
Keep the base flat.
Sew the character securely to the spiral.
Use contrasting colors for the Christmas details.
Block the spiral before final assembly if necessary.
Take time positioning the face before permanently sewing the pieces.
Where to Display Your Crochet Snowman & Santa
These handmade Christmas decorations can be used in many areas around the home.
Place them on a Christmas mantel.
Display them on a dining table.
Add them to a holiday shelf.
Use them as a Christmas centerpiece.
Place them beside your Christmas tree.
Create a matching pair for a festive entryway.
They also make thoughtful handmade Christmas gifts.
Frequently Asked Questions
How tall is the finished crochet spiral stand?
The finished decoration can measure approximately 20–30 cm depending on yarn weight, hook size, and the length of the spiral.
What yarn is best for this Christmas crochet project?
Cotton or acrylic worsted-weight yarn works well. Cotton creates firm, clearly defined stitches, while acrylic produces a softer decorative piece.
Can I make the spiral shorter?
Yes. Simply reduce the number of foundation chains and rows used to create the spiral.
How can I make the spiral taller?
Increase the length of the crocheted strip before shaping it into the spiral.
Can I make only the snowman?
Yes. The snowman can be made as a standalone amigurumi decoration by omitting the spiral stand.
Can I make only Santa?
Yes. Follow the Santa-specific head, body, hat, beard, and accessory instructions and attach them to a spiral stand.
How do I make the stand more stable?
Use a wider base, keep the character lightweight, and reinforce the connection between the spiral and base.
Can I sell finished decorations?
If you are working from your own original design, you can determine how you use your finished pieces. When working from another designer’s pattern, check that designer’s terms regarding selling finished items.
Final Thoughts
This Crochet Snowman & Santa Spiral Stand Pattern is a festive way to bring handmade personality to your Christmas decorating. The unusual spiral shape gives the traditional snowman and Santa characters a playful three-dimensional appearance, while the red, green, white, and gold details create a classic holiday atmosphere.
Make the snowman and Santa as a matching pair, experiment with different Christmas colors, or create several spiral stands for a complete handmade holiday display.


1 thought on “Crochet Snowman & Santa Spiral Stand Pattern”