
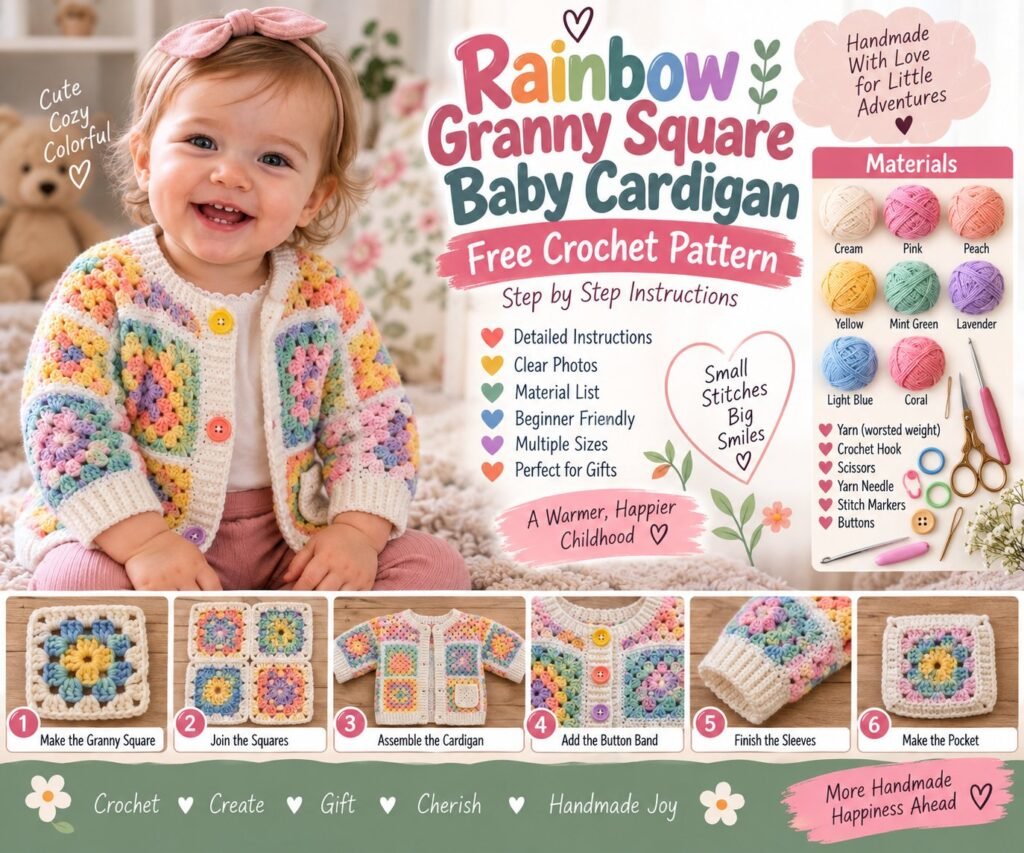
Create a sweet and colorful Rainbow Granny Square Baby Cardigan with this easy-to-follow free crochet pattern. This adorable baby cardigan combines classic granny squares with soft pastel colors, a cozy cream border, colorful buttons, and a practical little front pocket.
This crochet baby cardigan is a beautiful handmade project for babies and toddlers and makes a thoughtful handmade gift for a baby shower, birthday, holiday, or special occasion.
The pattern can also be customized by changing the yarn colors, square size, sleeve length, and overall cardigan length.
Table of Contents
- About the Rainbow Granny Square Baby Cardigan
- Materials Needed
- Crochet Abbreviations
- Gauge and Sizing
- How to Crochet the Granny Squares
- How to Join the Granny Squares
- How to Make the Cardigan Sleeves
- How to Add the Button Band
- How to Make the Pocket
- Finishing the Cardigan
- Crochet Tips
- Frequently Asked Questions
About This Crochet Baby Cardigan
The Rainbow Granny Square Baby Cardigan is built from individual crochet granny squares. Each square uses a combination of cheerful pastel colors surrounded by a cream border.
Once the squares are completed, they are joined together to create the back, front panels, and sleeves. The cardigan is finished with a simple neckline, button band, cuffs, and optional front pocket.
This construction makes the project easy to customize because you can add or remove squares to adjust the width and length.
Materials Needed
Soft baby-friendly worsted-weight or light DK yarn
Cream yarn for joining and edging
Pastel yarn in pink, yellow, lavender, mint green, peach, and light blue
4.0 mm crochet hook or the hook size needed to obtain your preferred fabric
Tapestry needle
Yarn scissors
4 to 5 baby-safe buttons
Stitch markers
Measuring tape
Small crochet hook for weaving in yarn ends if preferred
Crochet Abbreviations
ch – chain
sl st – slip stitch
sc – single crochet
hdc – half double crochet
dc – double crochet
st – stitch
sp – space
rep – repeat
rnd – round
Gauge and Sizing
The finished size will depend on your yarn weight, crochet hook, tension, and the number of granny squares used.
Before assembling the cardigan, measure your granny squares and compare them with a baby cardigan that fits well.
For easier customization, keep every granny square the same size.
You can make the cardigan smaller or larger by changing the number of squares used in the front and back panels.
How to Crochet a Rainbow Granny Square

Step 1: Make the Center
Start with your first pastel yarn color.
Create a magic ring and chain 3.
Work 2 double crochet stitches into the ring.
Chain 2.
Work another group of 3 double crochet stitches into the ring.
Continue creating groups of 3 double crochet stitches separated by chain-2 corner spaces until four groups have been made.
Join with a slip stitch.
Pull the magic ring closed.
Step 2: Add the Next Color
Attach a new pastel color in one of the corner spaces.
Chain 3.
Work 2 double crochet stitches into the same corner.
Chain 2.
Work 3 double crochet stitches into the same corner.
Chain 1.
Move to the next corner and repeat.
Continue around the square and join with a slip stitch.
Step 3: Continue the Granny Square
Change colors between rounds to create the rainbow effect.
For every corner, work:
3 dc, ch 2, 3 dc
For the spaces along the sides, work:
3 dc
Continue adding rounds until the granny square reaches your desired size.
Step 4: Add the Cream Border
For the final round, use cream yarn.
Work around the entire granny square while keeping the corners clearly defined.
Try to maintain the same number of rounds on every square so all pieces fit together evenly.
Fasten off and weave in the ends.
How to Prepare the Granny Squares
Step 5: Block the Squares
Place the finished squares on a flat surface.
Lightly dampen them and gently shape each one into an even square.
Allow them to dry completely.
Blocking helps create straighter edges and makes the joining process easier.
How to Assemble the Baby Cardigan
Step 6: Arrange the Squares
Before joining anything, place all your granny squares on a flat surface.
Arrange the pastel colors so that the shades are evenly distributed.
This is the easiest time to change the color arrangement before the pieces are permanently joined.
Step 7: Join the Back Panel
Place the granny squares next to each other.
Join them using cream yarn and a tapestry needle, or use a crochet slip-stitch seam.
Make sure the corners line up correctly.
Continue joining until the complete back panel is formed.
Step 8: Make the Front Panels
Create two front panels using the same granny-square construction.
Keep the center edges straight because they will become the cardigan opening.
Make sure both front panels are the same height as the back panel.
Step 9: Join the Shoulders
Place the front and back panels together.
Join the shoulder sections using cream yarn.
Leave enough space between the shoulders for the neckline.
Check the proportions before completely securing the seams.
How to Make the Crochet Sleeves
Step 10: Create the Sleeve Panels
Make additional granny squares or crochet rectangular sleeve sections according to the size you want.
Join the pieces together.
For a shorter baby sleeve, use fewer rounds or rows.
For a longer sleeve, continue crocheting until the desired length is reached.
Step 11: Attach the Sleeves
Place each sleeve into the corresponding armhole.
Match the sleeve seam with the side seam of the cardigan.
Sew or crochet the sleeve securely around the armhole.
Repeat for the second sleeve.
Step 12: Close the Side Seams
Fold the cardigan so the front and back panels meet.
Join each side from the bottom edge toward the armhole.
Repeat on the opposite side.
Check that both sides are even before weaving in the yarn ends.
How to Add the Cardigan Border
Step 13: Crochet the Neckline
Attach cream yarn around the neckline.
Work one or two rounds of single crochet.
Keep your stitches even around the curves.
Finish with a slip stitch.
Step 14: Make the Front Button Band
Work single crochet stitches along one front opening.
Continue for several rows to create a neat button band.
Repeat on the opposite side.
Keep both bands the same width.
Step 15: Add Buttonholes
Choose the side where you want the buttonholes.
Create evenly spaced buttonholes by chaining a small number of stitches and skipping the corresponding stitches.
Make sure each opening is large enough for your chosen button.
How to Add the Buttons
Step 16: Sew on the Buttons
Position the buttons opposite the buttonholes.
Sew each button securely using matching yarn.
Check that every button is firmly attached before the cardigan is worn.
For baby clothing, regularly inspect buttons and other small decorative pieces for looseness.
How to Make the Crochet Pocket
Step 17: Crochet the Pocket
Make a small rectangular crochet piece using your favorite pastel colors.
Add a cream border around the pocket.
Position it on the lower front section of the cardigan.
Sew around the bottom and sides while leaving the top open.
The pocket can be purely decorative or large enough for small lightweight items.
How to Finish the Sleeves
Step 18: Crochet the Cuffs
Attach cream yarn around the sleeve opening.
Work several rounds of single crochet or half double crochet.
For a more fitted cuff, use a slightly smaller crochet hook.
Finish with a clean slip-stitch edge.
How to Finish the Bottom Edge
Step 19: Add the Hem
Work cream yarn around the entire bottom edge of the cardigan.
Add one or two rounds of single crochet.
For a decorative finish, you can replace the final round with a simple scalloped crochet border.
Finishing the Rainbow Granny Square Baby Cardigan
Step 20: Weave in the Ends
Turn the cardigan inside out.
Use a tapestry needle to weave all loose yarn ends through several stitches.
Trim the excess yarn after each end is securely woven in.
Step 21: Check the Finished Cardigan
Lay the cardigan flat and check the following:
The front panels should be even.
The sleeves should have matching lengths.
The neckline should lie flat.
The buttons should line up with the buttonholes.
The bottom hem should have an even finish.
Step 22: Final Blocking
Lightly block the completed cardigan one final time.
Shape the sleeves, neckline, front edges, and bottom hem.
Allow the cardigan to dry completely before use.
Crochet Tips for Beginners
Use the same yarn weight throughout the project whenever possible.
Keep your tension consistent so the granny squares remain the same size.
Count your stitches regularly when making each square.
Arrange all granny squares before joining them.
Use a cream or neutral joining color to create a clean finished look.
Always make a gauge swatch if exact sizing is important.
Choose soft yarn suitable for baby clothing.
Why You’ll Love This Crochet Baby Cardigan
This Rainbow Granny Square Baby Cardigan is a fun way to combine classic crochet techniques with a modern pastel color palette.
The granny-square construction makes it easy to customize the size, colors, and sleeve length. It is also a wonderful project for using small amounts of leftover yarn.
The colorful squares, cream edging, and bright buttons give the cardigan a cheerful handmade appearance that works beautifully for everyday baby outfits and special occasions.
Frequently Asked Questions
Can I make this granny square baby cardigan in different sizes?
Yes. The easiest way to adjust the size is by changing the number of granny squares used for the body and sleeves or by changing the size of each square.
What yarn is best for a baby cardigan?
A soft baby-friendly DK or worsted-weight yarn is a good choice. Always check the yarn label for washing and care instructions.
Can I use different colors?
Absolutely. You can use traditional rainbow colors, soft pastel shades, neutral colors, or leftover yarn from your stash.
Is this crochet cardigan beginner friendly?
The granny squares use basic crochet stitches, making the project approachable for beginners who are comfortable with chains, double crochet, joining, and weaving in ends.
How do I make the cardigan larger?
You can make larger granny squares, add additional squares to the body, increase sleeve length, or use a larger crochet hook and suitable yarn.
Final Thoughts
The Rainbow Granny Square Baby Cardigan is a charming handmade crochet project that combines colorful granny squares with a simple cardigan construction. With soft pastel yarn, a neutral border, and colorful buttons, you can create a unique baby garment that is easy to customize.
Take your time with the granny squares, keep your tension consistent, and arrange the colors before joining. The result is a cozy handmade cardigan with a beautiful vintage-inspired crochet look.

