
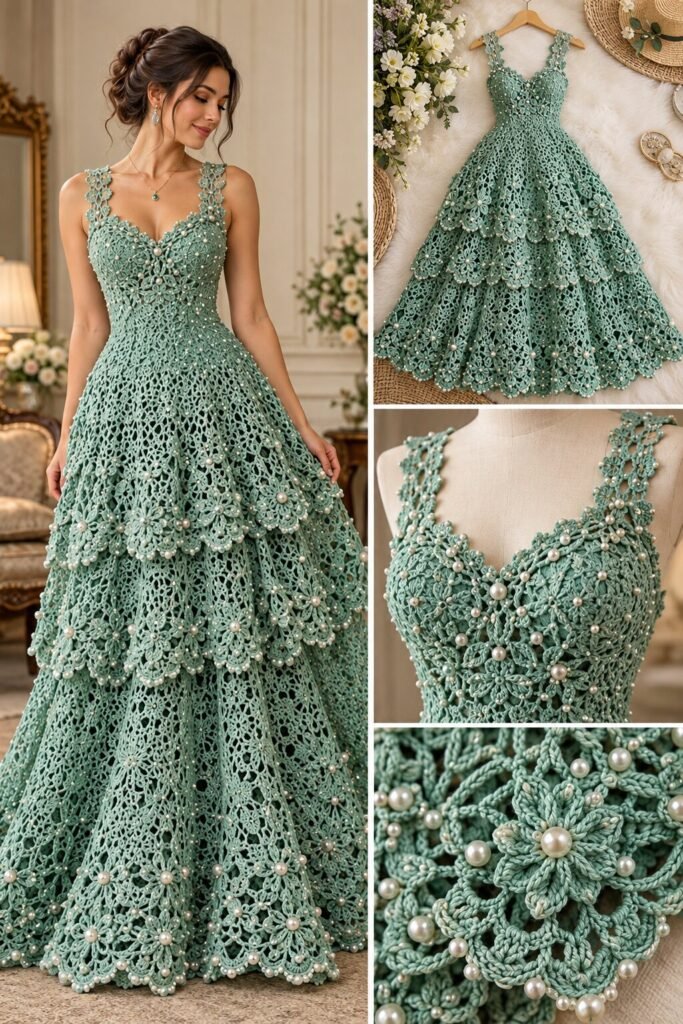
A floor-length sea green gown worked entirely in floral lace, with a sweetheart neckline, wide lace straps, and a fitted bodice that flows into a three-tier skirt. Each tier ends in a scalloped edge that overlaps the next one down, so the skirt cascades in layers. Pearl beads are scattered over the whole dress, dense across the bodice and clustered along every scalloped hem, with larger pearls set into the centers of the flower motifs. Everything is the same soft green, so the pearls and the open lace do all the decorating.
What stands out is how consistent the lace is. The straps, bodice, and skirt all appear to use the same flower-based motif, which makes the dress read as one continuous fabric rather than separate sections. The bodice looks denser, with smaller motifs packed close together, and the skirt opens up into larger, airier flowers. That change in scale is what gives the bodice structure and lets the skirt move.
This is a project for someone who has finished lace garments before and is ready to scale up. A gown at this length is a long commitment, and the beading adds a second layer of work on top of the crochet.
Reading the Construction
The lace looks like a flower-motif network, with round blossoms joined by chain-link bridges. It could be built from individual motifs joined as you go, or from a continuous stitch pattern that imitates the look. Joined motifs give you control over sizing, since you can count motifs across the bust and waist. A continuous pattern would be faster to shape. The photos don’t settle which was used, so either is a reasonable choice.
The bodice has a clear sweetheart shape with two peaks at the top, and the lace straps look like narrow strips of the same flower pattern, two or three motifs wide. The bodice appears to fit closely through the waist, then flare, which usually means a seam or a transition row where the skirt begins and the stitch count increases sharply.
The skirt tiers each look like a separate panel with its own scalloped border, attached at a higher point on the tier below, with extra fullness gathered or increased into the join. Each scalloped edge looks like a shell or fan round, and the pearls sit along its curve. The larger pearls in the flower centers look sewn on after the crochet is done.
Materials You’ll Need
- Sea green yarn in a fine, smooth fiber (a mercerized cotton or cotton blend is a reasonable suggestion, since it gives crisp lace and a bit of sheen that suits the pearls)
- Pearl beads in at least two sizes, small for scattering and larger for flower centers
- A crochet hook sized to your yarn, plus a very fine hook or beading needle if you thread beads onto the yarn
- Beading thread or strong fine thread for sewing on beads
- Yarn needle for joining motifs and weaving in ends
- Scissors
- Stitch markers, helpful for tracking motif placement and tier joins
- A tape measure, since a gown depends on accurate bust, waist, and length measurements
- A lining or slip in a matching shade, since open lace at this scale usually needs one underneath
Yarn and Hook Notes
The lace is fine and detailed, so a fingering or lace weight cotton is a sensible starting point, with a hook roughly in the 2mm to 3mm range. Heavier yarn would make the gown very heavy at this length, so test a swatch for weight as well as appearance. Block the swatch before measuring gauge, because lace relaxes a lot once wet.
Yardage will be considerable for a floor-length tiered skirt, and no official amount is provided here, so buy generously from one dye lot and plan on needing more than a short dress would take.
Skill Level
Advanced. The lace itself is stitch-and-chain work, but a gown requires keeping a pattern consistent over a very large area, shaping a fitted bodice, building three tiers that join cleanly, and adding hundreds of beads. Someone who has made a lace top and a lace skirt separately will find this a natural but demanding next step. Anyone new to lace garments would do better starting with a smaller piece.
Stitches Likely Involved
- Chain (ch): the links between motifs and the foundation rows
- Slip stitch (sl st): joining motifs and moving across stitches
- Single crochet (sc): anchoring points and edging
- Double crochet (dc) and treble crochet (tr): the petals and arcs of the flowers
- Shell or fan stitch: the scalloped tier borders
- Magic ring: starting the flower centers, if building from joined motifs
- Increase (inc) and decrease (dec): shaping the bodice and widening each tier
- Bead-crochet technique, optional: threading beads onto the yarn in advance and sliding them into place as you stitch, instead of sewing them on afterward
Building It: A Practical Sequence
Swatch and plan. Make a few motifs or a stitch repeat, block them, and calculate how many you need across your bust, waist, and hip. Decide on joined motifs or continuous stitch pattern before you start.
Work the bodice first. Build the sweetheart shape and check it against your measurements often. It is the part that must fit, so adjust here before committing to the skirt.
Add the straps. Work narrow lace strips and attach them at the peaks of the neckline and at the back, trying the bodice on to set the length.
Begin the skirt at the waist. Increase sharply at the transition so the fabric has room to flare, spacing the increases evenly around.
Work the top tier, then add the scalloped border. Finish its edge before moving on, so you can see how the scallops hang.
Attach the lower tiers. Work each one from a point on the tier above, with extra fullness, and finish each in its own scalloped border.
Block everything flat. A gown this size needs a lot of floor or board space. Pin the scallops out so the shells open evenly.
Add the beads last if you are sewing them on. Lay out the pattern first, with larger pearls in the flower centers and small ones along the scallops, then stitch each one securely.
Adjusting the Fit and Look
Bust and waist fit come from your own measurements and gauge swatch. Length is simply the number of rounds in each tier, so a tea-length or knee-length version just uses fewer or shorter tiers. Two tiers instead of three also lightens the project considerably.
If beading all over sounds like too much, pearls along only the scalloped hems and in the flower centers would still give the same look with far fewer beads. The same construction would also work in ivory for a wedding variation, or in a deep jewel tone for evening wear.
Where It’s Easy to Go Wrong
Beads that are too heavy. Large pearls pull on fine lace, and hundreds of them add up. Use lightweight beads, and attach them firmly so they don’t drag the fabric out of shape.
A bodice that doesn’t fit. Skipping measurements or gauge is the main reason a fitted lace bodice goes wrong. Try it on repeatedly as you work.
Tiers that hang unevenly. If the increases at each join aren’t spaced evenly, the hem will lean. Mark the join round with stitch markers.
Losing the motif pattern. In lace, one missed chain misaligns the flowers. Check your count at the end of every round or row.
Skipping the lining. Open lace at this scale will reveal more than most people want, and the lining also takes weight off the crochet.
Care
Hand wash gently in cool water, supporting the full weight of the wet gown, and lay it flat to dry, reshaping while damp. Never hang it wet, since the skirt will stretch badly. Check that the pearl beads are colorfast and washable before wetting them, and consider spot cleaning only. Follow the yarn label for the fiber.
Common Questions
Is this a beginner project?
No. The length, lace, shaping, and beadwork all call for real experience.
Do I have to use real pearls?
No. Plastic or glass pearl beads are lighter and cheaper, and lightness matters for lace at this scale.
Can I make it shorter?
Yes. Stopping after the first or second tier gives a midi or knee-length dress with the same construction.
Do I need a lining?
It is strongly recommended. The open lace is sheer, and a slip underneath adds modesty and support.
Should the beads be added while crocheting or after?
Either works. Pre-threading beads and placing them as you stitch holds them more securely, while sewing them on afterward gives you more control over placement.

