
Introduction
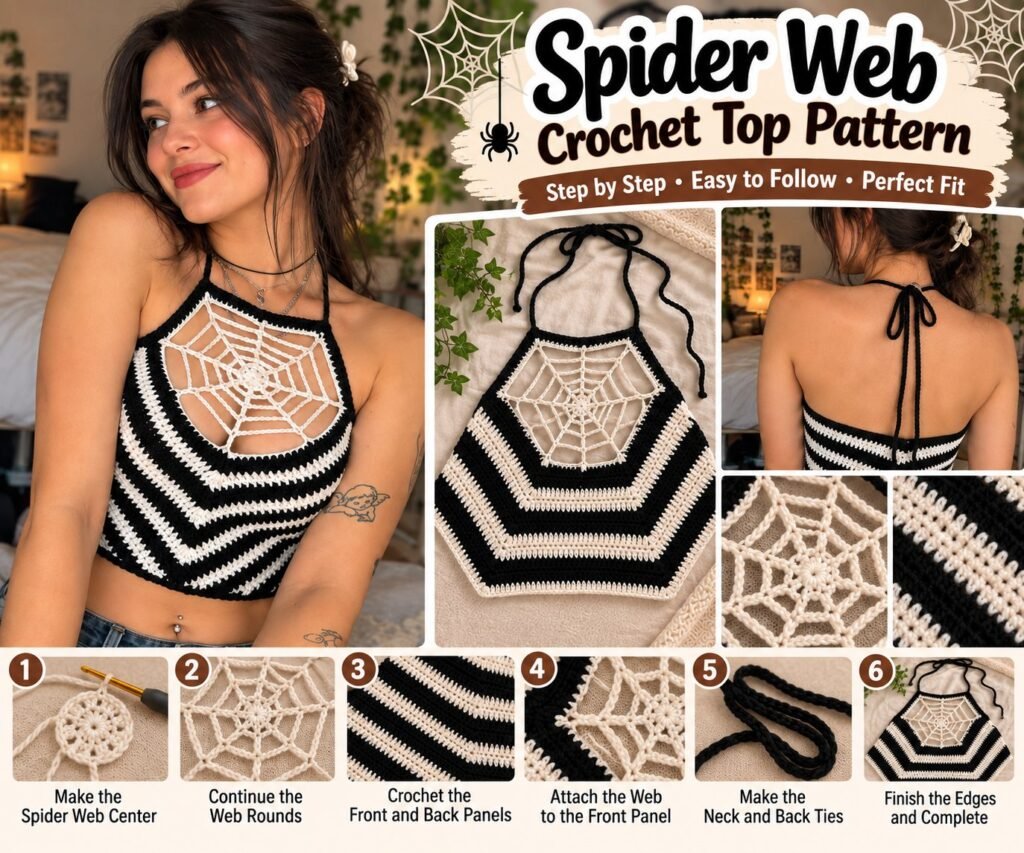
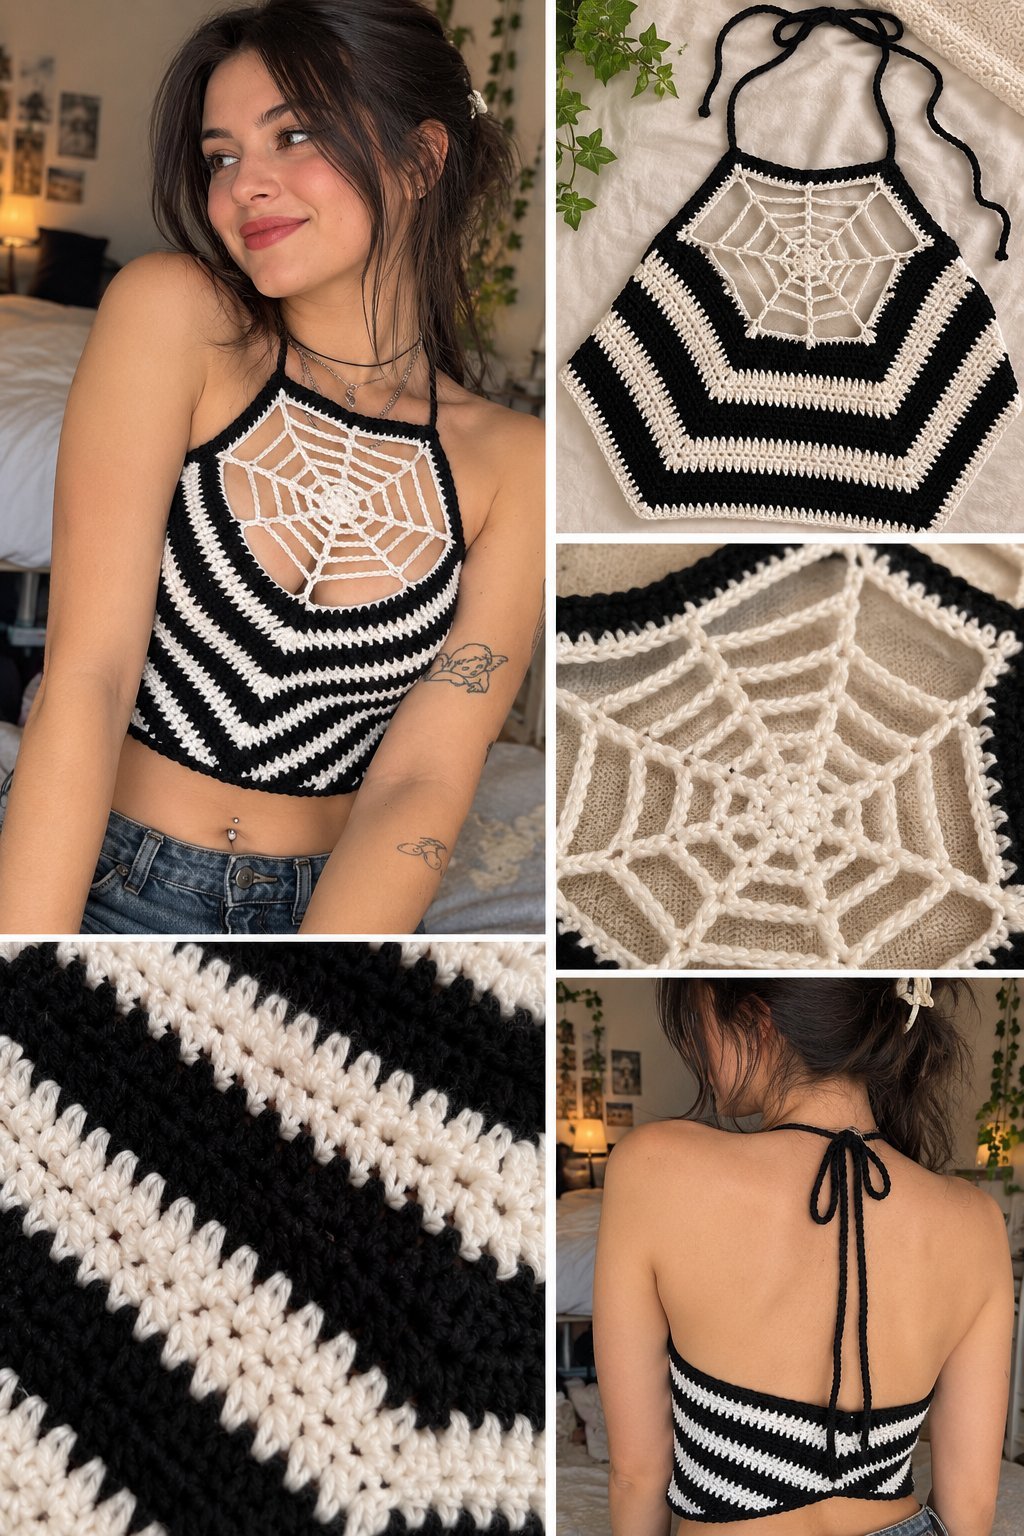
The spider web crochet top is one of those designs that manages to be edgy and delicate at the same time. Picture a fitted halter-style crop top worked in bold black and white stripes, with a dramatic open spiderweb motif set right into the center front, almost like a cutout window framed in crocheted thread. The chevron-style stripes radiate outward from that web, giving the whole piece a striking graphic quality that photographs beautifully from every angle.
This is a project that appeals to crocheters who want to make something fashion-forward rather than purely functional. It works well as a going-out top, a festival piece, or a statement layer for anyone who loves gothic or alternative style with a handmade twist. The combination of a crochet lace centerpiece and a solid striped body also makes it a satisfying project for anyone who enjoys mixing openwork and solid stitching in the same piece.
If you have been searching for a spider web crochet top pattern, this guide walks through how a design like this is typically constructed, from the web centerpiece outward to the striped body, halter straps, and open tie-back finish, along with practical suggestions for yarn, hook size, and customization.
Why You’ll Love This Crochet Project
There are several reasons this design tends to become a favorite once crocheters try it.
It is a striking statement piece. The contrast between the solid black and white stripes and the open web center gives this top a visual impact that few basic crochet garments have, making it a strong candidate for photos and Pinterest boards alike.
It combines two techniques in one project. You get to practice a circular or hexagonal openwork motif for the web, plus straight and diagonal striped construction for the body, which makes the project feel varied rather than repetitive.
It is highly wearable and versatile. A cropped halter shape like this pairs easily with high-waisted jeans, skirts, or as a swimsuit cover-up, which means the finished piece gets real use rather than sitting in a drawer.
It is a good stash project for two colors. Since the design relies mainly on black and white (or any two strong contrasting colors), it is an efficient way to use up yarn you already have without needing a large or varied stash.
It offers plenty of room for personal style. The web size, stripe width, and neckline shape can all be adjusted, so no two finished tops need to look quite the same.
Materials You’ll Need
Exact yardage will depend on your size and gauge, so treat the list below as a practical starting point rather than a fixed requirement.
- Worsted weight or DK weight yarn in two contrasting colors, such as black and white or black and cream (suggested option)
- A crochet hook sized to match your chosen yarn (see suggestion below)
- Yarn needle for weaving in ends and seaming
- Scissors
- Stitch markers to track rounds and shaping
- Measuring tape for checking fit as you go
Recommended Yarn
A cotton or cotton-blend yarn is a strong suggestion for this style of top, since it holds its shape well, has good stitch definition for the web motif, and feels comfortable against skin, which matters for a fitted garment worn close to the body. A yarn with a slight sheen also helps the web center stand out against the matte striped body.
In terms of weight, DK or light worsted tends to work well for a fitted top like this, since it creates fabric that is substantial enough to hold structure without becoming too heavy or bulky. Color-wise, the classic black and white combination gives the strongest graphic contrast for the web design, though deep purple and black, or red and black, are popular alternatives for a slightly different mood.
Recommended Crochet Hook
As a general suggestion, a hook in the E/4 (3.5mm) to G/6 (4.0mm) range pairs well with DK weight cotton or cotton-blend yarn for this type of fitted top. If you prefer a looser, more open fabric, sizing up slightly can help, while a tighter, denser stitch may call for going down a size.
Keep in mind that hook size should always be adjusted based on your own gauge and the specific yarn you are using, since a garment like this depends on accurate sizing to fit well.
Crochet Skill Level
This project is best suited to intermediate crocheters, and confident advanced beginners who are comfortable with garment shaping. The striped body itself is fairly straightforward, relying on repetitive rows or rounds, but the spiderweb motif requires more precise stitch placement, chain spacing, and symmetry to look clean and even.
Additionally, because this is a fitted garment rather than a flat accessory, understanding basic garment construction, such as working in the round, joining pieces, or shaping a neckline, is helpful for achieving a finished look that fits well.
Crochet Stitches You May Need
- Chain (ch)
- Slip stitch (sl st)
- Single crochet (sc)
- Half double crochet (hdc)
- Double crochet (dc)
- Treble crochet (tr), often used for the long spoke lines of a spiderweb motif
- Picot stitch, sometimes used for texture along web edges
- Increase (inc) and decrease (dec) for shaping
- Front post / back post stitches, if adding rib texture to straps or edges
Step-by-Step Crochet Guide
Step 1: Start the Foundation
Many spider web tops begin with the web motif itself, worked flat in the round from the center outward. A magic ring or small foundation chain forms the center point, and rounds of chain spaces and spokes are built outward, similar to a traditional doily or granny hexagon, to create the radiating web pattern in your lighter contrast color.
Step 2: Create the Main Section
Once the web motif reaches your desired size, the striped body is typically worked outward from the edges of the web, alternating between your two colors in even bands. Depending on the design, this may be worked as a hexagon that increases evenly on each side, creating the chevron-style diagonal stripe effect seen in many versions of this top.
Step 3: Shape the Project
As the hexagon or panel grows, continue increasing evenly at the corner points to maintain the flat, symmetrical shape. Once the piece reaches the width needed to wrap comfortably around the torso, shaping typically shifts to creating the underarm and side seams, either by working two mirrored panels or by continuing in the round and beginning to shape a fitted crop silhouette.
Step 4: Add Decorative Details
Beyond the central web, some versions of this top add small decorative touches such as a picot edge along the stripes, a subtle scalloped trim, or a second smaller web detail on the back. These details are optional but can reinforce the spiderweb theme throughout the piece rather than limiting it to the front panel alone.
Step 5: Create the Border or Finishing Edge
Once the main body is complete, a finishing round is typically worked around the entire top edge and armholes, often in single crochet or a simple shell stitch, to stabilize the edges and create a clean line for attaching straps.
Step 6: Finishing
Halter straps and a tie-back closure are usually added last, worked as long crocheted chains or corded straps attached at the top corners of the front panel and crossed or tied at the neck and upper back. Weave in all ends securely, and check the fit by trying the piece on before final blocking.
Size and Customization
Sizing for a project like this is generally controlled by how many rounds or rows you work before beginning armhole and body shaping, so it can be adjusted fairly naturally for different bust and torso measurements. Working a gauge swatch first and measuring your own chest circumference will help determine how large to make the striped panel before shaping begins.
For customization, consider changing the size of the central web to make it smaller and more subtle or larger and more dramatic. Stripe width can also be adjusted, thinner stripes create a more delicate chevron effect, while wider stripes feel bolder and more graphic. Strap length and tie placement can be modified for a higher or lower neckline, and some crocheters add a matching web motif to the back or hem for extra continuity.
Helpful Crochet Tips
- Block the web motif before attaching it to or building the body from it, since this helps the spokes lie flat and even rather than curling.
- Keep tension consistent across color changes, since uneven tension between stripe rows can distort the chevron pattern.
- Use stitch markers at each corner or increase point of the hexagon to keep your shaping symmetrical as the piece grows.
- Try the piece on periodically as you shape the body, since a fitted top depends heavily on accurate sizing rather than following row counts alone.
- Weave in color-change ends as you go rather than leaving them all until the end, since a striped design creates many more ends than a solid piece.
- Consider working a swatch of the web motif first to practice the spoke and chain-space technique before committing to the full-size version.
Common Mistakes to Avoid
- Uneven web spokes: Inconsistent chain lengths between spokes can make the web look lopsided. Count carefully and consider marking each spoke as you work.
- Skipping the gauge swatch: Since this is a fitted garment, skipping gauge can lead to a top that is noticeably too tight or too loose. Take the time to swatch before starting the body.
- Uneven corner increases: Missing an increase at one corner of the hexagon panel can cause the piece to pull out of shape. Double-check stitch counts at each corner after every round.
- Straps that are too thin or too short: Halter straps need to be sturdy enough to support the weight of the top. Test the strap length and thickness before finishing off.
- Rushing the blocking step: Skipping blocking on the web motif in particular can leave it looking crumpled rather than crisp and open.
Frequently Asked Questions
Is the spider web crochet top a good project for beginners?
It is better suited to confident intermediate crocheters, since the web motif requires precise stitch placement and the top itself involves garment shaping rather than a flat accessory.
What yarn works best for a spider web crochet top?
A cotton or cotton-blend yarn in a DK or light worsted weight is a practical suggestion, since it holds shape well and gives good stitch definition for the web center.
Can I make the spiderweb motif a different color than black and white?
Yes, while black and white creates the strongest classic contrast, any two contrasting colors will work, deep purple and black or red and black are both popular alternatives.
How do I make sure the spiderweb motif looks even?
Blocking the motif before attaching it or building outward from it helps enormously, along with counting spokes carefully and keeping consistent tension throughout.
Can this top be resized for different body types?
Yes, since the panel is generally worked to a customized width and the armhole and strap placement is adjustable, this design can be sized up or down with a gauge swatch and some test fitting.
Finishing and Care
Once the top is complete, weave in all ends securely, paying particular attention to the many color-change ends created by the striped sections. Block the piece by lightly wetting or steaming it and pinning it to shape, especially around the web motif, to help the openwork lie flat and even.
For care, hand washing in cool water is the safest option for a fitted piece like this, particularly if you used cotton yarn, which can be prone to stretching. Lay flat to dry to help the top retain its shape, and avoid hanging it while wet, since the weight of the water can cause the fabric to stretch out of proportion.
Final Thoughts
The spider web crochet top is a project that rewards patience with real visual payoff. Between the intricate web centerpiece and the bold striped body, it is the kind of piece that stands out in a handmade wardrobe and makes a genuine style statement, whether worn out for the evening or layered into an everyday look.
SEO Section
Primary Keyword: Spider Web Crochet Top
Secondary Keywords:
- Spiderweb crochet crop top
- Black and white crochet top
- Halter crochet top pattern
- Crochet spiderweb motif
- Gothic crochet top
- Striped crochet crop top
- Crochet halter top tutorial
- Openwork crochet top
- Handmade crochet top ideas
- Crochet top for summer
- Alternative crochet fashion
- Crochet cutout top
SEO Title: Spider Web Crochet Top: Black and White Halter Pattern Ideas
Meta Description: Discover how to make a spider web crochet top with a striking web centerpiece, striped body, and halter tie back, plus yarn and hook suggestions.
URL Slug: spider-web-crochet-top
Pinterest Title: Spider Web Crochet Top – Bold Black and White Halter Design
Pinterest Description: Love the spider web crochet top look? This guide covers building the openwork spiderweb centerpiece, striped chevron body, and halter tie-back closure, with yarn, hook, and sizing tips for an intermediate crochet project with major style impact.
Image Alt Text: Black and white crochet halter top with open spiderweb motif at the center front
SEO Tags:
- spider web crochet top
- crochet crop top
- black and white crochet
- halter crochet top
- gothic crochet fashion
- crochet spiderweb pattern
- openwork crochet top
- striped crochet top
- handmade crochet fashion
- alternative crochet style
- crochet tank top
- summer crochet top
Want this saved as a downloadable file for your blog workflow?

