
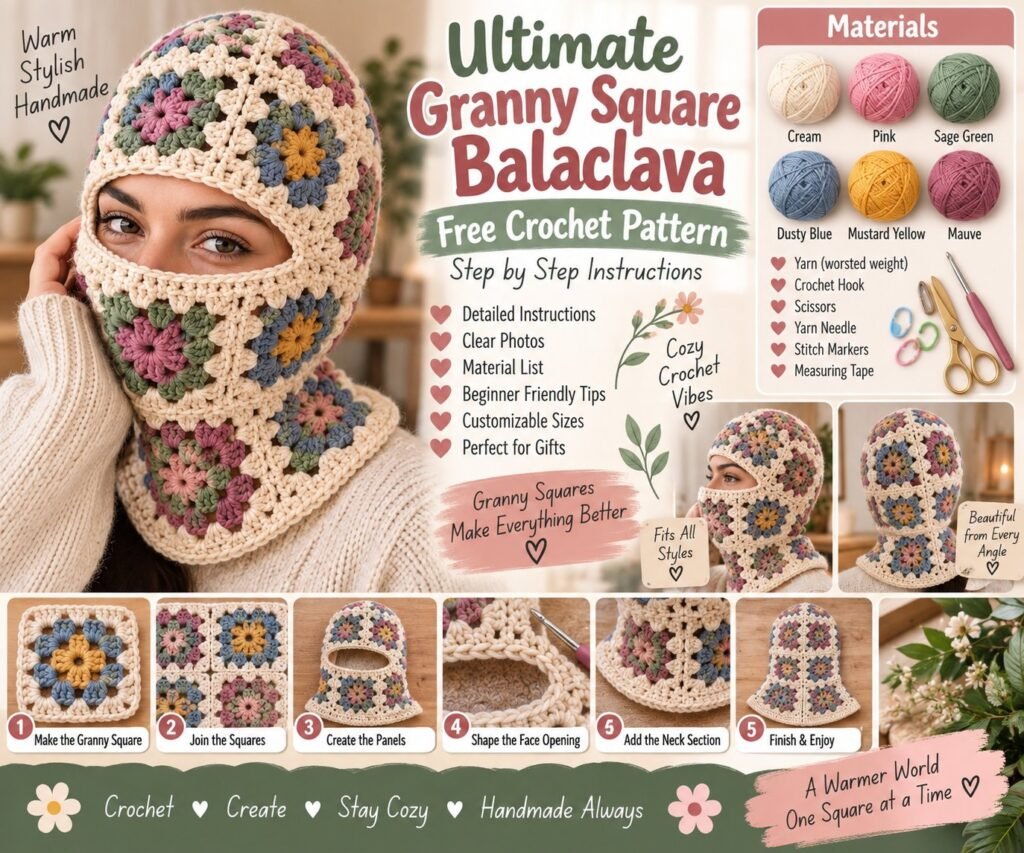
The Ultimate Granny Square Balaclava combines the classic charm of granny-square crochet with the cozy coverage of a modern balaclava. This handmade hood features colorful floral granny squares, a comfortable face opening, and a soft neck section that provides extra warmth during chilly days.
The design shown uses a beautiful cream base with pastel pink, sage green, dusty blue, and golden-yellow flowers. It is a fun project for crocheters who love colorful accessories and vintage-inspired fashion.
Pattern note: This is an original, adaptable tutorial inspired by the provided reference image. Stitch counts may need to be adjusted according to your yarn, hook size, gauge, and head measurements.
Granny Square Balaclava Details
- Project type: Crochet accessory
- Skill level: Intermediate
- Crochet terminology: US terms
- Construction: Individual granny squares joined together
- Main color: Cream
- Accent colors: Pink, sage green, blue, yellow, and other pastels
- Best for: Winter accessories, handmade gifts, crochet fashion, and cozy everyday wear
Materials
Yarn
Choose a soft, comfortable yarn suitable for wearing around the face and neck.
You will need:
- Cream or ivory yarn for the granny-square borders
- Pink yarn
- Sage green yarn
- Dusty blue yarn
- Golden yellow yarn
- Optional additional pastel colors
A worsted-weight or aran-weight yarn works well for a warm balaclava.
For a lighter spring or autumn version, use DK-weight yarn with a smaller hook.
Crochet Supplies
- 4.0–5.0 mm crochet hook, depending on yarn
- Yarn needle
- Scissors
- Stitch markers
- Measuring tape
- Blocking mat or clean towel
- Rustproof pins for blocking
Crochet Abbreviations
- MR: Magic ring
- ch: Chain
- sc: Single crochet
- hdc: Half double crochet
- dc: Double crochet
- sl st: Slip stitch
- st: Stitch
- sp: Space
- inc: Increase
- rep: Repeat
- FO: Fasten off
- BLO: Back loop only
Gauge and Sizing
Before making the complete balaclava, crochet one granny square and measure it.
A finished square can be approximately 3.5–4.5 inches, depending on your yarn and hook.
The exact number of squares depends on the wearer’s head circumference and the size of each square.
For a better fit, measure:
- Head circumference
- Crown to chin length
- Face opening width
- Neck length
- Neck circumference
The balaclava should fit comfortably without pressing tightly against the face.
Step-by-Step Granny Square Balaclava
Step 1: Create the Center of the Granny Square
Begin with your chosen flower color.
Make a magic ring.
Work a small cluster of double crochet stitches into the ring, separated by chain spaces.
Pull the center closed.
Join with a slip stitch.
The center will become the flower’s first layer.
Step 2: Crochet the Flower Petals
Switch to a second color, such as cream or pastel blue.
Work groups of stitches around the center to form rounded flower petals.
A simple petal structure can be made using:
- Chain stitches
- Double crochet
- Slip stitches
Repeat around the center until the flower is complete.
Fasten off and weave in the end.
Step 3: Add the Green Petal Layer
For the floral look shown in the reference, add a green round around the flower.
Work groups of stitches around the spaces between the petals.
Keep your tension consistent so the square remains flat.
Do not pull the stitches too tightly.
Step 4: Square the Flower
Switch back to cream yarn.
Begin turning the circular flower into a square.
Work groups of double crochet into the designated corner spaces.
Each corner should have enough stitches and chain space to create a clearly defined corner.
Continue around the square.
Join with a slip stitch.
Step 5: Add the Final Border
Work another round of cream stitches around the granny square.
Pay special attention to the corners.
The final round should create a clean, sturdy edge that will make joining the squares easier.
Fasten off.
Weave in all loose ends.
Step 6: Block the Granny Squares
Before joining, lightly dampen each square.
Place it flat on a blocking surface.
Gently stretch the square into shape.
Pin the four corners.
Allow it to dry completely.
Blocking helps the squares become more uniform and makes assembly much easier.
Making the Balaclava Panels
Step 7: Plan Your Square Arrangement
Lay all completed granny squares on a flat surface.
Arrange them according to your preferred color combination.
A balanced arrangement can alternate:
- Pink-centered flowers
- Blue-centered flowers
- Yellow-centered flowers
- Green-centered flowers
Keep the cream borders consistent throughout the project.
This creates the coordinated appearance shown in the reference.
Step 8: Determine the Front Section
Choose the squares that will form the front of the balaclava.
The face opening should sit approximately in the center.
Avoid joining squares across the area that will become the face opening.
You can mark this area with stitch markers before joining.
Step 9: Create the Crown
Arrange granny squares across the top of the head.
Join the upper squares together using either:
- Slip-stitch joining
- Single-crochet joining
- Mattress stitch
For a subtle seam, mattress stitch works especially well.
For a decorative raised seam, use single crochet.
Step 10: Join the Side Panels
Join the squares that extend from the crown toward the cheeks.
Continue down toward the neck.
The side panels should curve naturally around the head.
Check the fit regularly while assembling.
Creating the Face Opening
Step 11: Mark the Opening
Try the unfinished balaclava on or measure it against the intended wearer.
Mark the approximate face opening.
The opening should provide enough room around the eyes, nose, and mouth.
Do not make it excessively tight.
Step 12: Join Around the Opening
Connect the surrounding squares while keeping the marked face area open.
If your square arrangement does not naturally create the desired opening, add a few rows of crochet between sections to refine the shape.
This is where adjusting the pattern according to measurements is especially important.
Crochet the Face Border
Step 13: Add the First Border Round
Attach cream yarn around the face opening.
Work one round of single crochet.
Place stitches evenly around the opening.
Avoid pulling the yarn too tightly.
Step 14: Add a Soft Finished Edge
Continue with one or two additional rounds.
You can use:
- Single crochet
- Half double crochet
- Ribbed single crochet
- Slip-stitch edging
For a stretchy opening, work the final round in a slightly flexible stitch pattern.
Step 15: Shape the Eye Area
If you want a more fitted balaclava, add subtle shaping around the upper face.
Use decreases near the sides of the forehead and cheeks.
Try the balaclava on periodically to check the fit.
Creating the Neck Section
Step 16: Continue Below the Face
Once the face opening is complete, attach yarn around the lower edge.
Work rounds of single crochet or half double crochet.
Continue downward to create the neck portion.
Step 17: Add Length
Work as many rounds as needed to create your preferred neck coverage.
A shorter version can finish just below the jaw.
A longer version can extend farther down the neck for additional warmth.
Step 18: Add a Ribbed Neck Border
For a stretchy finish, use a ribbed stitch pattern.
A simple option is to alternate stitches worked through the back loop.
Continue until the border reaches the desired length.
Fasten off securely.
Finishing the Balaclava
Step 19: Hide the Yarn Ends
Use a yarn needle to weave all remaining ends into the wrong side of the crochet.
Work the needle through several stitches before trimming the excess yarn.
Do not leave loose ends near the face opening.
Step 20: Check the Seams
Inspect every granny-square join.
Pay special attention to:
- Crown seams
- Side seams
- Face opening
- Neck section
Reinforce any weak-looking areas.
Step 21: Final Blocking
Lightly dampen the finished balaclava.
Shape it gently over a suitable form or lay it flat.
Pay attention to the face opening and neck shape.
Allow it to dry completely before wearing.
How to Customize the Granny Square Balaclava
Pastel Version
Use:
- Cream
- Dusty pink
- Sage
- Powder blue
- Butter yellow
This creates the soft floral look shown in the reference.
Autumn Version
Try:
- Rust
- Mustard
- Olive
- Cream
- Burgundy
Neutral Version
Use:
- Ivory
- Beige
- Taupe
- Light brown
This creates a more minimalist everyday accessory.
Bright Rainbow Version
Use several bright colors for the flower centers and petals while keeping the outer borders cream.
How to Adjust the Size
For a Smaller Head
Use smaller granny squares or thinner yarn.
For a Larger Head
Use larger squares or add additional squares around the crown and sides.
For a Larger Face Opening
Reduce the number of squares surrounding the opening or add a wider crochet border.
For More Neck Coverage
Continue crocheting additional rounds below the face opening.
Tips for a Professional Finish
Keep Your Squares Consistent
Every granny square should have approximately the same dimensions.
Small differences become noticeable when the squares are joined.
Maintain Even Tension
Consistent tension gives the finished balaclava a smoother shape.
Block Before Joining
Blocking makes square assembly much easier and produces cleaner seams.
Test the Fit
Do not wait until the entire project is finished to check the size.
Measure the crown, face opening, and neck section throughout the project.
Choose Comfortable Yarn
Because the balaclava sits directly against the face and neck, choose a yarn that feels soft and pleasant against the skin.
Secure All Ends
A wearable crochet item receives plenty of movement, so weave in the yarn tails securely.
Optional Decorative Details
You can personalize the balaclava with:
- Small crochet flowers
- Tiny leaves
- Embroidered petals
- Additional granny-square colors
- Scalloped edging
- Crochet ties
- Matching mittens
- Matching scarf
- Matching leg warmers
Matching Crochet Accessories
The floral granny-square theme can easily be extended into a complete winter set.
Consider making:
- Granny square mittens
- Crochet flower scarf
- Matching ear warmers
- Granny square shoulder bag
- Crochet cardigan
- Matching neck warmer
Using the same colors throughout creates a coordinated handmade wardrobe.
Frequently Asked Questions
Is this granny square balaclava beginner-friendly?
Individual granny squares are beginner-friendly, but assembling them into a properly fitted balaclava requires some experience with joining, shaping, and adjusting measurements. It is a good advanced-beginner to intermediate project.
How many granny squares do I need?
The number depends on the size of your squares and the wearer’s measurements. Rather than following a fixed number, build the project around the head circumference and desired face opening.
What yarn is best?
Soft acrylic, cotton blends, merino blends, and other comfortable yarns can work well. For cold weather, a warm soft yarn is a good choice.
Can I use different colors?
Absolutely. Granny squares are perfect for experimenting with color combinations. Keep the outer border in one color if you want a cohesive appearance.
Can I make the balaclava without granny squares?
Yes. You can recreate the same overall shape using solid crochet stitches or a continuous textured fabric, but the classic floral granny-square appearance will be different.
How do I make the face opening larger?
Adjust the square arrangement around the opening or add additional border stitches. Measure the opening against the wearer rather than relying only on stitch counts.
Can I make it for a child?
Yes, but carefully measure the child’s head before crocheting. Avoid making the face opening restrictive, and choose soft, comfortable yarn.
Care Instructions
For best results:
- Follow the washing instructions recommended for your yarn.
- Wash gently.
- Avoid excessive heat.
- Reshape while damp.
- Lay flat to dry.
- Store folded rather than hanging.
Final Thoughts
The Ultimate Granny Square Balaclava is a beautiful way to combine traditional crochet techniques with a modern wearable accessory. The floral granny squares give the design a nostalgic handmade character, while the fitted face opening and extended neck create a cozy silhouette for cooler weather.
The best part of this project is how customizable it can be. Change the flower colors, border shades, square arrangement, face opening, or neck length to create a balaclava that feels completely your own.
With careful measuring, consistent granny squares, neat joining, and a comfortable yarn, you can create a unique handmade accessory that is both practical and stylish.

