
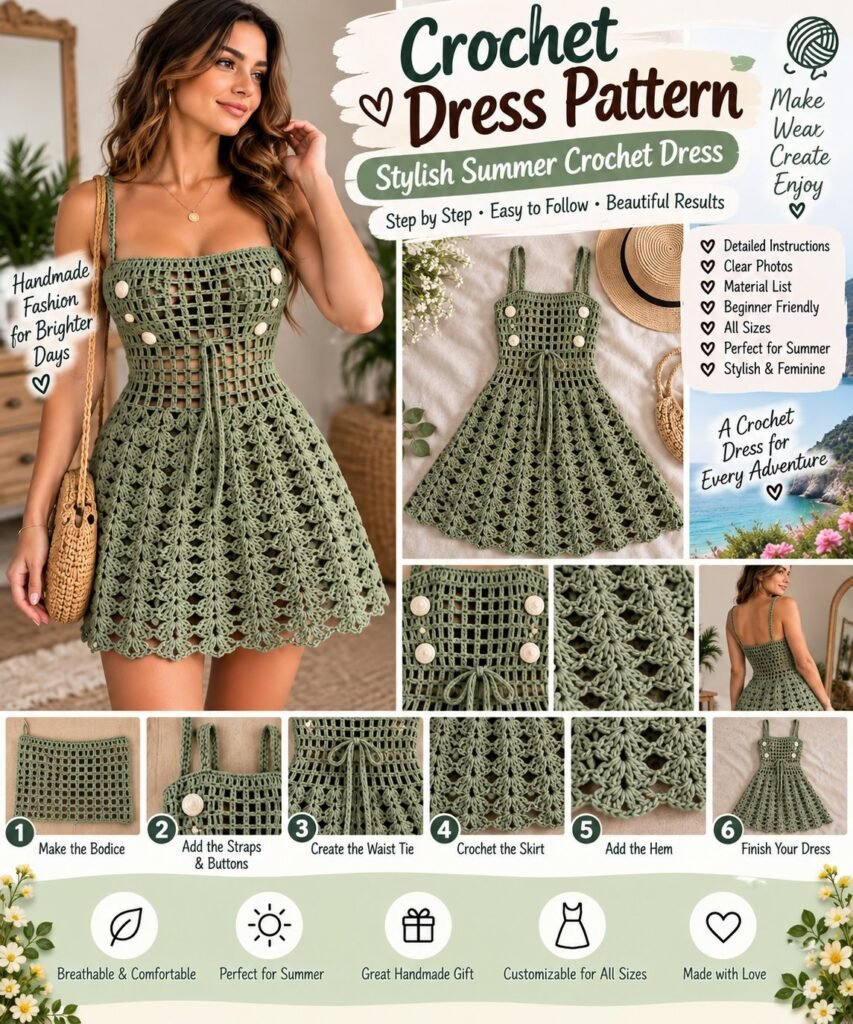
Create a beautiful and feminine Crochet Summer Dress with this detailed step-by-step pattern. This elegant handmade dress features a fitted openwork bodice, adjustable shoulder straps, a drawstring waist, a flowing lace skirt, decorative buttons, and a scalloped crochet hem.
The sage-green color gives the dress a natural, sophisticated summer look, making it perfect for vacations, beach days, garden parties, festivals, date nights, and warm-weather everyday outfits.
This pattern uses US crochet terminology and is designed as an adaptable construction inspired by the supplied reference image.
CROCHET SUMMER DRESS OVERVIEW
The dress is made in two main sections:
The fitted bodice uses an open mesh pattern.
The skirt uses a repeating floral lace stitch that gradually flares toward the hem.
The waist features a crochet drawstring for an adjustable fit.
The front bodice is decorated with cream-colored buttons.
The shoulder straps are crocheted separately and attached securely to the bodice.
The bottom edge is finished with a delicate scalloped lace border.
Because the reference photograph does not include the original written pattern or exact stitch counts, the instructions below are an original adaptable construction based on the visible design. Exact stitch counts should be adjusted according to your measurements, yarn, hook size, and crochet tension.
MATERIALS NEEDED
Sage-green DK or lightweight worsted-weight yarn
Approximately 500–800 g of yarn depending on size and length
Cream or ivory buttons
2.5–3.5 mm crochet hook
Tapestry needle
Scissors
Stitch markers
Measuring tape
Optional thin elastic
Optional sewing needle and matching thread
RECOMMENDED YARN
Cotton or cotton-blend yarn is ideal for this summer crochet dress.
Cotton creates well-defined lace stitches and provides a breathable fabric suitable for warm weather.
A lightweight yarn will produce a softer and more drapey dress.
A slightly heavier DK yarn will create a more structured garment.
CROCHET ABBREVIATIONS
CH – Chain
SC – Single Crochet
HDC – Half Double Crochet
DC – Double Crochet
TR – Treble Crochet
SL ST – Slip Stitch
INC – Increase
DEC – Decrease
SK – Skip
ST – Stitch
STS – Stitches
SP – Space
SKILL LEVEL
Intermediate.
The individual stitches are not difficult, but the dress requires accurate measuring, lace pattern consistency, shaping, and garment assembly.
GAUGE
Before beginning the dress, crochet a small swatch using the main stitch pattern.
A useful starting point is approximately:
18–20 stitches = 10 cm
18–22 rows = 10 cm
Your gauge may vary depending on yarn and hook size.
Always measure your swatch before beginning the garment.
FITTING MEASUREMENTS
Take the following measurements before starting:
Bust circumference
Underbust circumference
Waist circumference
Shoulder-to-waist length
Waist-to-hem length
Desired total dress length
The dress should be fitted according to the intended wearer’s measurements rather than relying on a standard size.
IMPORTANT PATTERN NOTES
The bodice should fit comfortably without being too tight.
The openwork pattern naturally creates some flexibility.
Keep the skirt slightly wider than the waist to create the flared silhouette shown in the reference.
Use stitch markers at the sides of the dress to keep the shaping symmetrical.
Try the dress on periodically while crocheting.
PART 1 — CROCHET THE BODICE
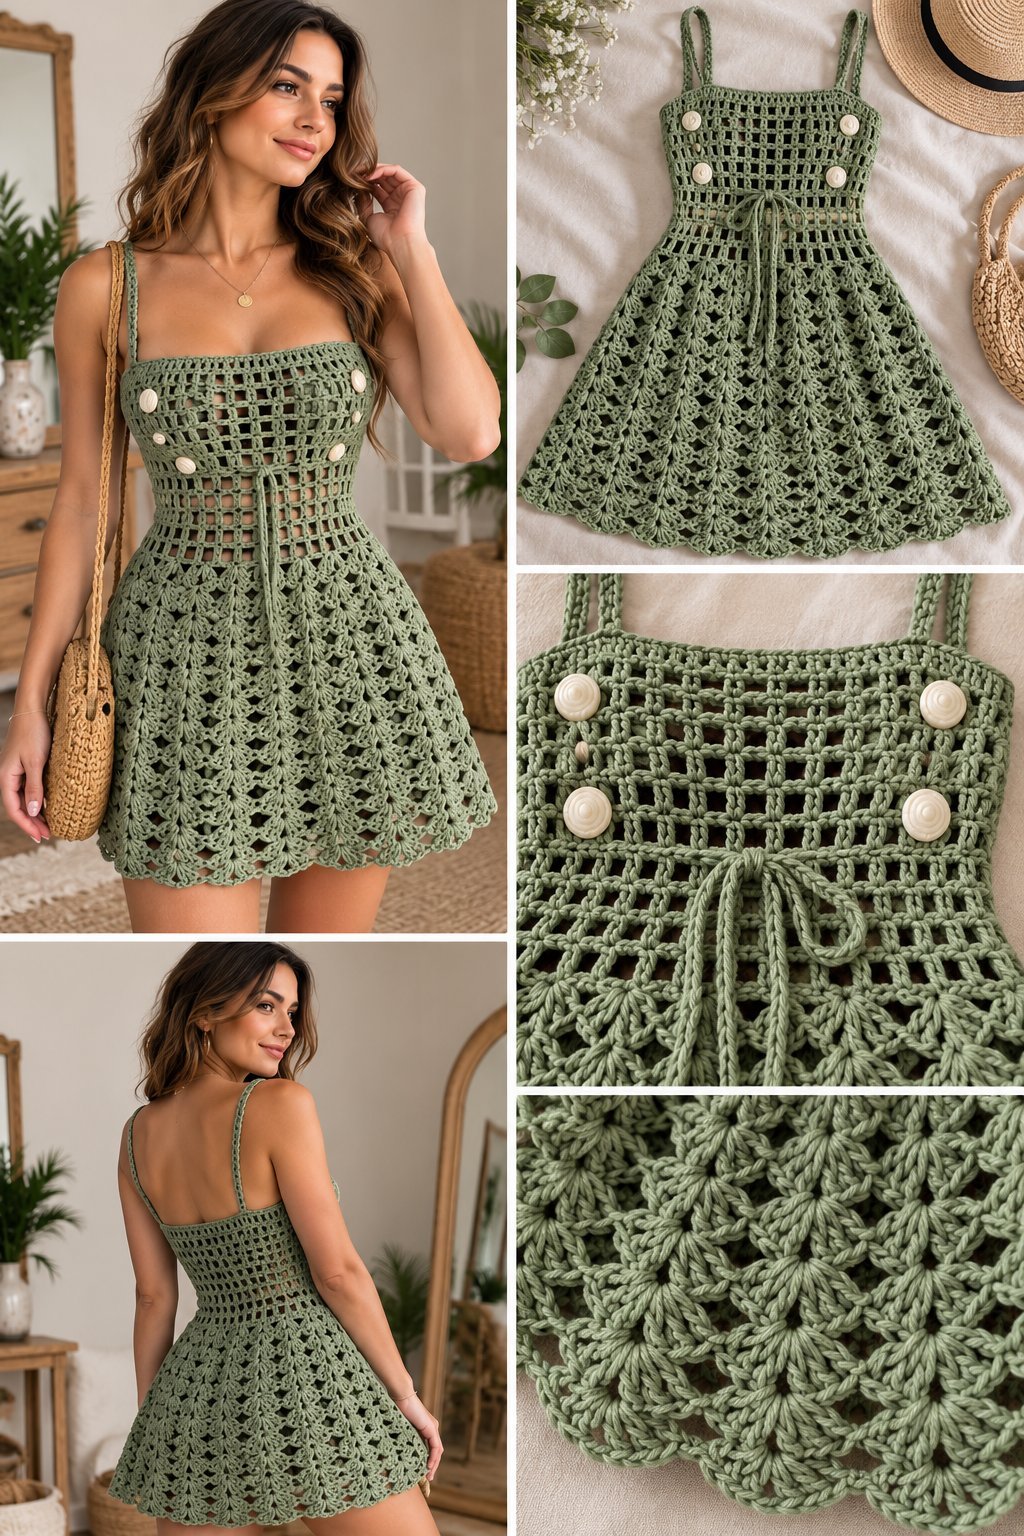
STEP 1 — CREATE THE BODICE FOUNDATION
Using sage-green yarn, create a foundation chain based on the waist or underbust measurement.
For a fitted design, the foundation should fit comfortably around the body without excessive looseness.
Join the chain with a SL ST, taking care not to twist it.
Work one round of SC around the entire chain.
Join with a SL ST.
This creates the foundation for the bodice.
STEP 2 — BEGIN THE OPENWORK PATTERN
The upper bodice in the reference features a square mesh design.
A simple version can be created with:
CH 1.
SC in the first stitch.
CH 1.
Skip 1 stitch.
DC in the next stitch.
Repeat around.
Join at the end of the round.
STEP 3 — BUILD THE MESH BODICE
For the next round, work into the chain spaces.
Continue alternating SC, CH 1, and DC sections to create evenly spaced open squares.
Repeat the mesh pattern for approximately 10–16 rounds.
The exact number depends on the desired bodice height.
Keep checking the dress against the wearer.
STEP 4 — CREATE THE WAIST SHAPE
When the bodice reaches the natural waist, begin shaping.
If the bodice is too wide, work occasional decrease rounds near the sides.
If additional room is required, add evenly spaced increases.
Keep the shaping symmetrical.
The waist should be narrower than the bust and skirt.
PART 2 — CREATE THE WAIST DRAWSTRING
STEP 5 — ADD THE DRAWSTRING ROW
Work one round of SC around the waist.
Then create a drawstring channel using:
SC
CH 1
Skip 1 stitch
SC in the next stitch
Repeat around.
On the following round, work SC into each stitch and chain space.
This creates small openings through which the drawstring can pass.
STEP 6 — MAKE THE CROCHET CORD
Using sage-green yarn, chain approximately 100–140 stitches.
Adjust the length according to the waist measurement.
Work SL ST back across the chain.
Fasten off.
Thread the cord through the waist channel.
Tie small knots at both ends to prevent the cord from pulling through.
PART 3 — ADD THE DECORATIVE BUTTONS
STEP 7 — POSITION THE BUTTONS
The reference dress uses light-colored decorative buttons across the upper bodice.
Place approximately 4–6 buttons on the front.
Space them evenly.
Mark their positions before sewing.
STEP 8 — SEW THE BUTTONS
Use matching sewing thread or strong yarn.
Sew each button securely to the front of the bodice.
If the buttons are decorative rather than functional, secure them firmly without creating unnecessary openings.
For functional buttons, add crochet button loops to the opposite side.
PART 4 — CROCHET THE SHOULDER STRAPS
STEP 9 — MAKE THE FIRST STRAP
Attach sage-green yarn to the upper edge of the front bodice.
Chain approximately 8–12 stitches depending on the desired strap width.
Work SC across.
Continue working rows of SC until the strap reaches the desired length.
For a thinner strap, use fewer stitches.
For a wider strap, increase the starting chain.
STEP 10 — MAKE THE SECOND STRAP
Repeat the same process on the opposite side.
Measure both straps carefully.
They should be approximately the same length.
STEP 11 — ATTACH THE BACK OF THE STRAPS
Place the back ends of the straps at the desired shoulder position.
Sew them securely to the back bodice.
Reinforce each attachment point with several stitches.
PART 5 — START THE SKIRT
STEP 12 — BEGIN THE SKIRT PATTERN
Attach sage-green yarn around the bottom edge of the bodice.
Work one round of SC.
Increase evenly around the waist.
The skirt should begin becoming wider than the bodice.
STEP 13 — CREATE THE FLORAL LACE STITCH
A simple decorative lace repeat can be created using groups of DC stitches.
For example:
CH 3.
Work 2 DC into the same space.
Skip 2 stitches.
SC into the next stitch.
Skip 2 stitches.
Work 5 DC into the next stitch.
Repeat around.
The groups of stitches create a repeating fan or flower-like texture.
STEP 14 — WORK THE NEXT ROUND
Work SC into the center of each fan.
Then create the next fan group into the following space.
Continue repeating the pattern around the dress.
This creates the layered floral texture visible in the skirt.
PART 6 — BUILD THE FLARED SKIRT
STEP 15 — ADD REGULAR INCREASES
As you move downward, gradually increase the circumference.
Add extra stitches between selected lace motifs.
Do not increase too quickly.
The goal is a gentle A-line shape.
STEP 16 — CONTINUE THE LACE REPEAT
Repeat the floral lace pattern for several rounds.
Every few rounds, check the skirt width.
If the skirt is too narrow, increase more frequently.
If the skirt is becoming too wide, reduce the frequency of increases.
STEP 17 — CREATE THE LOWER SKIRT
Continue crocheting until the skirt reaches approximately the desired length.
For a mini dress, the skirt may finish above the knee.
For a longer summer dress, continue the lace pattern for additional rounds.
The final length is completely customizable.
PART 7 — CREATE THE SCALLOPED HEM
STEP 18 — PREPARE THE HEM
Work one round of SC around the bottom edge.
This creates a stable foundation for the decorative border.
STEP 19 — CROCHET THE SCALLOPS
A simple scalloped border can be created using:
SL ST into the next stitch.
Skip 1 stitch.
Work 5 DC into the next stitch.
Skip 1 stitch.
SL ST into the next stitch.
Repeat around the entire hem.
This produces a soft rounded lace edge.
STEP 20 — FINISH THE HEM
Fasten off.
Weave the yarn tail securely into the wrong side of the dress.
Gently stretch the scallops into shape.
PART 8 — CREATE THE BACK DETAIL
STEP 21 — CHECK THE BACK BODICE
The reference design has a fitted openwork back.
Continue the mesh pattern across the back section.
Keep the stitch tension consistent with the front.
STEP 22 — REINFORCE THE STRAP CONNECTIONS
Sew around each strap attachment several times.
The shoulder straps receive additional tension when the dress is worn.
Strong attachment points will help the dress maintain its shape.
PART 9 — FINISHING THE DRESS
STEP 23 — WEAVE IN THE ENDS
Use a tapestry needle to weave every loose yarn end into the wrong side of the dress.
Weave each end through several stitches.
Trim the excess yarn.
STEP 24 — CHECK THE SHAPE
Lay the dress flat.
Smooth the bodice.
Arrange the lace pattern.
Spread the skirt evenly.
Check that the hem is symmetrical.
STEP 25 — BLOCK THE DRESS
Lightly dampen the dress.
Lay it flat on a clean towel or blocking mat.
Gently shape the skirt.
Open the lace motifs with your fingers.
Straighten the scalloped border.
Allow the dress to dry completely.
Blocking can make the lace pattern look considerably cleaner and more defined.
HOW TO CUSTOMIZE THE DRESS
MAKE A SHORTER DRESS
Stop crocheting the skirt earlier.
Add the scalloped hem.
A shorter version works well as a summer mini dress.
MAKE A LONGER DRESS
Continue the lace pattern for additional rounds.
Increase gradually toward the lower portion.
Finish with the same scalloped border.
MAKE THE BODICE MORE FITTED
Reduce the circumference at the waist.
Use a drawstring for additional adjustment.
MAKE A LOOSER DRESS
Increase the number of stitches around the bodice.
Add more increases at the beginning of the skirt.
ADD SLEEVES
The design can be adapted with short crochet sleeves.
Attach yarn around the armhole.
Work several rounds of SC or lace stitches.
Finish with a scalloped edge.
COLOR IDEAS
Sage Green
Sage green creates the natural appearance shown in the reference.
Cream and Sage
Use cream for the bodice details and sage green for the skirt.
Dusty Rose
Replace sage green with dusty rose for a romantic summer look.
Lavender
Lavender creates a soft pastel crochet dress.
Terracotta
Use warm terracotta with cream for a bohemian summer style.
Sky Blue
A light blue version works beautifully for beach vacations and summer events.
TIPS FOR CROCHETING THE DRESS
Measure the wearer before beginning.
Make a gauge swatch.
Check the fit regularly.
Keep increases evenly distributed.
Count your stitches at the end of each round.
Use stitch markers at the side seams.
Keep the lace repeat consistent.
Do not pull your yarn too tightly.
Block the finished dress to open the lacework.
Reinforce the shoulder straps.
COMMON CROCHET PROBLEMS
THE BODICE IS TOO TIGHT
Add stitches to the foundation chain or use a larger crochet hook.
THE BODICE IS TOO LOOSE
Reduce the starting chain or use a smaller hook.
THE SKIRT IS NOT FLARING
Add more increases between the lace repeats.
THE SKIRT IS TOO FULL
Reduce the frequency of increases.
THE LACE PATTERN LOOKS UNEVEN
Check your stitch count and make sure each repeat contains the same number of stitches.
THE HEM CURLS
Try blocking the dress.
If the problem remains, add a stabilizing round of SC before the scalloped border.
THE STRAPS STRETCH
Use tighter stitches and reinforce the attachment points.
A narrow strip of elastic can also be sewn inside the straps if desired.
CARE INSTRUCTIONS
Hand wash the crochet dress gently in cool water.
Use a mild detergent.
Do not wring or twist the garment.
Press excess water out using a clean towel.
Lay flat to dry.
Reshape the lace while damp.
Avoid high heat.
Store folded to prevent the shoulder straps from stretching.
FREQUENTLY ASKED QUESTIONS
What yarn is best for a crochet summer dress?
Cotton and cotton-blend yarn are excellent choices because they are breathable and provide clear stitch definition for lace patterns.
Is this crochet dress suitable for beginners?
The basic stitches are beginner-friendly, but the garment construction and lace shaping make it more suitable for someone with some crochet experience.
Can I make this dress in different sizes?
Yes. The dress is designed to be adaptable. Adjust the bodice circumference, waist, skirt width, strap length, and dress length according to your measurements.
Can I make the dress longer?
Yes. Continue the skirt pattern for additional rounds before crocheting the final border.
Can I use a different crochet stitch?
Yes. The bodice can be made with solid SC or HDC, while the skirt can be adapted using shells, fans, granny-style lace, or other openwork patterns.
Can I add lining?
Yes. A lightweight fabric lining can be added underneath the crochet dress for additional coverage.
Can I add pockets?
Yes. Crochet two matching rectangular or rounded pocket panels and sew them onto the front of the skirt.
Can the buttons be functional?
Yes. Add small crochet button loops beside the buttons if you want the bodice to open.

