
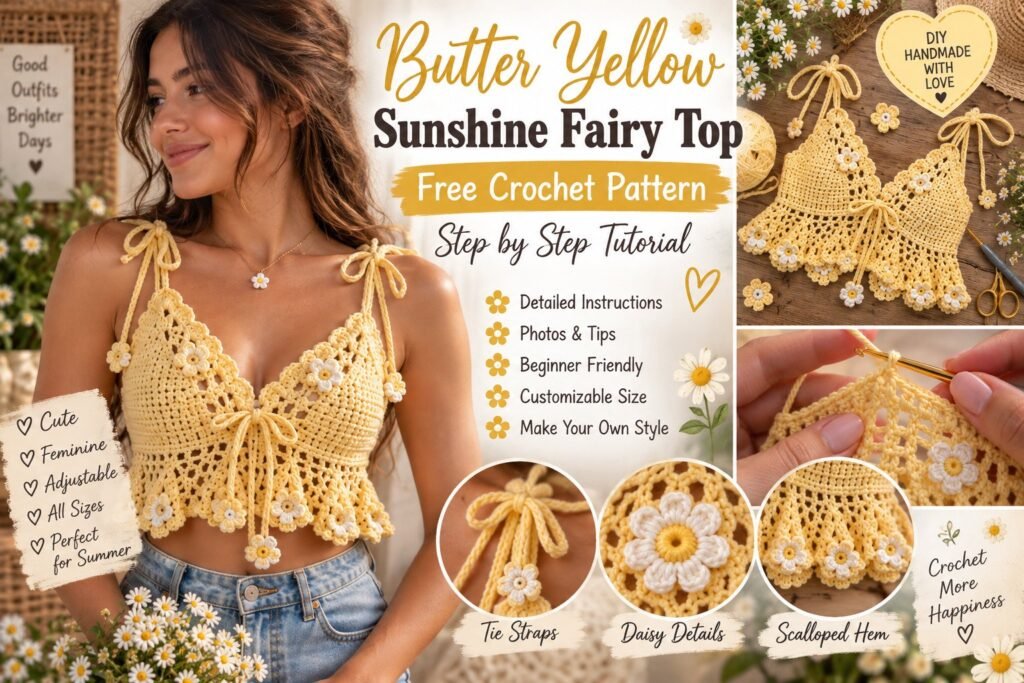
Bring a little sunshine to your handmade wardrobe with this beautiful Butter Yellow Sunshine Fairy Top! This delicate crochet top features a flattering triangle-style bodice, adjustable tie straps, an open lace section around the waist, and a pretty scalloped hem decorated with tiny crochet daisies.
The soft butter-yellow color gives this top a warm, feminine, fairy-inspired look that is perfect for summer outfits, festivals, beach days, picnics, and casual everyday wear. Pair it with high-waisted jeans, shorts, a flowing skirt, or a lightweight cardigan for a dreamy handmade look.
Note: This is an original, adaptable tutorial inspired by the pictured design. Since crochet tension, yarn weight, and body measurements vary, use your measurements and gauge as the main guide rather than treating the stitch counts as fixed.
🌞 Butter Yellow Sunshine Fairy Top Details
- Project Type: Crochet summer top
- Style: Fairycore / Cottagecore / Feminine
- Skill Level: Intermediate
- Construction: Two cups + lace waist + back panel + tie straps
- Crochet Terms: US terminology
- Fit: Adjustable
- Main Color: Butter yellow
- Season: Spring and summer
🧶 Materials
Yarn
Choose a lightweight cotton or cotton-blend yarn in butter yellow.
Approximately:
- 250–400 g butter-yellow yarn
- 20–30 g white yarn for flowers
- Small amount of yellow yarn for flower centers
The exact amount will depend on your size, yarn weight, and desired length.
Crochet Supplies
- 3 mm crochet hook
- 3.5 mm crochet hook, optional
- Yarn needle
- Scissors
- Measuring tape
- Stitch markers
✨ Crochet Stitches Used
- ch – Chain
- sl st – Slip stitch
- sc – Single crochet
- hdc – Half double crochet
- dc – Double crochet
- tr – Treble crochet
- inc – Increase
- dec – Decrease
- ch-sp – Chain space
The decorative lace is created using combinations of chains, double crochet stitches, and open spaces.
📏 Getting the Right Fit
Before crocheting the top, take these measurements:
- Bust circumference
- Underbust circumference
- Waist circumference
- Desired top length
- Shoulder strap length
Make a small gauge swatch first.
Because this is a fitted crochet garment, checking the measurements while working is much more important than following a rigid stitch count.
For a comfortable fit, allow a small amount of ease around the bust and waist.
STEP-BY-STEP BUTTER YELLOW FAIRY TOP
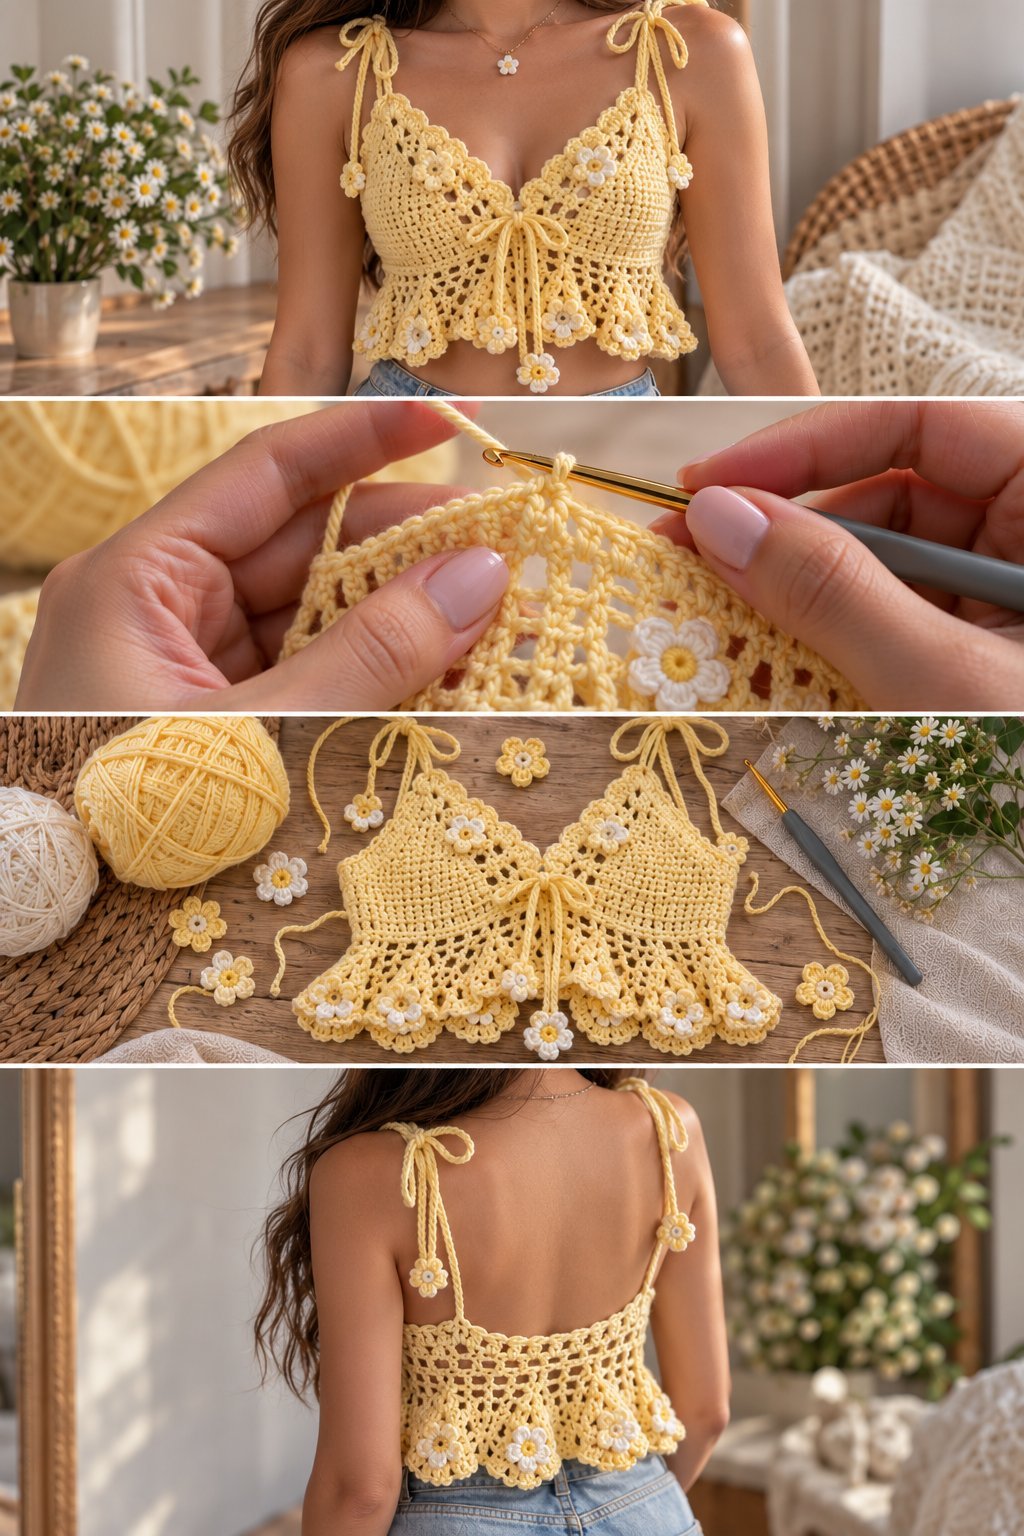
Step 1 — Crochet the First Bodice Cup
Start with butter-yellow yarn.
Create a foundation chain that corresponds to approximately half of the desired cup width.
Work the first row using single crochet or half double crochet.
At the end of each row:
Ch 1, turn.
Continue working rows while gradually shaping the cup.
To create the triangular shape, increase stitches toward the outer edges and maintain the center point.
A simple increase method is:
2 stitches in the first stitch, work across, 2 stitches in the final stitch.
Continue until the cup reaches the desired bust coverage.
Step 2 — Shape the Triangle Cup
The pictured top has a delicate triangular neckline.
Continue decreasing gradually toward the top center.
Work:
sc across, decrease at selected edges
until the cup forms a neat triangle.
Keep the center point sharp and symmetrical.
Try the cup against your body as you work.
If you need more coverage, add another row or two.
Step 3 — Crochet the Second Cup
Repeat the same process for the second cup.
Try to keep both cups identical in size and shape.
Place them side by side and compare the stitch rows before continuing.
This is especially important for the lace details and decorative flowers.
Step 4 — Join the Two Cups
Position the two cups next to each other.
Leave a small space between them if you want the center tie detail shown in the inspiration design.
Join them using several rows of single crochet or a decorative lace connection.
For the center opening, create a small chain section and attach it between the cups.
This gives the top a pretty adjustable front detail.
Step 5 — Add the Underbust Band
Attach butter-yellow yarn along the lower edge of the cups.
Work a few rows of single crochet or half double crochet.
This section should sit comfortably underneath the bust.
Keep the band snug but not tight.
The underbust area provides structure before transitioning into the more open lace pattern.
Step 6 — Create the Open Lace Waist
Now begin the airy lace section.
A simple repeat is:
Ch 3, skip 2 stitches, dc in next stitch, ch 2, repeat.
On the following row, work your stitches into the chain spaces.
Continue the lace pattern across the front.
The open spaces create the lightweight, fairy-inspired appearance seen in the pictured top.
Step 7 — Continue the Lace Pattern
Repeat the lace rows until the top reaches your desired waist length.
For a cropped version, work fewer rows.
For a longer top, continue adding lace rows.
Keep the edges symmetrical.
You can also add a few solid crochet rows between lace sections for extra structure.
🌸 Step 8 — Crochet the Back Panel
The back of the top can be made using a simple combination of solid and openwork rows.
Attach yarn to one side of the front.
Work across the back using:
sc, ch-sp, dc, ch-sp
repeated across the row.
Continue until the back reaches the desired height.
The pictured design uses an open back with delicate tie straps, so avoid making this section unnecessarily heavy.
🎀 Step 9 — Make the Shoulder Ties
The adjustable shoulder ties are an important feature of this fairy-style top.
Attach yarn to the top corner of each cup.
Chain approximately 35–50 stitches, depending on your measurements.
Slip stitch back along the chain or use single crochet for a thicker tie.
Repeat for the remaining straps.
The ties should be long enough to create small bows.
You can also make the straps thinner by using simple chains.
🌼 Step 10 — Crochet the Small Daisy Flowers
The tiny daisies give this top its sunshine-inspired look.
Use white yarn for the petals.
Start with a magic ring.
Create approximately 5 small petals around the center using chains and slip stitches.
Pull the center closed.
Fasten off.
Switch to yellow yarn and add a small center.
Make several flowers in different sizes.
🌸 Step 11 — Add Flowers to the Bodice
Arrange a few daisies around the neckline.
Sew each flower securely onto the crochet fabric.
Try placing them:
- Along the cup edges
- Near the shoulder ties
- Around the center opening
- Along the waist
Avoid placing too many flowers in one area.
A scattered arrangement creates a more natural handmade appearance.
🌼 Step 12 — Create the Decorative Hem
The lower edge of the top can be finished with a beautiful scalloped border.
Work one round of single crochet first.
Then create a shell-style edging:
Sc in next stitch, skip 2 stitches, 5 dc in next stitch, skip 2 stitches.
Repeat across the entire bottom edge.
This creates the soft scalloped appearance seen in the inspiration photo.
🌻 Step 13 — Add Daisy Flowers to the Hem
For the signature sunshine look, add small daisies along the scalloped hem.
Make several tiny white flowers with yellow centers.
Sew them carefully onto the individual scallops.
You can space them evenly or create a more organic flower arrangement.
For a simpler version, place flowers only along the center front.
🎀 Step 14 — Add the Front Waist Tie
The inspiration design includes a delicate tie at the center front.
Make a long crochet cord using chain stitches.
For a stronger cord, work slip stitches back across the chain.
Thread the cord through the center of the bodice.
Tie it into a small bow.
This also allows you to adjust the fit.
🧵 Step 15 — Finish the Edges
Inspect the entire garment.
Add a neat single-crochet border around:
- Top neckline
- Side edges
- Back
- Bottom hem
A clean border helps prevent the lace fabric from stretching too much.
✂️ Step 16 — Weave in the Ends
Use a yarn needle to weave all loose yarn tails into the wrong side of the crochet fabric.
Secure each end through several stitches.
Trim the excess yarn.
Pay special attention to the flower attachments and shoulder ties.
💧 Step 17 — Block the Finished Top
Lightly dampen the finished garment.
Lay it flat on a clean towel or blocking surface.
Gently shape:
- The triangle cups
- Lace waist
- Scalloped hem
- Shoulder straps
Allow it to dry completely.
Blocking helps the lace stitches open and gives the garment a more polished shape.
🎨 Color Ideas
Although butter yellow gives this top its signature sunshine look, you can easily change the palette.
🌼 Classic Sunshine
- Butter yellow
- White
- Golden yellow
🌸 Soft Fairycore
- Pale yellow
- Cream
- Blush pink
🌿 Cottagecore
- Butter yellow
- Sage green
- Ivory
🧡 Warm Summer
- Golden yellow
- Cream
- Peach
💜 Pastel Fairy
- Pale yellow
- Lavender
- White
👗 How to Style the Sunshine Fairy Top
Pair your crochet top with high-waisted denim for a casual summer outfit.
For a cottagecore look, wear it with a long flowing skirt and simple sandals.
For a festival outfit, combine it with wide-leg pants, a woven bag, and layered jewelry.
You can also wear the top over a lightweight camisole if you prefer additional coverage.
🧶 Tips for a Beautiful Crochet Top
Use lightweight yarn
Cotton or cotton-blend yarn creates breathable fabric that works especially well for summer.
Check your measurements frequently
Try the cups and waist section against your body as you crochet.
Keep the cups symmetrical
Make sure both cups have the same number of rows and similar tension.
Don’t make the lace too tight
Openwork needs enough room to drape naturally.
Reinforce the straps
The shoulder ties receive tension when the garment is worn, so weave the ends securely.
Block the finished garment
Blocking can make a significant difference in the appearance of lace crochet.
❓ Frequently Asked Questions
Is this crochet top beginner-friendly?
The basic stitches are simple, but shaping the cups and creating the lace sections requires some experience. It is best suited to an advanced beginner or intermediate crocheter.
What yarn is best for this pattern?
Lightweight cotton is an excellent option. It provides breathability and gives the lace a beautiful structure.
Can I make the top larger?
Yes. Adjust the foundation chains and number of cup rows according to your measurements. You can also add additional lace repeats around the waist.
Can I make it without the flowers?
Absolutely. The top looks beautiful even without the daisy embellishments. You can also replace them with crochet hearts, leaves, butterflies, or small roses.
Can I make longer straps?
Yes. Simply add more chain stitches to each shoulder tie. Longer ties are useful when you want adjustable bows.
Can I make the top less cropped?
Continue the lace pattern for additional rows before adding the final hem.
🌞 Final Thoughts
The Butter Yellow Sunshine Fairy Top is a dreamy crochet project for warm-weather wardrobes. Its delicate lacework, adjustable tie straps, triangle cups, scalloped hem, and tiny daisy flowers create a romantic handmade piece with a beautiful fairycore and cottagecore feel.
The pattern is easy to personalize, too. Change the color palette, adjust the length, add more flowers, or make the straps longer to create a crochet top that fits your own style perfectly.
Whether you’re making it for a summer outfit, a festival, a beach vacation, or simply because you love handmade crochet fashion, this sunshine-inspired top is a lovely project to add to your crochet wardrobe.
SEO Keywords: Butter Yellow Sunshine Fairy Top, free crochet top pattern, crochet summer top, crochet fairy top, butter yellow crochet top, crochet crop top, free crochet clothing pattern, crochet lace top, crochet camisole pattern, crochet flower top, fairycore crochet, cottagecore crochet top, handmade summer top, crochet festival top, beginner crochet top, crochet fashion pattern.


2 thoughts on “Butter Yellow Sunshine Fairy Top – Free Crochet Pattern”