
Introduction
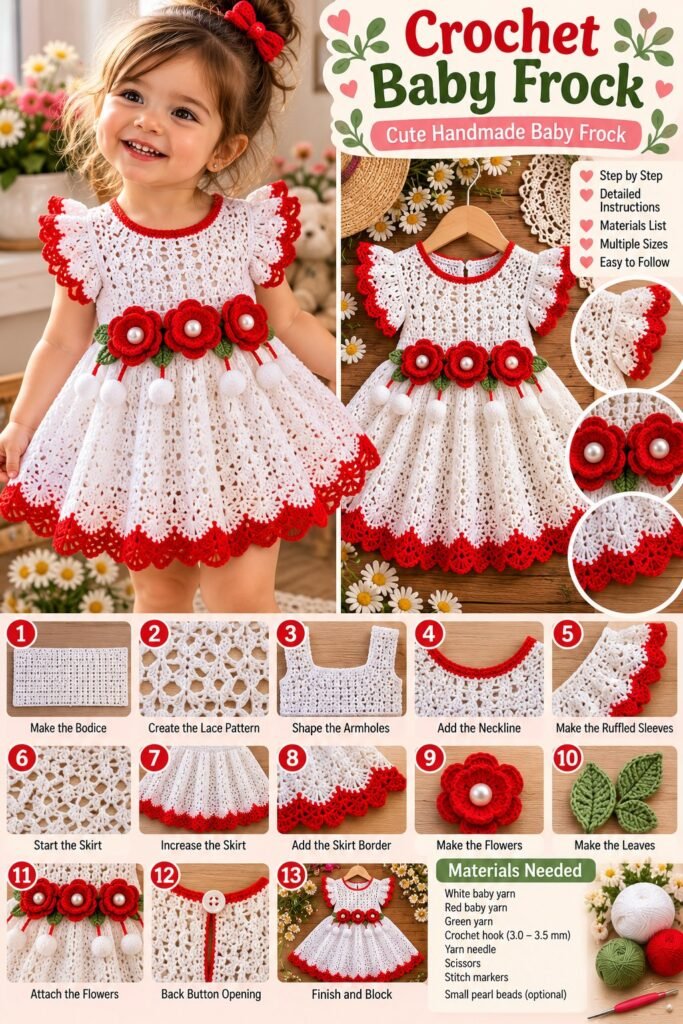
A crochet baby frock like this one is the kind of project that turns heads the moment it comes out of the gift box. Picture a fitted lattice-stitch bodice in soft white, short flutter sleeves finished with a scalloped red edge, and a full, flared skirt that falls in soft ripples to the knee. At the waist, three crocheted roses in deep red, each centered with a small pearl bead, sit above dangling cord ties finished with tiny pom-poms, adding a delicate, almost couture-like detail to the whole design.
This style of frock has become a favorite among crocheters who enjoy garment making with a decorative payoff. It suits special occasions such as birthdays, holidays, and family photo sessions especially well, though a simpler version without the rose embellishments works just as beautifully as an everyday piece. The combination of an open lattice bodice and a dense, textured skirt hem also makes it a rewarding project for anyone who wants to practice more than one crochet technique in a single garment.
If you are working on a crochet baby frock, this guide walks through the materials, stitches, and general construction approach typically used for a design like this, along with suggestions for yarn, hook size, and customization so you can shape your own version with confidence.
Why You’ll Love This Crochet Project
It has a genuine boutique quality. The combination of open latticework, a scalloped color-contrast border, and dimensional rose appliques gives this frock a polished, special-occasion feel that few basic baby garments achieve.
It is a wonderful gift and keepsake piece. Handmade dresses like this are popular for birthdays, holidays, and milestone photos, and the level of detail here makes the finished piece feel especially thoughtful.
It combines several techniques in one project. Between the openwork bodice, the flared skirt shaping, the scalloped edging, and the rose motifs, this frock keeps the work varied and engaging rather than repetitive.
It is highly photogenic. The white and red color combination and the fullness of the skirt photograph beautifully, making this a strong candidate for both keepsake photos and Pinterest content.
It offers real customization potential. The color palette, rose embellishments, and skirt fullness can all be adjusted to suit different occasions, seasons, or personal preferences.
Materials You’ll Need
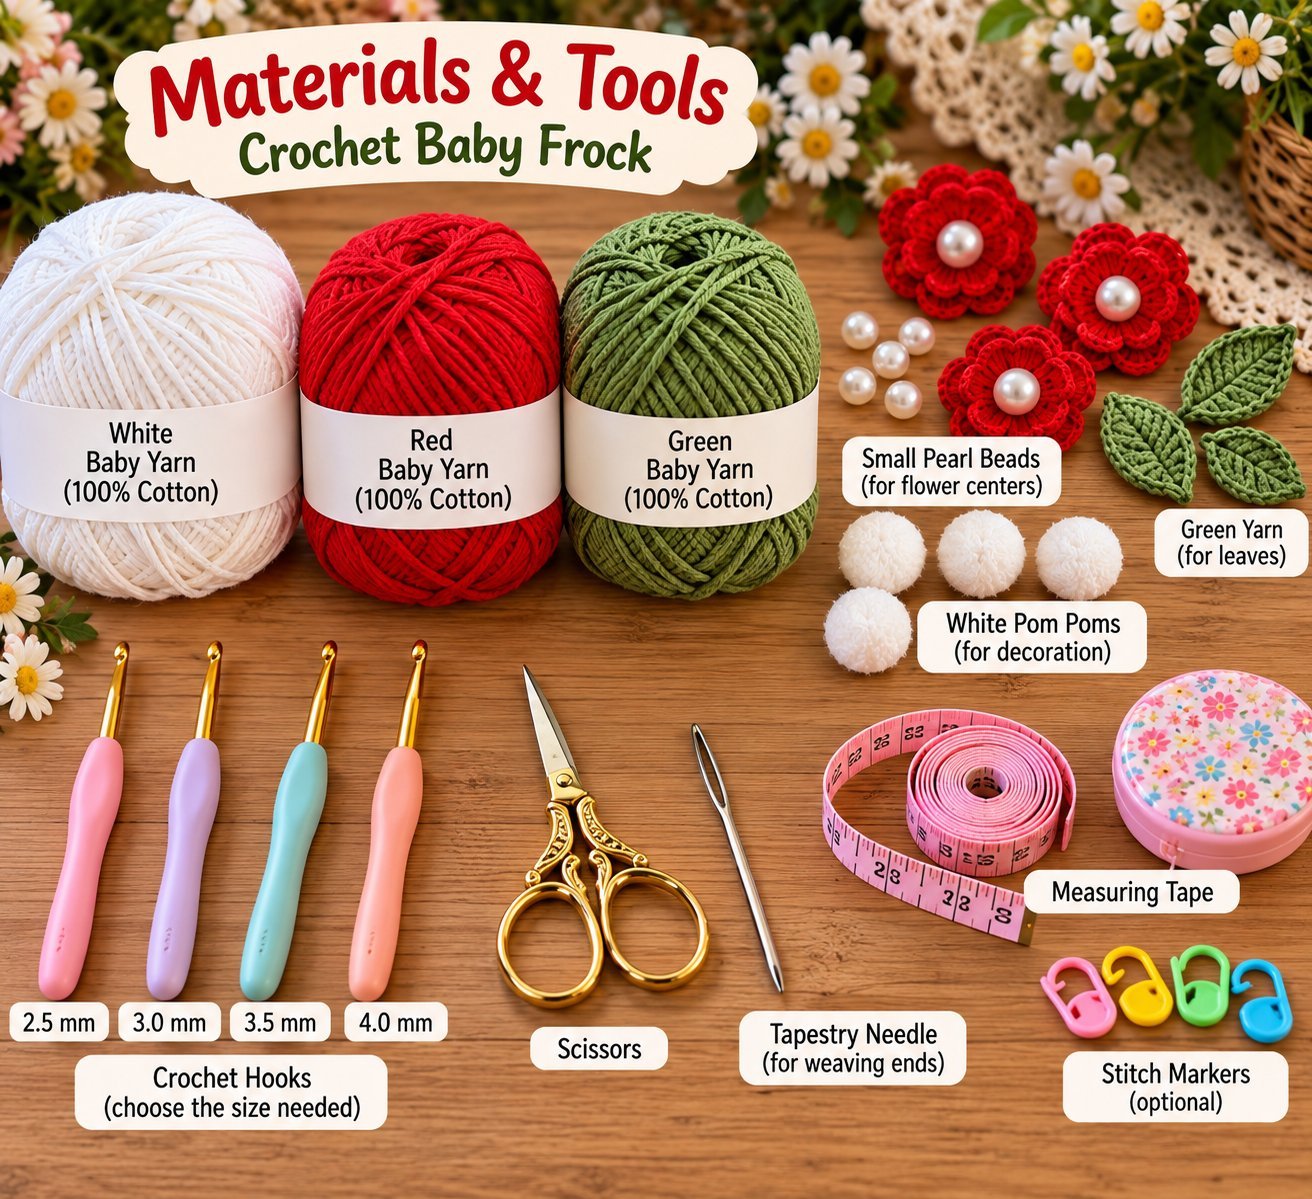
Exact yardage will vary depending on the size you are making, so treat the list below as a practical starting point rather than a fixed requirement.
- Soft baby-appropriate yarn in white or ivory for the main body (suggested main color)
- A smaller amount of red yarn for the trim, scalloped edging, and rose motifs
- A touch of green yarn for the rose leaves, if included
- A crochet hook sized to match your yarn weight (see suggestion below)
- Small pearl beads or buttons for the center of each rose motif
- Yarn needle for weaving in ends and attaching appliques
- Scissors
- Stitch markers to track rounds and shaping
- Measuring tape for checking fit against baby or toddler sizing references
Recommended Yarn
For a special-occasion piece like this, a soft, breathable cotton or cotton-blend yarn is a strong suggestion, since it holds crisp stitch definition for the lattice bodice and scalloped trim while remaining gentle against a child’s skin. Cotton also tends to hold its shape well in a flared skirt, helping the fabric fall with a bit of structure rather than going limp.
A light DK or sport weight yarn typically works well for baby and toddler garments, since it creates fabric that is substantial enough to hold shape without becoming too heavy for a small body to wear comfortably. The classic white and red combination shown in this style gives a bold, festive contrast, though soft pastels with a white base could easily be substituted for a gentler, everyday look.
Recommended Crochet Hook
As a general suggestion, a hook in the C/2 (2.75mm) to E/4 (3.5mm) range pairs well with DK or sport weight cotton yarn for a fitted baby garment like this. A smaller hook helps keep the lattice bodice stitches crisp and well defined, while the fuller skirt section may benefit from slightly looser tension to allow the fabric to drape and flare properly.
Keep in mind that hook size should always be adjusted based on your own gauge, since a fitted garment like this depends heavily on accurate sizing for a good fit.
Crochet Skill Level
This project is best suited to intermediate crocheters. The open lattice bodice, the scalloped border, and the layered rose motifs each require more precision and stitch control than a simple baby garment, and combining several techniques into one cohesive piece calls for some prior garment-making experience.
Crocheters who are comfortable with filet or mesh-style stitch patterns, basic increases and decreases, and attaching separate crocheted motifs will find this project very manageable, while newer crocheters may want to start with a simpler frock design first.
Crochet Stitches You May Need
- Chain (ch)
- Slip stitch (sl st)
- Single crochet (sc)
- Half double crochet (hdc)
- Double crochet (dc)
- Treble crochet (tr), often used in scalloped edges and rose petals
- Filet or mesh stitch pattern, for the open lattice bodice
- Shell stitch, commonly used for scalloped hem and sleeve edges
- Increase (inc) and decrease (dec) for shaping
- Picot stitch, sometimes used along scalloped trim for extra texture
Step-by-Step Crochet Guide
Step 1: Start the Foundation
Begin at the neckline with a foundation chain or small round, working the yoke first before shaping downward, or alternatively work the bodice flat in two panels that are seamed at the shoulders, depending on preferred construction. The neckline and armhole edges are typically finished with a contrast-colored trim round early on.
Step 2: Create the Main Section
Work the bodice in an open filet or lattice-style stitch pattern, which creates the diamond mesh texture seen across the chest and back. This openwork panel is usually worked to a length that ends just below the natural waistline, where the skirt will begin.
Step 3: Shape the Project
At the waist, begin working the skirt portion with a significant increase round or a switch to a fuller stitch pattern, allowing the fabric to flare outward into a full, gathered silhouette. Continue in rounds or rows, maintaining even increases so the skirt flares symmetrically to the desired length.
Step 4: Add Decorative Details
This is where the signature elements come in. Crochet several small rose motifs separately, layering rounds of petals in red and finishing each with a small pearl bead or button at the center, then attach them in a row at the waistline along with a few crocheted leaves. Cord ties finished with small pom-poms can be added beneath the roses for extra movement and detail.
Step 5: Create the Border or Finishing Edge
Around the hem of the skirt, the sleeve edges, and sometimes the neckline, a scalloped border is typically worked using shell stitches or picot detailing in the contrast color, giving the piece its soft, decorative silhouette along every edge.
Step 6: Finishing
Attach the rose motifs and any pom-pom ties securely at the waist, weave in all loose ends thoroughly, and check the fit against a sizing reference before considering the frock complete. A closure such as a button or snap at the back neckline is often added last.
Size and Customization
Baby and toddler garments are generally sized according to age ranges, and this frock can be adjusted by adding or removing rounds in both the bodice and skirt sections to fit different sizes. Working a gauge swatch first and comparing it against a standard sizing chart will help determine the right proportions for your target size.
For customization, consider swapping the red trim and roses for a different color palette to suit another season or occasion, such as pastel pink for spring or soft blue for a more neutral look. The number and size of the rose motifs can be adjusted, the pom-pom ties can be omitted for a simpler finish, and the skirt fullness can be reduced for a more streamlined silhouette if a less voluminous frock is preferred.
Helpful Crochet Tips

- Work a swatch of the lattice bodice stitch first to confirm it lies flat and check your gauge before starting the full garment.
- Keep tension even across the open mesh sections, since inconsistent tension can distort the diamond pattern.
- Crochet the rose motifs and leaves separately and lay them out at the waist before stitching them down, so you can adjust spacing and arrangement.
- Block the finished bodice gently to help the lattice stitches sit open and even rather than puckered.
- Secure pearl beads or buttons at the rose centers with extra reinforcement, since small embellishments need to withstand handling by little hands.
- Try the piece against a sizing reference periodically while shaping the skirt, rather than relying on row counts alone.
- Weave in ends as you go, particularly around the rose attachments, since this area accumulates more loose ends than the rest of the garment.
Common Mistakes to Avoid
- Uneven lattice tension: Inconsistent stitch tension in the open mesh bodice can make the diamond pattern look distorted. Practice on a swatch first to find a comfortable, even tension.
- Skipping the gauge swatch: Since this is a fitted garment, skipping gauge can result in a frock that is noticeably too tight or too loose. Take the time to swatch before starting.
- Uneven skirt increases: Missing increases at consistent intervals can cause the skirt to flare unevenly. Use stitch markers to track increase points round by round.
- Loose rose or bead attachment: Motifs and embellishments that are not securely stitched down can come loose with handling. Reinforce attachment points generously.
- Rushing the blocking step: Skipping blocking on the lattice bodice in particular can leave it looking tight and puckered rather than open and even.
- Underestimating trim yarn: The scalloped border and rose motifs use more contrast-color yarn than expected, so keep extra on hand rather than running short partway through.
Frequently Asked Questions
Is the crochet baby frock a good project for beginners?
It is better suited to intermediate crocheters, since the open lattice bodice, scalloped edging, and layered rose motifs each require more precision than a basic baby garment.
What yarn works best for a crochet baby frock?
A soft cotton or cotton-blend yarn in DK or sport weight is a practical suggestion, since it holds stitch definition well for the lattice and trim details while remaining gentle on skin.
How do I make sure the frock fits properly?
Working a gauge swatch and comparing your stitch count to a standard baby or toddler sizing chart, along with trying the piece against a reference garment as you go, is the most reliable approach.
Can I make this frock without the rose motifs?
Yes, the frock works well as a simpler design with just the lattice bodice and scalloped trim if you prefer a cleaner, less embellished look.
Can I change the color scheme from white and red?
Absolutely, this design translates well into other color combinations, such as pastel pink with cream roses or soft blue with white trim, depending on the occasion.
Finishing and Care
Once the frock is complete, weave in all ends securely, paying particular attention to the areas around the rose motifs and pom-pom ties where extra ends accumulate. A gentle steam or wet block can help the lattice bodice lie open and even, and can also help the scalloped edges hold their shape.
For care, hand washing in cool water is generally the safest choice for a garment with this much detail, particularly around the beaded rose centers. Lay flat to dry to preserve the shape of the skirt and scallops, and avoid high heat, which can cause certain yarns to shrink or lose their crisp stitch definition.
Final Thoughts
A crochet baby frock like this one turns a simple garment into a genuine keepsake. Between the delicate lattice bodice, the flared skirt, the scalloped trim, and the dimensional rose details at the waist, it is a project that rewards a bit of extra patience with a truly special, photo-ready result.


1 thought on “Crochet Baby Frock Cute Handmade Baby Dress with Rose Trim”