
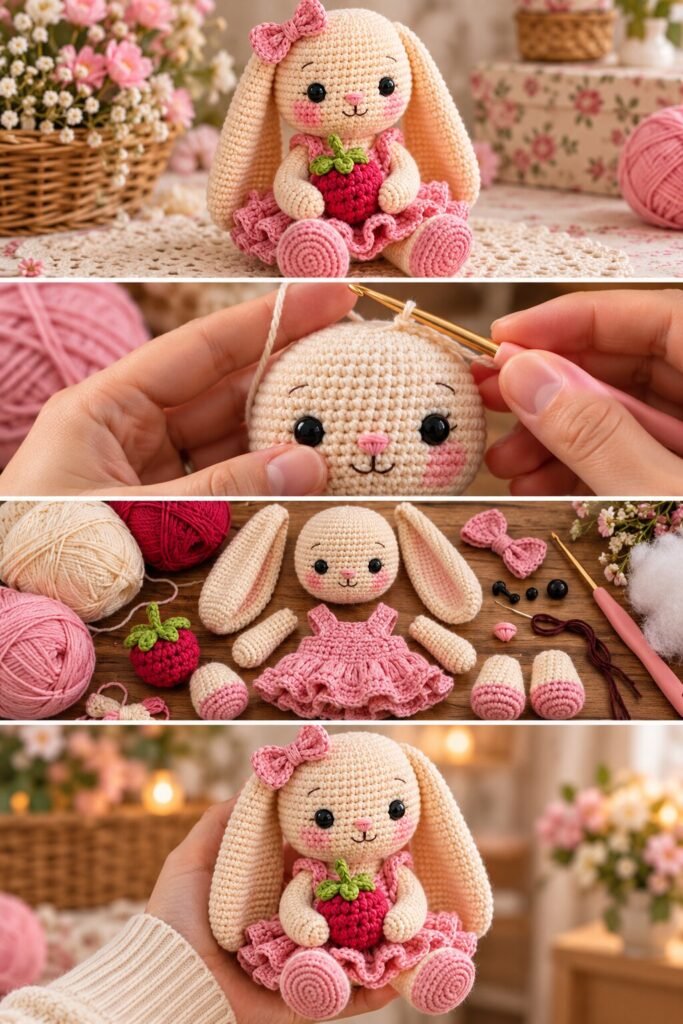
A cream-colored bunny with long, floppy folded-down ears, embroidered eyebrows, black safety eyes, a pink stitched nose, and two rosy cheek patches sits in a ruffled pink dress with a tiered skirt, pink feet peeking out from under the hem, and a small bow pinned to one ear. Between its paws it holds a plump crocheted raspberry, worked in deep red bobble-like texture with a little green leafy cap on top. The flat-lay shot showing all the pieces separately — head, ears, arms, legs, dress, bow, raspberry, and tiny safety eyes and nose piece laid out on the table — makes the construction logic easy to follow.
What’s doing the most expressive work here isn’t the bunny shape itself, which is a fairly standard amigurumi silhouette, but the combination of the long folded ears and the layered ruffled dress. Ears this length, worked separately and then bent or tacked down rather than standing upright, give the whole figure a soft, sleepy character quite different from a bunny with alert, upright ears. The dress ruffles add movement to what would otherwise be a simple round seated shape.
This is a reasonable project for someone who’s comfortable with standard amigurumi shaping and wants to practice a specific technique: attaching a floppy, pre-shaped ear so it drapes convincingly rather than standing stiffly away from the head.
Reading the Construction
The ears are the detail worth examining closest. They’re clearly worked as separate long, flat-ish pieces — you can see this in the flat-lay photo, where they lie next to the head rather than attached — then stitched on at the top and left to fold down naturally rather than being stuffed firmly enough to stand upright. That’s a deliberate choice: a firmly stuffed ear would stick out, while a lightly stuffed or partially flat ear drapes the way these do.
The dress looks like it’s built as a separate garment piece entirely, worked from a fitted yoke down into a gathered or ruffled tiered skirt — the kind of construction you’d use for a doll dress, with increases concentrated at specific rounds to create each ruffle tier rather than one smooth flare. It’s put onto the body after the body itself is assembled, based on how cleanly it sits as its own piece in the flat-lay.
The raspberry is its own small motif, likely built in rounds of single crochet worked at a tighter gauge than the rest of the project to get that compact, bumpy berry texture, topped with a few small leaf shapes in green.
Materials You’ll Need

- Cream or ivory yarn for the body, head, and ears (worsted weight is a reasonable suggestion, based on the compact, even stitch texture visible in the close-ups)
- Pink yarn in two shades, for the dress and the bunny’s feet/cheek details
- Deep red yarn for the raspberry
- A small amount of green yarn for the raspberry’s leaf cap
- A crochet hook sized to your yarn (see below)
- Small black safety eyes
- Pink yarn or felt for the nose
- Dark embroidery floss, for the eyebrows and mouth detail
- Polyester stuffing
- Yarn needle, for seaming and attaching all the separate pieces
- Scissors
- Stitch markers, useful for tracking rounds in the ears, dress ruffles, and raspberry
Yarn and Hook Notes
Based on the fine, even stitch definition in the close-up shots, a worsted weight cotton or cotton-blend yarn is a sensible starting point, worked at a slightly tighter gauge than the label suggests — standard practice for amigurumi, where you want a dense fabric that holds stuffing without gaps showing through. A hook somewhere around 3mm to 3.5mm is reasonable for that weight.
Cotton specifically is worth considering here over a very soft, fuzzy yarn, since the dress ruffles and the raspberry’s bumpy texture both depend on crisp, visible stitch definition that a halo-heavy yarn would blur.
Skill Level
This sits at an intermediate level, mainly because of the number of distinct pieces rather than any one technique being especially hard. A beginner amigurumi project usually has one body, maybe some simple limbs, and basic facial features. Here you’ve got the body, two long ears that need to drape correctly, two arms, two legs with color-changed feet, a separately constructed ruffled dress, a bow, and a raspberry motif with its own leaf detail — each one approachable individually, but the total assembly asks for more patience and planning than a simpler toy would.
Stitches Likely Involved
- Magic ring — starting point for the head, body, ears, limbs, and raspberry
- Single crochet (sc) — the primary stitch throughout, for its dense, stuffing-proof fabric
- Increase (inc) and decrease (dec) — shaping the rounded head and body, tapering the long ears, and building the raspberry’s rounded form
- A ruffle or gathered increase technique for the dress skirt, likely worked as sudden increase rounds at specific points to create each tier of ruffle
- Basic embroidery stitches — for the eyebrows, nose detail, and cheek shading
- Color-change technique — for the two-tone legs with pink feet
Building It: A Practical Sequence
Start the head with a magic ring, shaping it round and placing the safety eyes before stuffing fully, checking symmetry against the whiskers or embroidery lines you plan to add afterward.
Work the ears as separate long pieces, using a steady decrease rate to taper them if they narrow toward the tip, and stuff them only lightly or leave them unstuffed through most of the length so they’ll fold down naturally rather than standing stiff.
Attach the ears to the top of the head, positioning them so they drape down past the sides of the face rather than standing upright, securing the attachment point firmly since this is where all the ear’s weight and movement concentrates.
Build the body with a color change for the lower legs, switching to pink partway down each leg piece before attaching them to the body, and work the arms as simple tapered cylinders.
Embroider the facial details — eyebrows, nose line, and cheek shading — once the head is fully assembled and stuffed, using a few simple straight or satin stitches rather than anything elaborate.
Crochet the dress separately, starting at a fitted yoke and working down into the skirt with increase rounds spaced to create the ruffled tiers visible in the photos, then slip it onto the finished body once both pieces are complete.
Make the raspberry and its leaf cap as a final small project, working the berry in tight single crochet rounds for that compact, bumpy look, and stitching the leaf shapes on top before placing the berry between the bunny’s paws.
Attach the bow to one ear last, positioning it so it sits naturally against the fold rather than fighting the ear’s drape.
Adjusting the Fit and Look
Scale adjusts the same way most amigurumi does — a smaller hook and thinner yarn shrinks the whole project proportionally, while a bulkier yarn and larger hook scales it up, as long as your round counts for each piece adjust with the gauge change.
The dress color and the raspberry can both be swapped easily — a different fruit motif, like a small strawberry or a cluster of berries, would work with the same general construction logic, and the dress could just as easily be worked in a different pastel to suit a different color preference.
Where It’s Easy to Go Wrong
Ears that stand up instead of folding down. If they’re stuffed too firmly or attached at the wrong angle, the ears will stick out rather than drape convincingly. Keep stuffing light through most of the ear’s length and angle the attachment point toward the sides of the head rather than straight up.
A dress that doesn’t sit well on the body. If the yoke opening is too tight or too loose relative to the bunny’s torso, the dress will look pinched or will slide out of place. Check the yoke’s fit against your finished body before completing the skirt.
Asymmetrical facial embroidery. Hand-embroidered eyebrows and cheek shading are easy to place slightly off from one side to the other. Work slowly and check both sides against each other frequently as you go.
A raspberry that looks too smooth or too lumpy. The compact, bumpy texture depends on tight, even stitches — looser tension will make it look more like a plain ball than a textured berry. Keep your gauge noticeably tighter for this small piece than for the main body.
Care
Hand washing in cool water, if the yarn allows, is the gentler approach for a toy with this many separate attached pieces and safety eye components, since machine agitation can loosen both the dress’s attachment and the safety eyes. Air dry fully away from direct heat, which risks warping the stuffing and distorting the dress ruffles. Check the yarn label for fiber-specific guidance, since cotton and acrylic behave differently under heat and moisture.
Common Questions
Is this a good project for someone newer to amigurumi?
It’s better suited as a second or third amigurumi project — the individual techniques are approachable, but managing this many separate pieces, especially the floppy ears and the fitted dress, asks for more patience than a true first project typically requires.
Can I make the dress removable rather than permanently attached?
Yes, since it’s constructed as a separate piece from the body, leaving it unstitched or only lightly tacked at a few points would let it be removed and changed, similar to a small doll’s outfit.
What if I want upright ears instead of floppy ones?
Stuffing the ears more firmly throughout their length and attaching them straight up rather than angled to the sides would produce a more alert, upright-eared look instead.
Can I substitute a different fruit for the raspberry?
Yes, a strawberry or a small cluster of berries would both work with a similar compact, textured construction approach.

