

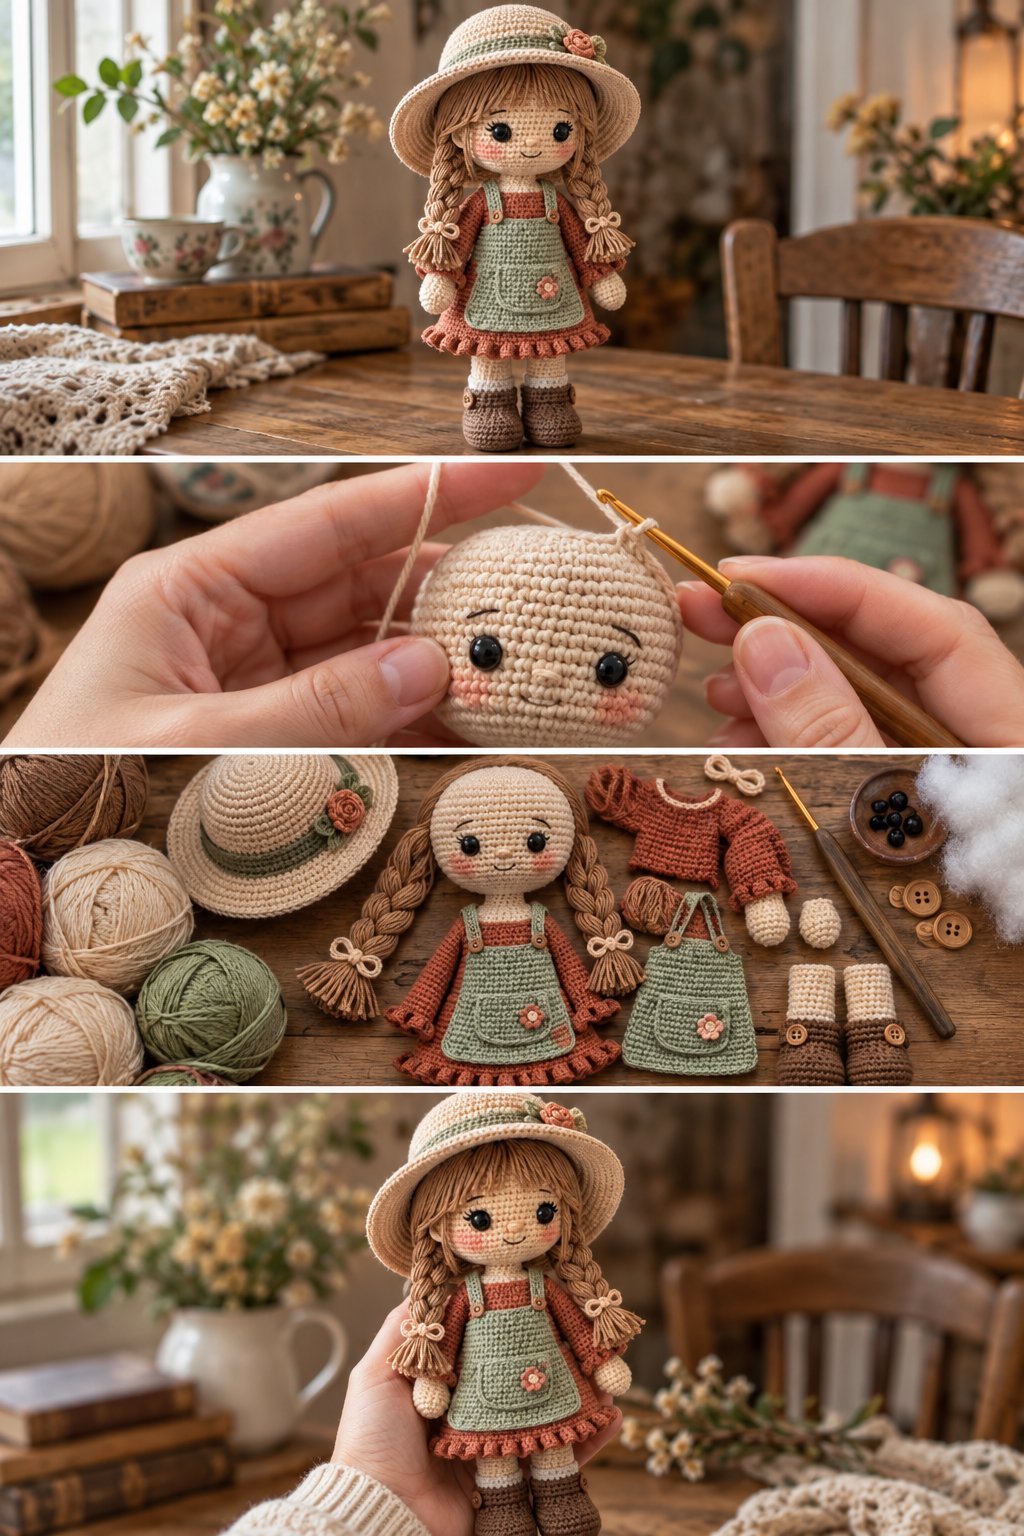
Create a charming handmade amigurumi doll with long braided hair, a cozy crochet hat, a vintage-inspired dress, apron, boots, and sweet embroidered facial details. This crochet doll is designed to resemble the rustic, soft, handmade character shown in the reference image and makes a beautiful nursery decoration, handmade gift, or crochet collectible.
This is an original, adaptable crochet pattern inspired by the reference design. Because yarn weight, hook size, and tension can change the final proportions, your finished doll may vary slightly in size and appearance.
The pattern uses standard US crochet terminology and is worked mainly with single crochet stitches, making it suitable for crocheters who are comfortable with basic amigurumi construction. A structured crochet pattern commonly includes materials, skill level, abbreviations, finished size, gauge or tension notes, and numbered instructions, which are included below.
Amigurumi Doll with Braids Pattern
Skill Level: Intermediate
Finished Size: Approximately 15–17 inches tall
Crochet Terms: US terminology
Construction: The doll is crocheted in separate pieces and assembled with a yarn needle.
Gauge: Gauge is not critical for this project, but tight stitches are recommended so the stuffing does not show through the fabric. If your stitches are loose, use a smaller crochet hook.
Materials Needed
Worsted weight yarn #4:
Cream or light beige for the skin
Rust, terracotta, or burnt orange for the shirt and skirt
Sage green for the pinafore and hat band
Brown for the boots
Medium brown or light brown for the hair
Small amounts of pink for the bow and cheeks
Small amount of cream or beige for the hat
Black embroidery thread for the eyelashes and facial details
Dark brown embroidery thread for the eyebrows and mouth
3.25 mm crochet hook
3.5 mm crochet hook
Polyester fiberfill stuffing
Yarn needle
Embroidery needle
Scissors
Stitch marker
Two safety eyes, approximately 10–12 mm, or black embroidery thread for embroidered eyes
Two small buttons for the pinafore
Two or four small buttons for the boots
Fabric or cardboard scrap for shaping the hat brim, optional
Crochet Abbreviations
ch = chain
sc = single crochet
sl st = slip stitch
inc = increase
dec = decrease
st = stitch
sts = stitches
BLO = back loop only
FLO = front loop only
FO = fasten off
rep = repeat
rnd = round
hdc = half double crochet
dc = double crochet
The abbreviations above follow common crochet pattern shorthand, including sc for single crochet, inc for increase, dec for decrease, and ch for chain.
Important Pattern Notes
Work the amigurumi pieces in continuous rounds unless the instructions say otherwise.
Use a stitch marker to mark the first stitch of each round.
Stuff the head and body firmly but gradually. Do not overstuff because excessive stuffing can distort the crochet stitches.
For a child-safe doll, embroidered eyes are a good alternative to safety eyes.
The dress, apron, hat, and accessories can be customized with different colors.
Keep the tension fairly tight throughout the doll so the stuffing remains inside.
Step 1: Crochet the Head
Use cream or beige yarn.
Start with a magic ring.
Rnd 1: 6 sc into magic ring. (6)
Rnd 2: inc around. (12)
Rnd 3: sc in next st, inc in next st around. (18)
Rnd 4: sc in next 2 sts, inc in next st around. (24)
Rnd 5: sc in next 3 sts, inc in next st around. (30)
Rnd 6: sc in next 4 sts, inc in next st around. (36)
Rnd 7: sc in next 5 sts, inc in next st around. (42)
Rnd 8: sc in next 6 sts, inc in next st around. (48)
Rnd 9–16: sc around. (48)
Place the safety eyes between Rounds 11 and 12, leaving approximately 10–12 stitches between them.
Rnd 17: sc in next 6 sts, dec around. (42)
Rnd 18: sc in next 5 sts, dec around. (36)
Rnd 19: sc in next 4 sts, dec around. (30)
Begin stuffing the head.
Rnd 20: sc in next 3 sts, dec around. (24)
Rnd 21: sc in next 2 sts, dec around. (18)
Add more stuffing and shape the head evenly.
Rnd 22: sc in next st, dec around. (12)
Rnd 23: dec around. (6)
FO and leave a long yarn tail.
Use the yarn tail to close the remaining opening.
Step 2: Add the Face
The face gives this doll most of its personality.
Using black embroidery thread, create soft eyelashes extending slightly outward from the eyes.
Embroider two small curved eyebrows above the eyes using brown or dark beige thread.
For the nose, use a few small horizontal stitches in skin-tone yarn.
Create the smiling mouth with dark brown or black embroidery thread.
For the cheeks, lightly embroider small pink circles or use a tiny amount of fabric-safe blush.
Keep the facial features symmetrical but slightly soft rather than perfectly geometric. This helps create the handmade appearance seen in the reference design.
Step 3: Crochet the Body
Use cream yarn for the neck and body.
Rnd 1: 6 sc into magic ring. (6)
Rnd 2: inc around. (12)
Rnd 3: sc in next st, inc in next st around. (18)
Rnd 4: sc in next 2 sts, inc in next st around. (24)
Rnd 5–10: sc around. (24)
Rnd 11: sc in next 2 sts, dec around. (18)
Rnd 12–14: sc around. (18)
Rnd 15: sc in next st, dec around. (12)
Rnd 16–17: sc around. (12)
FO and stuff the body firmly.
Leave the bottom opening available for attaching the legs.
Step 4: Crochet the Legs
Make two identical legs.
Use cream yarn.
Rnd 1: 6 sc into magic ring. (6)
Rnd 2: inc around. (12)
Rnd 3: sc in next st, inc in next st around. (18)
Rnd 4–8: sc around. (18)
Stuff the lower portion lightly.
Rnd 9: sc in next st, dec around. (12)
Rnd 10–14: sc around. (12)
FO and leave a long sewing tail.
Do not overstuff the upper part of the legs because you will need to sew them securely to the body.
Make the second leg in exactly the same way.
Sew the legs to the bottom of the body, positioning them evenly so the doll can stand or sit.
Step 5: Crochet the Arms
Make two arms.
Use cream yarn.
Rnd 1: 6 sc into magic ring. (6)
Rnd 2: inc around. (12)
Rnd 3–5: sc around. (12)
Rnd 6: sc in next 2 sts, dec around. (9)
Rnd 7–14: sc around. (9)
Add a small amount of stuffing to the hand and lower arm.
FO and leave a long sewing tail.
Sew the arms to the sides of the body around the shoulder area.
Position the hands slightly forward for a gentle doll-like pose.
Step 6: Crochet the Rust-Colored Sleeves
Change to rust or terracotta yarn.
Attach yarn around the upper portion of each arm.
Rnd 1: sc evenly around. (9)
Rnd 2–10: sc around. (9)
FO and weave in the end.
The sleeves should cover the upper arms while leaving the cream-colored hands visible.
For a slightly flared sleeve, work 2 sc in every third stitch during the final two rounds.
Step 7: Crochet the Dress Skirt
Use rust, terracotta, or another warm autumn color.
The skirt is worked from the waist downward.
Join yarn around the doll’s waist.
Rnd 1: sc evenly around the waist. (approximately 30 sts)
Rnd 2: sc around. (30)
Rnd 3: inc in every 5th stitch around. (36)
Rnd 4–8: sc around. (36)
Rnd 9: inc in every 6th stitch around. (42)
Rnd 10–14: sc around. (42)
Rnd 15: inc around evenly to approximately 48 sts.
Rnd 16–20: sc around. (48)
For the bottom ruffle:
Rnd 21: sc around. (48)
Rnd 22: 2 sc in each stitch around. (96)
Rnd 23: sc around. (96)
FO and weave in the ends.
The increased final rounds create the gentle ruffled hem visible on the reference doll.
Step 8: Crochet the Pinafore Apron
Use sage green yarn.
Chain 28.
Row 1: sc in the second ch from hook and across. (27)
Row 2–10: ch 1, sc across. (27)
For the lower apron section, increase at both ends.
Row 11: ch 1, 2 sc in first st, sc across, 2 sc in last st. (29)
Row 12: sc across. (29)
Row 13: repeat Row 11. (31)
Row 14–18: sc across. (31)
FO.
The apron should sit over the front of the dress.
Sew or crochet two narrow straps from the top corners of the apron to the back of the doll.
Step 9: Add the Pinafore Buttons
Sew two small buttons near the upper corners of the apron.
Position them approximately 5–6 stitches apart.
For a rustic appearance, wooden-look buttons work particularly well with the sage green and terracotta color combination.
Make sure any buttons are securely attached if the finished doll will be handled by a young child.
Step 10: Crochet the Hair
Use medium brown or light brown yarn.
Cut approximately 30–40 strands of yarn, depending on the desired hair thickness.
Each strand should be approximately 16–20 inches long.
Fold each strand in half.
Attach the folded strands around the head using a crochet hook or yarn needle.
Concentrate the hair around the top, sides, and back of the head.
The reference style uses two thick braids, so divide the hair into two equal sections.
Step 11: Make the Braids
Separate the hair on one side into three approximately equal sections.
Cross the outside section over the middle section.
Cross the opposite outside section over the new middle section.
Continue until you reach the desired braid length.
Tie the end securely with matching yarn.
Repeat on the other side.
Gently loosen the braid slightly with your fingers to create a soft, handmade appearance.
Wrap a small yarn bow around the bottom of each braid.
Trim the ends evenly.
Step 12: Crochet the Hair Bows
Use pink or dusty rose yarn.
Chain 8.
Join with a slip stitch to form a small ring.
Work 3 dc, ch 2, sl st into the ring.
Repeat on the opposite side.
FO and wrap a small strand of yarn around the center to create the bow shape.
Sew one bow to each braid.
Step 13: Crochet the Sun Hat
Use cream or beige yarn.
Rnd 1: 6 sc into magic ring. (6)
Rnd 2: inc around. (12)
Rnd 3: sc in next st, inc around. (18)
Rnd 4: sc in next 2 sts, inc around. (24)
Rnd 5: sc in next 3 sts, inc around. (30)
Rnd 6: sc in next 4 sts, inc around. (36)
Rnd 7: sc in next 5 sts, inc around. (42)
Rnd 8: sc in next 6 sts, inc around. (48)
Rnd 9–13: sc around. (48)
For the brim:
Rnd 14: sc in next 3 sts, inc in next st around. (60)
Rnd 15: sc in next 4 sts, inc in next st around. (72)
Rnd 16: sc around. (72)
Rnd 17: sc in next 5 sts, inc in next st around. (84)
Rnd 18: sc around. (84)
Rnd 19: sl st around.
FO and weave in the end.
The brim should remain relatively flat. If necessary, lightly block it or place a thin flexible insert between two crocheted layers for extra stability.
Step 14: Add the Hat Band
Use sage green yarn.
Chain enough stitches to comfortably wrap around the crown of the hat.
Work several rows of sc until the band reaches approximately 1 inch wide.
Wrap the band around the hat and sew the ends together at the back.
For the flower decoration, crochet a tiny flower using pink and cream yarn and sew it onto the side of the hat.
Step 15: Crochet the Boots
Use brown yarn.
Rnd 1: 6 sc into magic ring. (6)
Rnd 2: inc around. (12)
Rnd 3: sc in next st, inc around. (18)
Rnd 4: sc in next 2 sts, inc around. (24)
Rnd 5–7: sc around. (24)
To shape the front of the boot, work several decreases across the front.
Rnd 8: sc 8, dec 4 times, sc 8. (20)
Rnd 9–11: sc around. (20)
Rnd 12: sc in next 3 sts, dec around. (16)
Rnd 13–16: sc around. (16)
Stuff lightly.
FO and leave a long sewing tail.
Make the second boot.
Sew the boots securely to the bottom of the legs.
Add small decorative buttons to the outer side of each boot if desired.
Step 16: Assemble the Doll
Once all pieces are finished, check the placement before permanently sewing everything together.
Attach the legs first.
Sew the arms to both sides of the torso.
Attach the head securely to the neck.
Position the braids evenly on both sides of the face.
Place the hat slightly tilted for a relaxed handmade look.
Add the pinafore over the front of the dress.
Attach the buttons.
Finally, check the facial embroidery and tighten any loose stitches.
Step 17: Finishing Details
Use a yarn needle to hide all remaining yarn tails inside the doll.
Gently shape the head, arms, legs, dress, and hat with your fingers.
Brush the ends of the braids lightly if you want a softer hairstyle.
Adjust the hat so the brim sits naturally over the forehead.
Make sure the doll stands or sits comfortably before photographing the finished project.
Color Combination Ideas
The vintage look in the reference can be recreated with:
Cream + sage green + terracotta + brown
Cream + dusty pink + olive green + chocolate brown
Beige + mustard + forest green + warm brown
Ivory + rust + muted teal + dark brown
For a softer nursery-style doll, replace the rust with dusty rose and the sage with pale green.
Tips for Making the Doll
Keep your amigurumi stitches tight so the stuffing does not show.
Use a stitch marker at the beginning of every continuous round.
Stuff gradually instead of waiting until the final round.
When attaching the head, sew through several stitches of both the head and body for additional strength.
Use pins to position the arms, legs, apron, and hair before sewing.
If your doll is becoming too large, switch to a smaller hook and thinner yarn.
If your doll is too small, use a larger hook and thicker yarn.
For a child-safe version, embroider the eyes instead of using plastic safety eyes.
How to Customize Your Amigurumi Doll
One of the best things about this crochet doll is how easily the design can be personalized.
You can change the hair color, dress colors, hat decoration, apron color, shoes, facial expression, and hairstyle.
You can also make shorter braids for a younger-looking doll or longer braids for a more dramatic handmade character.
For a seasonal version, replace the flower on the hat with a small pumpkin, leaf, snowflake, or Christmas flower.
Frequently Asked Questions
How big is the finished crochet doll?
Using worsted weight yarn and the suggested hook sizes, the doll should measure approximately 15–17 inches tall. Your finished size will depend on yarn thickness, hook size, stuffing, and crochet tension.
Is this crochet doll suitable for beginners?
The individual stitches are beginner-friendly, but assembling the doll, creating the clothing, shaping the hat, and styling the braids make the complete project more suitable for an intermediate crocheter.
Can I use different yarn?
Yes. You can use cotton, acrylic, cotton-acrylic blends, or other suitable yarn. Changing the yarn weight will change the finished size.
Can I make the doll smaller?
Yes. Use lighter-weight yarn and a smaller crochet hook. You can also reduce the number of plain rounds in the head, body, arms, and legs.
Can I make the doll larger?
Yes. Use thicker yarn and a larger hook, or add additional increase and straight rounds to the main pieces.
Are safety eyes required?
No. Embroidered eyes can be used instead and are especially useful when making toys intended for very young children.
Can the clothes be removed?
The pinafore and hat can be made removable. If you want removable clothing, avoid sewing the apron directly to the dress and make the straps long enough to fasten around the body.
SEO Information
SEO Title:
Amigurumi Doll with Braids – Free Crochet Pattern
Meta Description:
Learn how to crochet a charming amigurumi doll with braids, a sun hat, dress, pinafore apron, and boots with this detailed free crochet pattern and step-by-step instructions.
Focus Keyword:
Amigurumi Doll with Braids
Secondary Keywords:
crochet doll pattern
amigurumi doll crochet pattern
free crochet doll pattern
crochet doll with braids
crochet girl doll
amigurumi girl doll
crochet doll with hat
crochet dress doll
handmade crochet doll
crochet doll free pattern
Suggested URL Slug:
amigurumi-doll-with-braids-free-crochet-pattern
Suggested Image Filename:
amigurumi-doll-with-braids-free-crochet-pattern.jpg
Image Alt Text:
Amigurumi doll with braided hair wearing a crochet dress, pinafore apron, sun hat, and boots
Image Title:
Amigurumi Doll with Braids Free Crochet Pattern
Image Caption:
A handmade amigurumi doll with braided hair, crochet sun hat, vintage dress, pinafore apron, and boots.
Final Thoughts
This Amigurumi Doll with Braids is a lovely project for anyone who enjoys creating detailed handmade crochet characters. The combination of braided yarn hair, a wide-brimmed hat, vintage-inspired clothing, apron, and little boots gives the finished doll a warm handcrafted personality.
The basic doll construction can also become the foundation for many other designs. Change the colors, hairstyle, clothing, and accessories to create an entire collection of personalized crochet dolls.

