

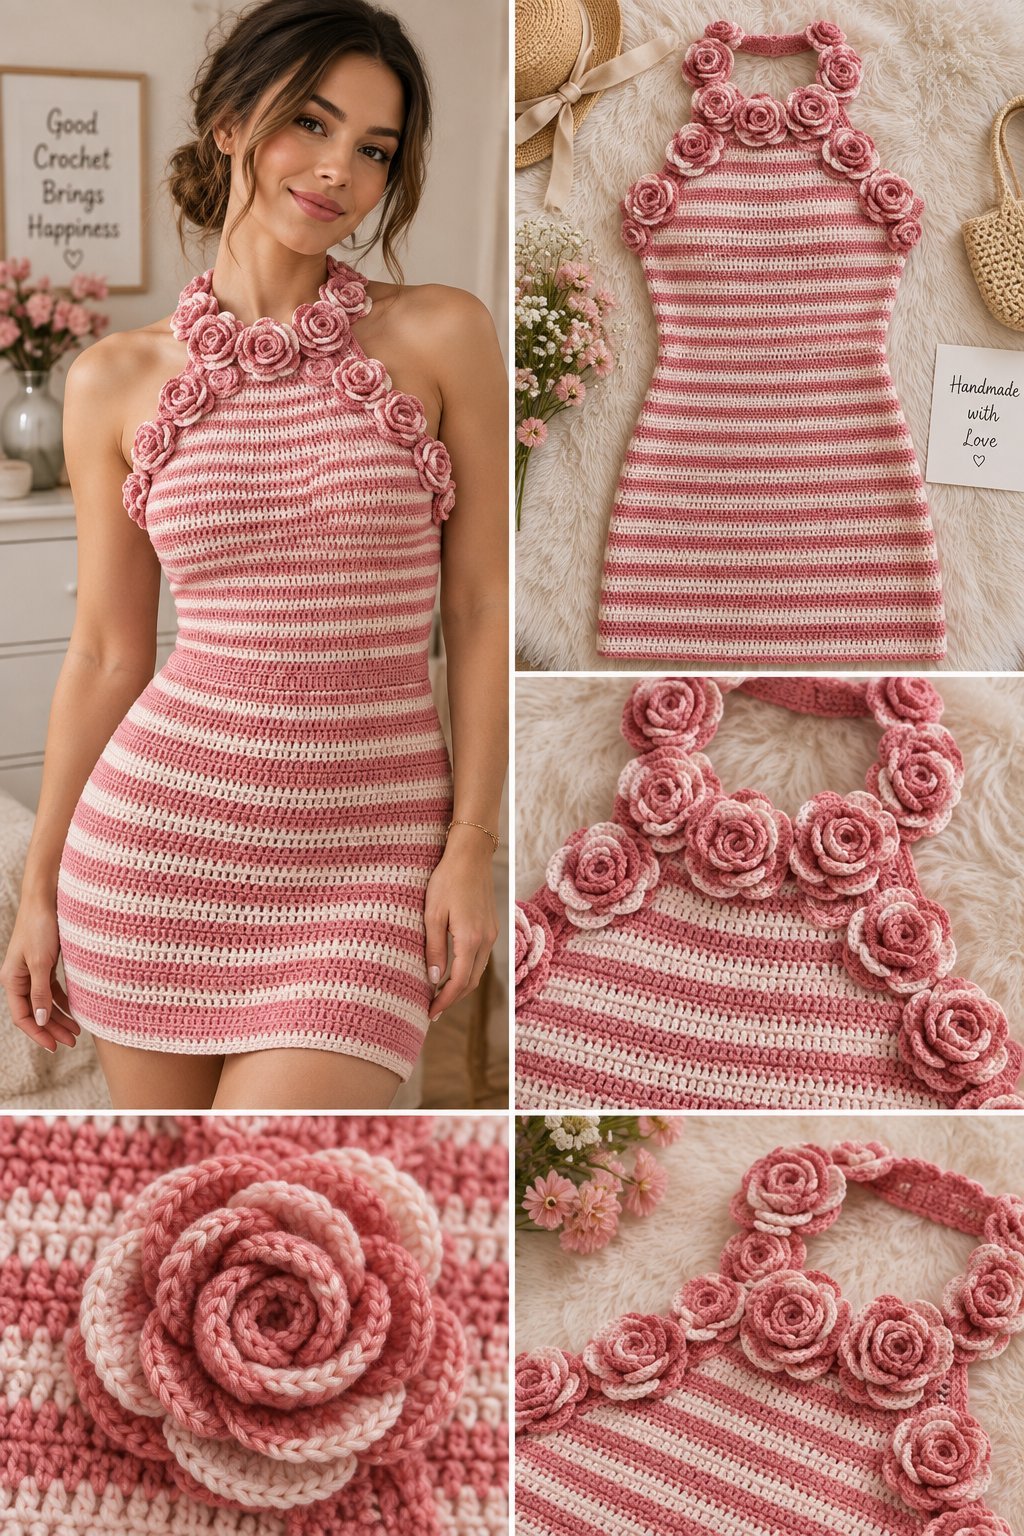
Create a romantic handmade statement piece with this beautiful Crochet Rose Dress! This feminine mini dress combines soft pink and cream horizontal crochet stripes with delicate 3D crochet roses arranged around the neckline, shoulders, and sides.
The fitted silhouette makes this dress perfect for summer outings, date nights, garden parties, festivals, or special occasions. The rose embellishments add a charming cottagecore and romantic aesthetic while allowing you to personalize the dress with your favorite colors.
Pattern note: This is an original, adaptable tutorial inspired by the provided reference image. Because crochet tension, yarn weight, and body measurements vary, use your measurements and gauge as the primary guide.
🌹 Crochet Rose Dress Details
- Project: Crochet mini dress
- Style: Romantic / Cottagecore / Feminine
- Skill Level: Intermediate
- Construction: Fitted body + shaped neckline + crochet roses
- Crochet Terms: US terminology
- Main Colors: Dusty pink and cream
- Fit: Body-skimming
- Season: Spring and summer
🧶 Materials
Yarn
Choose a lightweight cotton or cotton-blend yarn.
You will need approximately:
- Dusty pink yarn
- Light pink yarn
- Cream or ivory yarn
- Slightly darker pink yarn for rose details
- Small amount of green yarn for optional leaves
The exact quantity depends on your size, dress length, and yarn tension.
Crochet Supplies
- 3–3.5 mm crochet hook
- 2.5–3 mm hook for small roses
- Yarn needle
- Scissors
- Stitch markers
- Measuring tape
- Blocking mats or clean towels
✂️ Crochet Abbreviations
- ch – Chain
- sl st – Slip Stitch
- sc – Single Crochet
- hdc – Half Double Crochet
- dc – Double Crochet
- tr – Treble Crochet
- inc – Increase
- dec – Decrease
- BLO – Back Loop Only
- FO – Fasten Off
📏 Measure Before Crocheting
Since this is a fitted crochet dress, accurate measurements are important.
Measure:
- Bust circumference
- Underbust circumference
- Waist circumference
- Hip circumference
- Shoulder-to-waist length
- Waist-to-hem length
- Total desired dress length
Make a gauge swatch using your main stitch pattern.
The fabric should feel comfortable and have enough flexibility to move with the body.
🌸 STEP-BY-STEP CROCHET ROSE DRESS
Step 1 — Start the Bodice
Begin with your main pink yarn.
Create a foundation chain that matches your bust measurement.
Join carefully if you’re working the bodice in rounds.
Work several rounds of single crochet or half double crochet.
For a smoother fitted appearance, half double crochet works especially well.
Continue until the bodice reaches the underbust area.
Step 2 — Create the Horizontal Stripes
The inspiration design uses alternating pink and cream rows.
Change yarn colors every few rounds.
For example:
- 3 rounds dusty pink
- 2 rounds cream
- 3 rounds dusty pink
- 2 rounds light pink
Repeat this color sequence throughout the dress.
When changing colors, complete the final stitch of the previous round with the new color for a cleaner transition.
Step 3 — Shape the Waist
The waist should be slightly narrower than the bust and hips.
Begin decreasing gradually around the waist.
For example:
Work several stitches, then dec, repeat around.
Avoid making large decreases in a single round.
Gradual shaping creates a smoother silhouette.
Continue for several rounds until you reach your desired waist measurement.
Step 4 — Shape the Hips
After reaching the narrowest part of the waist, begin increasing again.
Work increases evenly around the garment.
For example:
Work 4 stitches, inc, repeat around.
Adjust the number of increases according to your measurements.
The skirt should become slightly wider around the hips.
Step 5 — Continue the Main Skirt
Continue crocheting rounds of your chosen stitch pattern.
Keep alternating your pink and cream colors.
For a mini dress like the inspiration image, stop when the skirt reaches several centimeters above the knee.
For a longer dress, simply continue working additional rounds.
🌷 Step 6 — Shape the Upper Bodice
If you want the neckline to sit higher and closer to the neck, continue the bodice upward.
For a sleeveless style, leave the armholes open.
You can create a halter-style neckline by narrowing the front section and forming two straps.
Step 7 — Create the Neckline
The pictured style has a high, halter-inspired neckline.
Mark the center front.
Work rows of crochet while decreasing gradually toward the top.
Continue until you have a narrow neckline section.
You can make the neckline:
- High neck
- Halter neck
- Scoop neck
- Sweetheart neckline
Choose the shape that best suits your preferred fit.
🎀 Step 8 — Make the Neck Strap
Create a long chain using pink yarn.
Work single crochet back across the chain for a stronger strap.
Attach the strap securely to both sides of the neckline.
Make it long enough to tie comfortably behind the neck.
For additional support, reinforce the attachment points with several passes of a yarn needle.
🌹 Step 9 — Crochet the First Rose
Now create the decorative roses.
Using pink yarn, chain approximately 25–35 stitches.
Work a row of double crochet stitches along the chain.
To create the petals, use a repeat such as:
sl st, sc, hdc, 3 dc, hdc, sc
Repeat along the chain.
The taller stitches create curved petal sections.
Step 10 — Roll the Crochet Rose
Once the petal strip is finished, begin rolling it from one end.
Roll the strip tightly at first.
Then gradually loosen it as you reach the outer petals.
This creates the appearance of a blooming rose.
Use a yarn needle to sew through the bottom of the rose.
Secure it firmly so it does not unravel.
🌹 Step 11 — Make Roses in Different Sizes
Create several roses using different foundation-chain lengths.
For example:
- Small roses: 18–22 chains
- Medium roses: 25–30 chains
- Large roses: 35–45 chains
Different sizes create a more natural floral arrangement.
Use light pink, dusty pink, cream, and darker pink for variation.
🌿 Step 12 — Add Optional Crochet Leaves
Using green yarn, create small leaves.
Chain 7–10 stitches.
Work single crochet and half double crochet along one side of the chain.
Add a few increases toward the center.
Work back down the opposite side.
Fasten off.
Make several leaves and attach them between the roses.
🌸 Step 13 — Arrange the Roses
Before sewing anything, place the roses on the dress.
Try arranging them around:
- Neckline
- Shoulder straps
- Upper bodice
- Side seams
- Hip area
The inspiration design uses roses as a dramatic border around the neckline and sides.
A combination of large and small flowers works beautifully.
🧵 Step 14 — Sew the Roses Onto the Dress
Use matching pink yarn.
Place each rose where you want it.
Sew through the center and several points around the base.
Make multiple stitches to keep each rose firmly attached.
Avoid sewing only through the center because the outer petals may move.
🌹 Step 15 — Create the Rose Border
For a dramatic floral look, continue adding roses down both sides of the bodice.
Place larger flowers near the neckline.
Use smaller flowers as you move toward the waist and hips.
This creates a natural transition from the floral neckline into the striped dress.
🎀 Step 16 — Finish the Armholes
Work one round of single crochet around each armhole.
For a decorative finish, add:
sc, skip 1, 3 dc in next stitch, skip 1
Repeat around.
Alternatively, keep the armhole border simple for a cleaner modern appearance.
🌸 Step 17 — Finish the Dress Hem
Work one or two rounds of single crochet around the bottom edge.
For a soft feminine finish, add a small scalloped border.
A simple option is:
sc, skip 2, 5 dc in next stitch, skip 2
Repeat around.
If you prefer the straight geometric look shown in the reference, finish with several simple single-crochet rounds instead.
🧵 Step 18 — Reinforce the Side Seams
If the dress was constructed from separate panels, carefully sew the side seams together.
Use matching yarn.
Sew from the armhole down toward the hem.
Reinforce the waist and hip areas because these sections receive more tension when the dress is worn.
✂️ Step 19 — Weave in Yarn Ends
Use a yarn needle to weave every loose yarn tail into the wrong side of the crochet fabric.
Secure each end through several stitches.
Trim the excess.
Pay special attention to the rose attachments and neckline.
💧 Step 20 — Block the Finished Dress
Lightly dampen the completed dress.
Lay it flat on a clean blocking surface.
Gently shape the neckline, waist, hips, and hem.
Shape the roses with your fingers so their petals remain open.
Allow the dress to dry completely.
🎨 Rose Dress Color Ideas
🌹 Classic Romance
- Dusty pink
- Cream
- Rose pink
🌸 Blush Garden
- Blush pink
- White
- Soft peach
💗 Strawberry Rose
- Light pink
- Berry pink
- Cream
🌷 Vintage Rose
- Dusty rose
- Ivory
- Burgundy
💜 Fairy Garden
- Lavender
- Blush pink
- Cream
- Soft green
👗 How to Style a Crochet Rose Dress
Pair the dress with simple sandals and a small woven handbag for a romantic summer outfit.
For a cottagecore look, add a lightweight cardigan and delicate jewelry.
For a festival outfit, wear it with ankle boots and a crochet or woven bag.
You can also layer a fitted camisole underneath if you prefer additional coverage.
🧶 Tips for a Beautiful Crochet Dress
Make a gauge swatch
This is especially important for fitted garments.
Measure as you work
Try the dress on regularly to make sure the waist and hips fit comfortably.
Use lightweight yarn
Cotton and cotton blends are excellent for summer dresses.
Keep color changes neat
Carry yarn carefully or weave in ends as you go.
Secure every rose
The flowers can catch on clothing, so reinforce their attachment points.
Don’t overdo the flowers
A mixture of larger and smaller roses gives the dress a balanced appearance.
📏 How to Adjust the Dress Size
For a larger bust
Increase the foundation chain or add stitches to the bodice.
For a smaller waist
Use additional gradual decreases around the waist.
For wider hips
Add additional increase rounds below the waist.
For a longer dress
Continue the striped pattern for additional rounds.
For a shorter dress
Stop the skirt earlier and add the final border.
❓ Frequently Asked Questions
Is this crochet rose dress beginner-friendly?
The basic striped body is relatively straightforward, but creating a fitted garment and shaping the neckline requires some crochet experience. The rose appliqués are simple once you understand the rolling technique.
What yarn is best for a summer crochet dress?
Lightweight cotton or cotton-blend yarn is a great choice because it is breathable, comfortable, and provides good stitch definition.
Can I make this dress in one color?
Yes. A single-color dress with contrasting roses can create a beautiful elegant look.
Can I make the roses detachable?
You can attach some roses using removable brooch-style pins, but make sure any attachment is secure and appropriate for the intended wearer.
How many roses do I need?
The number depends on how heavily you want to decorate the dress. For a floral neckline, approximately 10–20 roses of mixed sizes may be enough.
Can I make this dress longer?
Absolutely. Continue the skirt pattern until it reaches your preferred length.
🌹 Final Thoughts
This Crochet Rose Dress Free Pattern combines classic crochet techniques with beautiful floral embellishments to create a romantic handmade statement piece. The alternating pink and cream stripes provide a simple foundation, while the dimensional crochet roses transform the dress into something truly special.
The design is highly customizable. Experiment with rose colors, add crochet leaves, change the neckline, adjust the length, or create a completely different color palette.
Whether you’re looking for a crochet summer dress, a cottagecore outfit, or a special handmade fashion project, this rose-covered design is a beautiful addition to your crochet wardrobe.
SEO Keywords: Crochet Rose Dress Free Pattern, crochet rose dress, free crochet dress pattern, crochet summer dress, crochet flower dress, crochet floral dress, crochet mini dress, crochet rose pattern, crochet flower appliqué, handmade summer dress, cottagecore crochet dress, romantic crochet dress, crochet women’s clothing, easy crochet dress pattern, crochet fashion tutorial.

