
Introduction
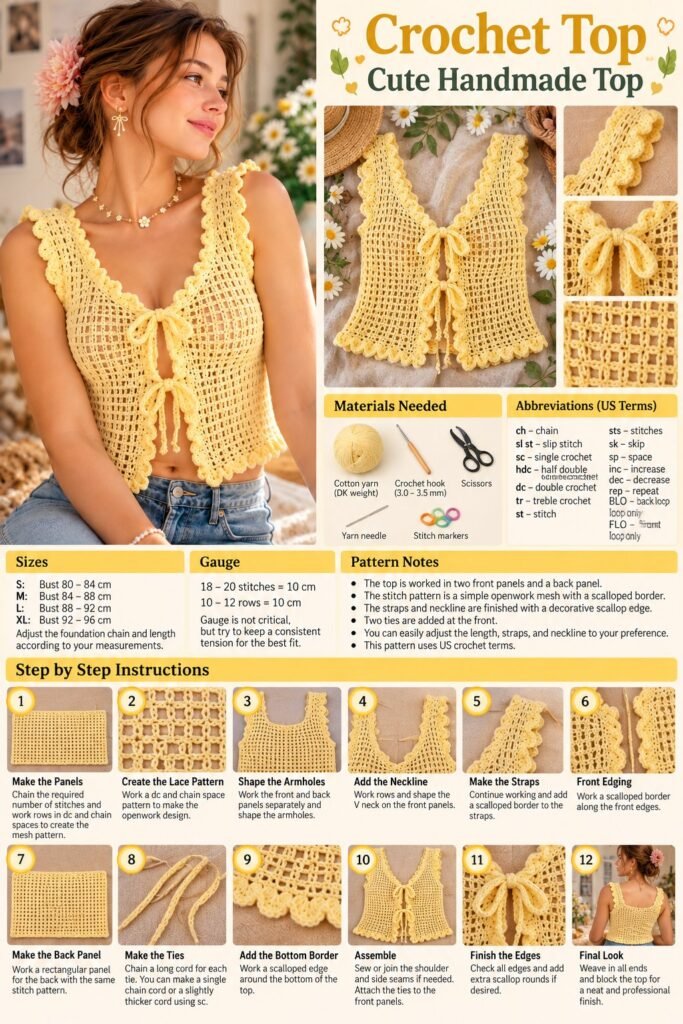
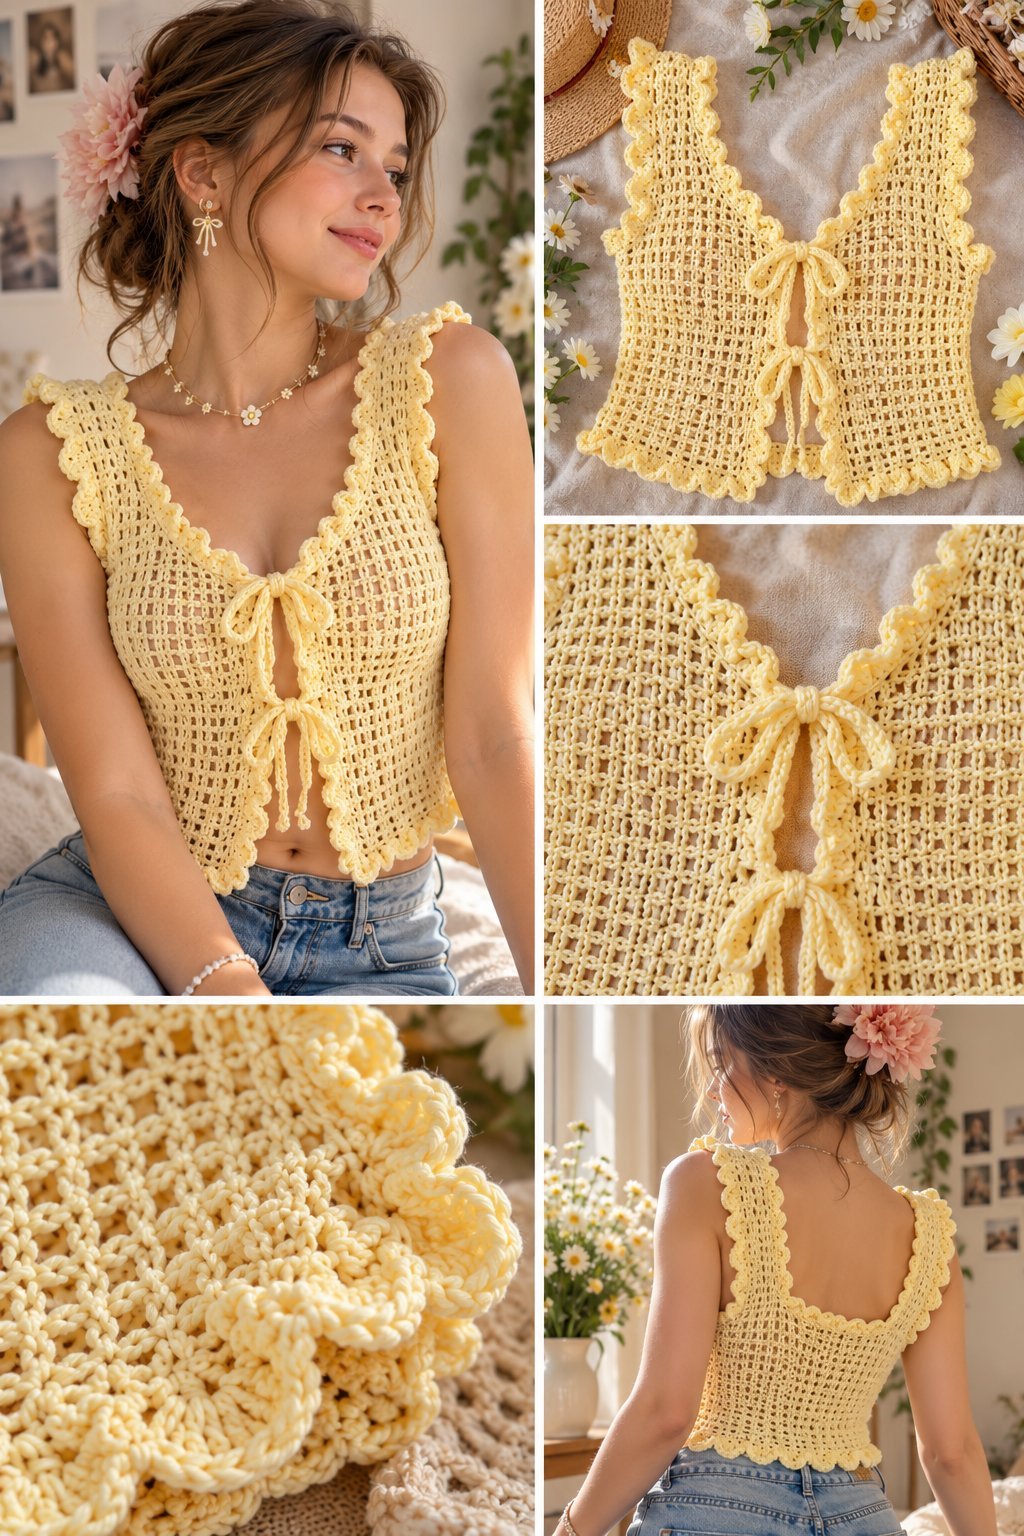
This crochet summer top captures everything that makes warm-weather crochet so appealing. Picture a soft butter yellow mesh-stitch top with a deep V-neckline, scalloped trim along every edge, and two delicate crocheted bows tying together at the center front. The open, airy mesh fabric lets the fabric breathe in the heat while still offering coverage, and the scalloped edging along the straps, neckline, and hem gives the whole piece a feminine, romantic finish.
This style of top has become a favorite for anyone drawn to soft, cottagecore-inspired crochet fashion. It works beautifully layered over a bralette or worn on its own for a beach day, a summer festival, or simply lounging at home in warm weather. The combination of an open lattice-mesh body and delicate scalloped trim also makes it a satisfying project for crocheters who enjoy garment work with a decorative, romantic edge.
If you are working on a crochet summer top like this one, this guide walks through the materials, stitches, and general construction approach typically used for a design like this, along with practical suggestions for yarn, hook size, and customization so you can build your own version with confidence.
Why You’ll Love This Crochet Project
It is wonderfully breathable and lightweight. The open mesh stitch pattern allows for excellent airflow, making it genuinely practical for hot summer days rather than just decorative.
It has a soft, romantic aesthetic. The scalloped edges, front bow ties, and pastel color give this top a delicate, feminine quality that stands out from more basic tank or crop top designs.
It is highly versatile. This top pairs easily with jeans, skirts, or swimwear as a cover-up, which means it earns its place in a warm-weather wardrobe rather than being a one-occasion piece.
It is a manageable size project. A fitted top uses considerably less yarn and time than a full garment or blanket, making it a satisfying project that can realistically be finished within a week or two of casual crocheting.
It offers genuine customization potential. The neckline depth, tie placement, mesh density, and trim style can all be adjusted, allowing you to shape the design to your own taste and fit.
Materials You’ll Need
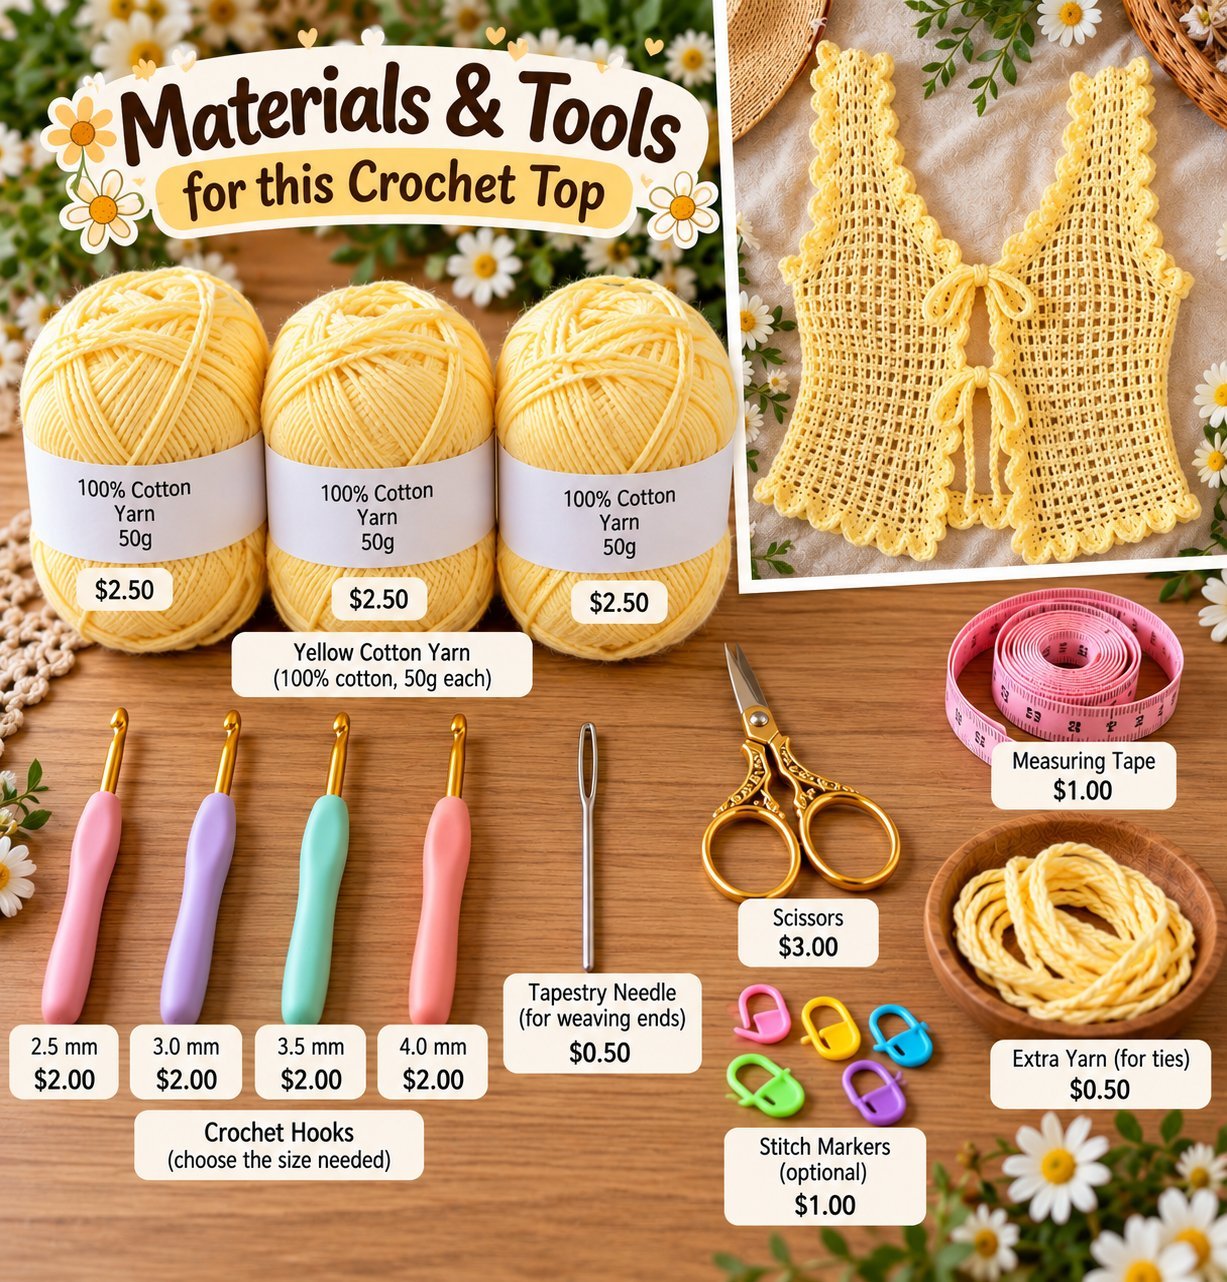
Exact yardage will depend on your size and gauge, so treat the list below as a practical starting point rather than a fixed requirement.
- Lightweight cotton or cotton-blend yarn in your chosen color (suggested option; butter yellow, cream, or soft pastels all work well for this style)
- A crochet hook sized to match your yarn weight (see suggestion below)
- Yarn needle for weaving in ends and seaming
- Scissors
- Stitch markers to track rounds and shaping
- Measuring tape for checking fit as you work
Recommended Yarn
A cotton or cotton-blend yarn is a strong suggestion for this style of summer top, since it holds its shape well in warm weather, has good stitch definition for the mesh pattern, and feels breathable and comfortable against skin. Cotton also tends to have a bit of natural structure, which helps the scalloped trim hold its shape rather than flopping.
In terms of weight, DK or light worsted works well for a mesh top like this, since it creates an open lattice that is airy without being so fine that the stitches become difficult to see and work evenly. Soft pastel shades like the butter yellow shown here are especially popular for summer pieces, though cream, blush pink, and light sage are all lovely alternatives depending on your personal palette.
Recommended Crochet Hook
As a general suggestion, a hook in the E/4 (3.5mm) to G/6 (4.0mm) range pairs well with DK weight cotton or cotton-blend yarn for a mesh-style top like this. A slightly larger hook relative to the yarn weight helps create the open, lattice-like texture seen in this design, since a tighter gauge would result in a denser fabric with less drape.
Keep in mind that hook size should always be adjusted based on your own gauge, since a fitted garment like this depends heavily on accurate sizing for a proper fit.
Crochet Skill Level
This project is best suited to confident beginner to intermediate crocheters. The mesh stitch pattern itself is fairly repetitive and approachable, but shaping the V-neckline, working symmetrical straps, and finishing with a consistent scalloped edge require more attention to detail and garment know-how than a simple flat accessory.
Crocheters who have some experience with basic garment construction, gauge swatching, and simple shaping techniques will find this project very manageable, while first-time garment makers may want to start with a simpler tank shape before attempting the mesh and scallop combination.
Crochet Stitches You May Need
- Chain (ch)
- Slip stitch (sl st)
- Single crochet (sc)
- Double crochet (dc)
- Filet or mesh stitch pattern (typically double crochet with chain spaces), for the open lattice body
- Shell stitch, commonly used for scalloped trim
- Picot stitch, sometimes used along scalloped edges for extra texture
- Increase (inc) and decrease (dec) for shaping the neckline and straps
Step-by-Step Crochet Guide
Step 1: Start the Foundation
Begin with a foundation chain sized to your desired hem width, then work in the mesh stitch pattern, alternating chain spaces and double crochet stitches to build the open lattice texture that will make up the majority of the top’s body.
Step 2: Create the Main Section
Continue working the mesh pattern upward in rows, maintaining a consistent stitch and chain-space count to keep the lattice even. This section typically makes up the bulk of the top, worked as two panels for front and back, or as one piece worked flat and seamed at the sides.
Step 3: Shape the Project
As you approach the underarm area, begin working armhole shaping by decreasing at the sides, then continue shaping a V-neckline by gradually decreasing stitches along the center front on each side. Straps are typically worked as a continuation of the shoulder area, narrowed to a comfortable width and shaped to meet at the back if using a crossback or halter style, or left as simple straight straps for a classic tank shape.
Step 4: Add Decorative Details
This is where the front ties come in. Two sets of crocheted cords or narrow strips are worked and attached at the center front opening, allowing the top to be tied at one or two points down the chest. Bows are then tied into place once the ties are attached, giving the design its signature romantic detail.
Step 5: Create the Border or Finishing Edge
Once the main body and straps are complete, a scalloped border is typically worked around the entire neckline, armholes, straps, and hem using shell stitches or picot detailing. This trim ties the whole design together and gives the top its soft, decorative silhouette along every edge.
Step 6: Finishing
Attach the ties securely at the front opening, weave in all loose ends thoroughly, and try the top on to check fit and tie placement before considering the piece complete. A light blocking session at this stage helps the mesh lie open and even.
Size and Customization
Sizing for a top like this is generally controlled by the width of your foundation chain and the placement of your armhole and neckline shaping, so it can be adjusted fairly naturally for different bust and torso measurements. Working a gauge swatch first and comparing it to your own chest circumference will help determine how wide to make the body before shaping begins.
For customization, consider adjusting the depth of the V-neckline for more or less coverage, changing the number of front ties from two down to one for a simpler look, or widening the mesh chain spaces for an even more open, airy fabric. Strap width and length can also be modified for a halter-style or crossback variation, and the scalloped trim can be made more subtle or more dramatic depending on personal preference.
Helpful Crochet Tips
- Work a gauge swatch in the mesh pattern first, since an open stitch like this can behave differently under tension than a solid fabric.
- Keep your chain spaces consistent throughout the body, since uneven mesh spacing is one of the most noticeable flaws in a finished piece like this.
- Try the top on periodically as you shape the neckline and armholes, rather than relying solely on row counts.
- Block the finished mesh sections before attaching the scalloped trim, since this helps the lattice lie open and even rather than puckered.
- Use a stitch marker at the point where neckline shaping begins, so you can keep both sides symmetrical as you decrease.
- Crochet the front ties as a separate step and attach them securely, since these small details receive a lot of handling when the top is worn and removed.
- Consider working the scalloped border in a slightly larger hook if you want the edges to have more visible flounce and movement.
Common Mistakes to Avoid
- Uneven mesh spacing: Inconsistent chain-space counts between rows can distort the lattice pattern. Count carefully and keep your stitch repeat consistent.
- Skipping the gauge swatch: Since this is a fitted garment, skipping gauge can lead to a top that is noticeably too tight or too loose. Take the time to swatch before starting.
- Asymmetrical neckline shaping: Decreasing unevenly on each side of the V-neck can create a lopsided finish. Use stitch markers and count rows carefully on both sides.
- Ties that are too short: Underestimating tie length can make the bows difficult to tie comfortably. Err on the side of a bit of extra length.
- Skipping the border: Leaving off the scalloped trim can leave raw or curling edges, since this finishing step is a major part of what gives the top its polished look.
Frequently Asked Questions
Is a crochet summer top like this good for beginners?
It suits confident beginners through intermediate crocheters, since the mesh pattern itself is approachable but the V-neckline shaping and scalloped trim require some garment-making experience.
What yarn works best for a crochet summer top?
A cotton or cotton-blend yarn in DK weight is a practical suggestion, since it is breathable, holds shape well, and gives good stitch definition for both the mesh body and scalloped trim.
How do I keep the mesh pattern even throughout the top?
Working a gauge swatch first and counting your chain spaces carefully at the end of each row are the most reliable ways to keep the lattice pattern consistent.
Can I make this top with a different neckline style?
Yes, while a V-neckline with front ties is shown here, the same mesh body and scalloped trim can easily be adapted to a scoop neck, square neck, or halter style.
Is this top true to size, or does the mesh stretch?
Open mesh fabric does have some natural give, so many crocheters find it helpful to work slightly fitted rather than oversized, since the stitch pattern will stretch a bit with wear.
Finishing and Care
Once the top is complete, weave in all ends securely, paying particular attention to the areas around the front ties and strap attachments. Block the piece by lightly wetting or steaming it and pinning it to shape, especially along the mesh body and scalloped edges, to help the open lattice lie flat and even.
For care, hand washing in cool water is the safest option for a piece like this, particularly if you used cotton yarn, which can be prone to stretching when wet. Lay flat to dry to help the top retain its shape, and avoid hanging it while damp, since the weight of the water can pull the mesh out of proportion.
Final Thoughts
A crochet summer top like this one is a rewarding project that delivers real warm-weather wearability alongside genuine style. Between the airy mesh body, the romantic scalloped trim, and the sweet front bow ties, it is the kind of piece that earns a regular spot in a summer wardrobe rather than sitting unworn.

