

Make a cute orange cat amigurumi with this easy beginner-friendly crochet pattern. This Garfield-inspired design features a rounded head, pointed ears, a soft body, chunky paws, a curved tail, expressive embroidered facial details, and classic black stripe accents.
This is an original, simplified crochet construction inspired by Garfield’s recognizable orange-cat appearance. It is not an official Garfield pattern or an exact reproduction of another designer’s pattern. Existing Garfield crochet patterns use different constructions and skill levels; for example, published versions range from beginner to intermediate and commonly use orange, black, white, yellow, and pink yarn. StringyDingDing
The pattern below is designed to be approachable for crocheters who are learning amigurumi techniques such as working in the round, increasing, decreasing, stuffing, and sewing pieces together.
Project Details
Project type: Amigurumi cat
Style: Garfield-inspired orange cat
Skill level: Beginner to intermediate
Crochet terminology: US terms
Main technique: Crochet in the round
Suggested finished size: Approximately 18–22 cm
Main color: Orange
Accent colors: Black, white, yellow, and pink
Main stitches: Single crochet, increase, and decrease
Materials Needed
Orange medium-weight yarn: approximately 100–150 g
Black yarn: small amount
White yarn: small amount
Yellow yarn: small amount
Pink yarn: small amount
3.0–3.5 mm crochet hook
Polyester fiberfill stuffing
Tapestry needle
Embroidery needle
Stitch marker
Scissors
Pins
Safety eyes, optional
Black embroidery thread
Pink embroidery thread
For a tighter amigurumi fabric, use a crochet hook smaller than the size normally recommended for your yarn. Published Garfield-inspired amigurumi projects commonly use orange as the main color with black and lighter accent colors. Ravelry
Crochet Abbreviations
MR — magic ring
ch — chain
sc — single crochet
inc — increase
dec — decrease
sl st — slip stitch
st — stitch
sts — stitches
FO — fasten off
BLO — back loop only
FLO — front loop only
rep — repeat
rnd — round
Before You Begin
Work the amigurumi tightly so the stuffing cannot easily be seen through the stitches.
Use a stitch marker at the beginning of each round.
Count your stitches after every increase and decrease round.
Add stuffing gradually as you crochet.
Avoid overstuffing because it can stretch the stitches and change the shape.
For a clean finish, use an invisible decrease whenever possible.
Amigurumi does not require a traditional garment gauge. The most important thing is achieving a firm fabric with no large gaps.
Step 1: Crochet the Body
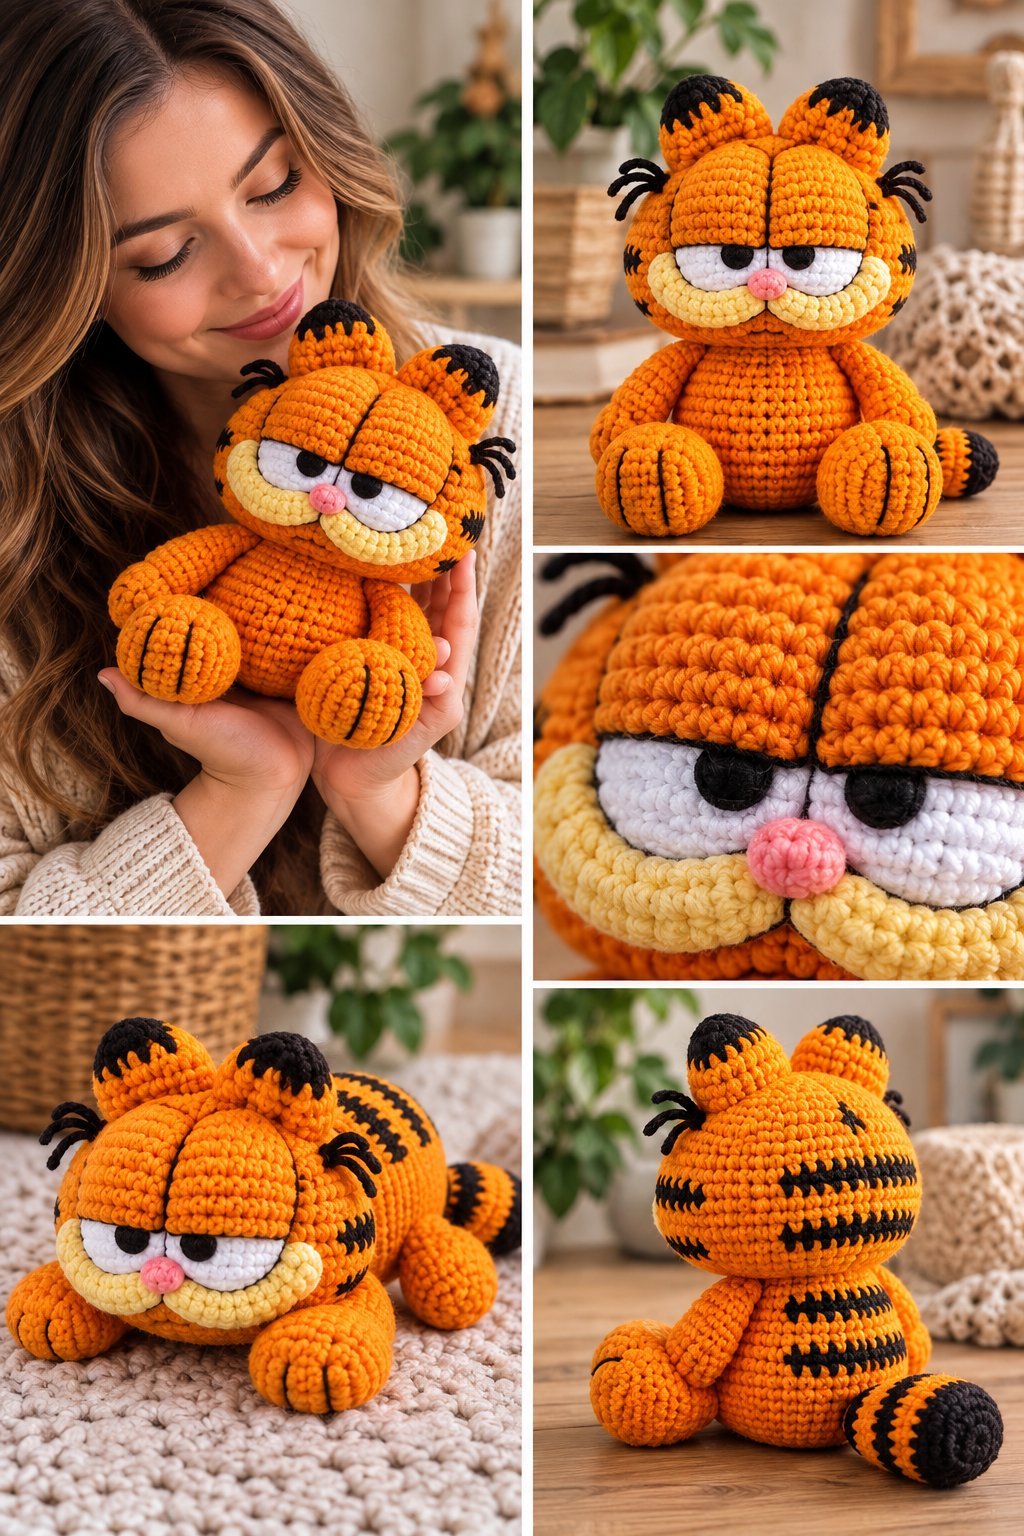
Start with orange yarn.
Round 1
Make a magic ring.
Work 6 sc into the ring.
6 sts
Round 2
Work 2 sc in each stitch around.
12 sts
Round 3
Sc in the next stitch, inc in the next stitch.
Repeat around.
18 sts
Round 4
Sc in the next 2 stitches, inc in the next stitch.
Repeat around.
24 sts
Round 5
Sc in the next 3 stitches, inc in the next stitch.
Repeat around.
30 sts
Round 6
Sc in the next 4 stitches, inc in the next stitch.
Repeat around.
36 sts
Round 7
Sc in the next 5 stitches, inc in the next stitch.
Repeat around.
42 sts
The bottom of the body should now have a rounded shape.
Step 2: Build the Body
Rounds 8–16
Sc in every stitch around.
42 sts
Continue working evenly without increasing.
The body should become slightly rounded through the middle.
Check the shape as you work.
Step 3: Shape the Upper Body
Round 17
Sc in the next 5 stitches, dec in the next 2 stitches.
Repeat around.
36 sts
Round 18
Sc in the next 4 stitches, dec.
Repeat around.
30 sts
Round 19
Sc in the next 3 stitches, dec.
Repeat around.
24 sts
Begin adding small amounts of stuffing.
Round 20
Sc in the next 2 stitches, dec.
Repeat around.
18 sts
Continue adding stuffing until the body has a soft, rounded shape.
Round 21
Sc, dec around.
12 sts
Round 22
Dec around.
6 sts
Add the final amount of stuffing.
Fasten off and use a tapestry needle to close the opening.
Weave in the yarn end.
Step 4: Crochet the Head
The head should be larger and rounder than the body.
Using orange yarn, make a magic ring.
Round 1
6 sc into the magic ring.
6 sts
Round 2
Inc around.
12 sts
Round 3
Sc, inc around.
18 sts
Round 4
Sc in the next 2 stitches, inc.
Repeat around.
24 sts
Round 5
Sc in the next 3 stitches, inc.
Repeat around.
30 sts
Round 6
Sc in the next 4 stitches, inc.
Repeat around.
36 sts
Round 7
Sc in the next 5 stitches, inc.
Repeat around.
42 sts
Round 8
Sc in the next 6 stitches, inc.
Repeat around.
48 sts
Step 5: Continue the Head
Rounds 9–17
Sc around.
48 sts
Keep the head rounded.
Do not stuff yet.
Step 6: Shape the Face
Round 18
Sc in the next 6 stitches, dec.
Repeat around.
42 sts
Round 19
Sc in the next 5 stitches, dec.
Repeat around.
36 sts
Round 20
Sc in the next 4 stitches, dec.
Repeat around.
30 sts
Round 21
Sc in the next 3 stitches, dec.
Repeat around.
24 sts
Begin stuffing the head.
Add stuffing slowly and shape the cheeks with your fingers.
Round 22
Sc in the next 2 stitches, dec.
Repeat around.
18 sts
Round 23
Sc, dec around.
12 sts
Round 24
Dec around.
6 sts
Add the final stuffing.
Fasten off.
Close the opening with a tapestry needle and weave in the end.
Step 7: Make the Ears
Make 2 ears using orange yarn.
Round 1
Make a magic ring.
6 sc into the ring.
6 sts
Round 2
Inc around.
12 sts
Round 3
Sc, inc around.
18 sts
Round 4
Sc in the next 2 stitches, inc around.
24 sts
Rounds 5–6
Sc around.
24 sts
Do not stuff the ears heavily.
Fasten off and leave a long sewing tail.
Flatten the ear gently.
Repeat for the second ear.
Step 8: Attach the Ears
Place the ears near the top of the head.
Position them slightly outward to create a relaxed cat shape.
Pin both ears before sewing.
Look at the head from the front and side.
Once you are happy with the placement, sew the ears securely to the head.
Weave the yarn through several stitches inside the head.
Step 9: Make the Legs
Make 2 legs using orange yarn.
Round 1
6 sc into a magic ring.
6 sts
Round 2
Inc around.
12 sts
Round 3
Sc, inc around.
18 sts
Rounds 4–6
Sc around.
18 sts
Round 7
Sc in the next 4 stitches, dec.
Repeat around.
15 sts
Rounds 8–12
Sc around.
15 sts
Lightly stuff the lower portion of the leg.
Round 13
Sc in the next 3 stitches, dec.
Repeat around.
12 sts
Rounds 14–15
Sc around.
12 sts
Fasten off.
Leave a long yarn tail.
Repeat for the second leg.
Step 10: Attach the Legs
Place both legs underneath the body.
Position them so the cat can sit upright.
Pin them in place.
Check that both legs are the same height.
Sew each leg securely to the body.
Make several passes with the tapestry needle to reinforce the attachment.
Step 11: Crochet the Arms
Make 2 arms.
Using orange yarn:
Round 1
6 sc into a magic ring.
6 sts
Round 2
Inc around.
12 sts
Rounds 3–10
Sc around.
12 sts
Lightly stuff the lower section.
Round 11
Sc in the next 2 stitches, dec.
Repeat around.
9 sts
Round 12
Sc around.
9 sts
Fasten off.
Leave a long sewing tail.
Repeat for the second arm.
Step 12: Attach the Arms
Place the arms on the sides of the body.
Position them approximately halfway between the head and the bottom of the body.
Pin both arms.
Check that they are at the same height.
Sew them firmly to the body.
Step 13: Crochet the Tail
The tail should remain flexible so it can curve naturally.
Using black yarn:
Round 1
6 sc into a magic ring.
6 sts
Round 2
Inc around.
12 sts
Round 3
Sc around.
12 sts
Change to orange yarn.
Rounds 4–12
Sc around.
12 sts
Lightly stuff the tip.
Continue working until the tail reaches approximately 10–14 cm.
Fasten off.
Leave a long sewing tail.
Avoid overstuffing the tail.
Step 14: Attach the Tail
Position the tail on the back of the body.
For a sitting cat, place it slightly toward one side.
Pin it in place.
Sew the base firmly to the body.
Curve the tail gently before securing the final stitches.
Step 15: Add the Eyes
You can use safety eyes or embroidered eyes.
For safety eyes, position them before completely closing the head if your particular eyes require access to the inside.
Place the eyes approximately around the middle of the face.
Keep them relatively close together for a cute, expressive appearance.
For a baby-safe decorative version, embroidered eyes can be used instead of plastic safety eyes.
Step 16: Create the White Eye Details
Use white yarn or embroidery thread.
Add small white areas around the eyes.
Keep both sides approximately symmetrical.
These details help create a more expressive cartoon-inspired face.
Step 17: Embroider the Nose
Use pink yarn or embroidery thread.
Create a small triangular nose.
Position it between the eyes and slightly below them.
Use several small stitches to build the shape.
Step 18: Embroider the Mouth
Using black embroidery thread, create a small curved mouth below the nose.
Add two short curved lines extending from the sides of the mouth.
Keep the lines neat and relatively small.
Step 19: Add the Cheeks
For a softer Garfield-inspired appearance, add rounded cheek details using a slightly lighter orange yarn.
You can crochet small circles and sew them onto the face.
Alternatively, use embroidery stitches to create subtle cheek shading.
Step 20: Add the Black Face Stripes
Using black yarn or embroidery thread, add short stripes on both sides of the face.
Make approximately 3 stripes per side.
Keep the stripes slightly curved.
Try to mirror the placement on the opposite cheek.
Step 21: Add the Body Stripes
Use black yarn to embroider short stripes along the sides and back of the body.
Place several stripes on each side.
Keep some space between the stripes.
Do not make every stripe exactly the same length.
This gives the finished amigurumi a more natural handmade appearance.
Step 22: Add the Leg Stripes
Add 2–3 short black stripes to each leg.
Work the stripes horizontally or with a slight curve.
Keep the design balanced on both legs.
Step 23: Add the Tail Stripes
Embroider several black stripes along the orange section of the tail.
Space them evenly.
Keep the black tip clearly defined.
Step 24: Add Optional Whiskers
Using black embroidery thread, add a few small whisker lines on each side of the face.
Keep them short and securely fastened.
For a plush toy intended for very young children, embroidered details are preferable to loose or detachable decorations.
Step 25: Assemble the Complete Amigurumi
Now check every part of the cat.
The head should be centered.
The ears should be even.
The eyes should be positioned correctly.
The arms should sit at the same height.
The legs should be balanced.
The tail should be firmly attached.
The facial embroidery should be secure.
The black stripes should look balanced.
Make any adjustments before trimming the remaining yarn ends.
Step 26: Shape the Amigurumi
Gently squeeze and shape the head.
Round out the cheeks.
Adjust the ears.
Shape the body into a comfortable sitting position.
Bend the tail into a soft curve.
Do not pull aggressively on any sewn pieces.
Step 27: Finish the Amigurumi
Weave every remaining yarn tail into the inside of the piece.
Pull gently.
Trim excess yarn.
Check all seams.
Inspect the eyes, face, limbs, and tail.
Your Garfield-inspired amigurumi is now complete.
Tips for Beginners
Keep your stitches tight and consistent.
Use a stitch marker at the beginning of every round.
Count your stitches frequently.
If you lose your stitch count, stop and check the previous round before continuing.
Stuff small amounts at a time.
Shape the head while adding stuffing.
Pin every piece before sewing.
Always check symmetry before permanently attaching pieces.
Use embroidery for facial details rather than trying to crochet extremely tiny pieces.
Take your time with the stripes because neat embroidery makes a big difference to the finished character.
How to Customize Your Amigurumi
Make a Smaller Cat
Use thinner yarn and a smaller hook.
Reduce the number of rounds in the head and body.
Make proportionally smaller ears, arms, legs, and tail.
Make a Larger Cat
Use thicker yarn and a larger hook.
Add additional rounds to the head and body.
Increase the size of all the other components proportionally.
Make a Sleepy Cat
Embroider half-closed eyes.
Lower the eyelids slightly.
Use a small curved mouth.
Make a Sitting Cat
Keep the body rounded.
Place the legs toward the front.
Attach the tail lower on the back.
Shape the tail along the side of the body.
Make a Mini Cat
Use cotton yarn with a 2–2.5 mm hook.
Reduce the number of rounds.
Use embroidered eyes and facial details.
This can create a small decorative amigurumi.
Color Ideas
Classic orange with black stripes
Orange with cream details
Pumpkin orange with dark brown
Orange with pink accents
Soft orange with white
Orange with mustard yellow
Orange with cream and black
The traditional visual combination for Garfield-inspired crochet is an orange body with black stripes and lighter facial accents. Similar published designs use this palette. Ravelry
Common Problems and Solutions
The Stuffing Is Showing
Your stitches are too loose.
Try using a smaller crochet hook.
The Head Looks Too Small
Add another increase round before beginning the straight rounds.
Make sure the body remains proportionally smaller than the head.
The Head Looks Too Long
Reduce the number of straight rounds before starting the decreases.
The Ears Are Uneven
Pin both ears before sewing.
Look at the amigurumi from the front, side, and top before securing them.
The Body Does Not Sit Properly
Check the position of the legs.
Move them slightly forward if necessary.
The Tail Is Too Stiff
Remove some stuffing.
The tail should contain enough stuffing to hold its shape while remaining flexible.
The Face Looks Uneven
Place the eyes and nose first using pins or removable markers.
Only embroider them permanently after you are satisfied with the placement.
Care Instructions
Spot clean the finished amigurumi whenever possible.
Use a damp cloth and mild soap.
Avoid soaking the toy unless the yarn manufacturer recommends it.
Allow the amigurumi to dry completely.
Do not use high heat.
Inspect the toy regularly for loose stitches, damaged seams, or detached parts.
Frequently Asked Questions
Is this Garfield amigurumi suitable for beginners?
Yes. The construction uses basic amigurumi techniques including single crochet, increases, decreases, stuffing, and sewing. Some published Garfield patterns are classified as beginner, while others are intermediate, so the difficulty depends on the specific design. Ravelry
What yarn should I use?
Medium-weight orange yarn is a good choice for a larger plush. Sport or DK-weight cotton can be used when you want a smaller and more defined amigurumi.
What crochet hook should I use?
A 3.0–3.5 mm hook is a good starting point for medium-weight yarn. For tighter amigurumi, choose a hook that creates firm stitches without visible gaps.
Do I need safety eyes?
No. You can use embroidered eyes instead. This is also a useful option when making a toy for a young child.
How much stuffing should I use?
Add stuffing gradually until the head and body are firm but not overly hard.
Can I change the colors?
Yes. You can change the orange shade or use different colors for the stripes and facial details.
Can I make this into a keychain?
Yes. Make a smaller version with thinner yarn and add an appropriate keychain attachment at the top. Make sure all components are securely attached.
Can I sell the finished amigurumi?
If you create your own original version, check the applicable rules concerning the commercial use of recognizable copyrighted characters and trademarks. Also respect the licensing terms of any third-party crochet pattern you use. This tutorial is an original Garfield-inspired construction rather than an official Garfield pattern.

