
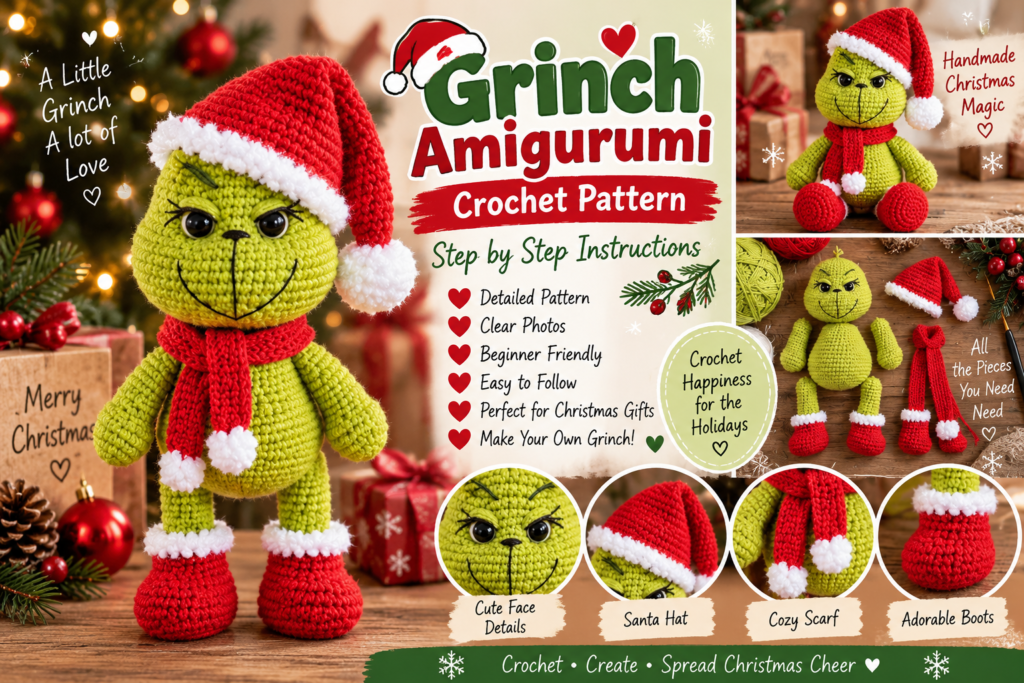
Bring some mischievous Christmas spirit to your crochet collection with this adorable Grinch Amigurumi Crochet Pattern! This cute handmade character features a bright green body, expressive embroidered face, tiny arms and legs, a classic red Santa hat, scarf, and festive red boots with fluffy white trim.
This project is perfect for Christmas decorating, handmade gifts, holiday craft fairs, or adding a fun character to your seasonal crochet collection.
Pattern note: This is an original, simplified crochet tutorial inspired by the pictured Grinch-style amigurumi. It is not an official licensed pattern. Adjust stitch counts according to your yarn, hook, tension, and desired finished size.
🎄 Grinch Amigurumi Details
- Project: Christmas Grinch-inspired amigurumi
- Skill Level: Beginner to Intermediate
- Technique: Amigurumi crochet
- Finished Size: Approximately 18–25 cm
- Main Color: Lime green
- Accent Colors: Red, white, black
- Crochet Terms: US terminology
- Construction: Head, body, arms, legs, boots, hat, and scarf
🧶 Materials
Yarn
You will need:
- Lime green yarn – head, body, arms, and legs
- Red yarn – Santa hat, scarf, and boots
- White yarn – hat and boot trim
- Black yarn – facial details
- Small amount of dark green yarn, optional
- Small amount of yellow yarn, optional
Other Supplies
- 2.5–3.5 mm crochet hook
- Polyester fiberfill
- Yarn needle
- Stitch marker
- Scissors
- Embroidery needle
- Optional safety eyes
Baby-Safe Option
If making the amigurumi for a young child, embroider the eyes instead of using plastic safety eyes or other small detachable pieces.
✂️ Crochet Abbreviations
- MR – Magic Ring
- ch – Chain
- sc – Single Crochet
- sl st – Slip Stitch
- inc – Increase
- dec – Decrease
- FO – Fasten Off
- BLO – Back Loop Only
Inc: 2 sc in the same stitch.
Dec: Crochet 2 stitches together.
💚 STEP-BY-STEP GRINCH AMIGURUMI

Step 1 — Crochet the Grinch Head
Start with lime-green yarn.
Round 1
Make a magic ring and work 6 sc into the ring.
Round 2
Increase in every stitch.
12 stitches
Round 3
Repeat:
1 sc, inc
around.
Round 4
Repeat:
2 sc, inc
around.
Continue increasing evenly until the head reaches your desired width.
For a larger Grinch, add an additional increase round.
Step 2 — Shape the Head
Work several rounds of single crochet without increasing.
This creates the rounded head.
Keep your stitches tight and even.
Begin adding small amounts of polyester stuffing.
Do not overstuff because the crochet stitches can become stretched.
Step 3 — Decrease the Head
Begin shaping the top of the head with decreases.
Try:
4 sc, dec
around.
Then:
3 sc, dec
around.
Continue decreasing until only a small opening remains.
Add the final amount of stuffing.
Close the opening and weave in the yarn tail.
😏 Step 4 — Create the Grinch Face
The facial expression gives this amigurumi its personality.
Use black yarn or embroidery thread to create:
- Two expressive eyes
- Dark eyebrows
- Small nose
- Curved smile
- Facial contour lines
For the characteristic mischievous expression, angle the eyebrows slightly downward toward the center.
Keep the face symmetrical while allowing the eyebrows to give the character a playful expression.
👀 Step 5 — Add the Eyes
You can use safety eyes or crochet/embroider the eyes.
For a more expressive look, create small embroidered eyelids around the eyes.
Use black yarn to add the eyelashes or eye details.
For a child-safe version, embroidered eyes are recommended.
💚 Step 6 — Crochet the Body
Using green yarn, begin with a magic ring.
Round 1
6 sc into the ring.
Round 2
Increase around.
Round 3
Repeat:
1 sc, inc
around.
Round 4
Repeat:
2 sc, inc
around.
Continue increasing until the body reaches the desired width.
Then work several rounds of sc without increases.
The body should be slightly smaller than the head at the neck and wider around the belly.
🧸 Step 7 — Stuff the Body
Add polyester fiberfill gradually.
Push the stuffing evenly into the lower and side sections.
Keep the body firm but soft.
Continue crocheting while stuffing.
Near the bottom, begin decreasing.
Close the opening securely.
💪 Step 8 — Crochet the Arms
Make two identical arms using green yarn.
Start with a magic ring.
Work several rounds of single crochet.
Gradually increase near the top if necessary.
Keep the arms narrow and slightly tapered.
Stuff lightly.
Decrease near the wrist and close.
Repeat for the second arm.
🖤 Step 9 — Add Hand Details
Use black or dark-green yarn to add small lines representing fingers.
Only a few stitches are needed.
Keep these details subtle so the hands remain soft and simple.
🦵 Step 10 — Crochet the Legs
Create two green legs.
Begin with a magic ring.
Work several rounds of single crochet.
Increase slightly around the upper leg.
Continue until the leg reaches your desired length.
Stuff lightly.
Leave enough opening at the bottom to attach the red boots.
Repeat for the second leg.
❤️ Step 11 — Crochet the Red Boots
Using red yarn, crochet two small boot shapes.
Begin with a magic ring.
Work several rounds of sc while increasing enough to create a rounded foot.
Continue upward to form the boot.
Add a few rounds of red yarn.
Stuff lightly.
🤍 Step 12 — Add the White Boot Trim
Switch to white yarn.
Work one or two rounds around the top of each boot.
For a fluffy appearance, use slightly taller stitches or a simple shell border.
The white trim should contrast clearly against the red boot.
🧵 Step 13 — Attach the Legs to the Body
Place the two legs underneath the body.
Position them evenly.
Sew each leg securely using green yarn.
For a sitting Grinch, angle the legs slightly outward.
For a standing Grinch, position them straight underneath the body.
🧸 Step 14 — Attach the Arms
Place one arm on each side of the body.
Sew them securely near the shoulders.
You can angle the arms slightly outward to create a playful pose.
Make several passes with the yarn needle to reinforce the attachment.
🎅 Step 15 — Crochet the Santa Hat
Start with red yarn.
Create a magic ring.
Work a small number of sc stitches.
Continue crocheting in rounds while gradually increasing.
As the hat grows, maintain fewer increases so that it develops into a cone.
Continue until the hat is tall enough to cover the top of the Grinch’s head.
🤍 Step 16 — Add the White Hat Border
Switch to white yarn.
Work one or two rounds of single crochet around the bottom of the hat.
For a fluffy-looking border, add a shell or bobble-style edge.
The border should sit comfortably around the Grinch’s head.
⚪ Step 17 — Make the Hat Pom-Pom
Using white yarn, create a small crochet ball.
Alternatively, make a tiny yarn pom-pom.
Attach it securely to the tip of the red hat.
For baby-safe projects, sew the pom-pom firmly rather than using a loose decorative piece.
🎀 Step 18 — Crochet the Christmas Scarf
Using red yarn:
- Chain approximately 35–50 stitches.
- Work single crochet back across the chain.
- Add another row or two if you want a wider scarf.
- Fasten off.
Make two small white pom-poms or tassels.
Attach them to the ends of the scarf.
🧣 Step 19 — Wrap the Scarf Around the Grinch
Place the scarf around the neck.
Cross the two ends in front.
Sew a tiny stitch at the back if you want the scarf to remain in position.
Alternatively, leave it removable.
🎄 Step 20 — Add the Hat and Accessories
Place the Santa hat on the Grinch’s head.
Adjust the angle slightly for a playful appearance.
Add the scarf around the neck.
Check that both accessories sit naturally.
🖤 Step 21 — Add Extra Grinch Details
For more character, add a few dark-green or black embroidered details around:
- Eyebrows
- Mouth
- Cheeks
- Hands
- Feet
Keep the details subtle.
The expressive face should remain the main focus.
🧵 Step 22 — Final Assembly
Check the entire amigurumi.
Make sure:
- Head is secure
- Body is firmly closed
- Arms are attached
- Legs are secure
- Boots are firmly attached
- Hat is secure
- Scarf is positioned correctly
- Facial details are reinforced
Hide every loose yarn tail inside the crochet pieces.
🎄 Optional: Add a Hanging Loop
Want to turn your Grinch into a Christmas ornament?
Attach green or red yarn to the top of the hat.
Chain approximately 12–15 stitches.
Join the chain back to the starting point with a slip stitch.
Fasten securely.
Now your amigurumi can hang from a Christmas tree.
✨ Finishing and Shaping
Once everything is assembled, gently shape the head, body, arms, and legs with your fingers.
Adjust the stuffing if necessary.
Straighten the hat and scarf.
Your Christmas Grinch amigurumi is ready!
🎨 Grinch Color Ideas
Classic Christmas
- Lime green
- Bright red
- White
- Black
Soft Christmas
- Sage green
- Burgundy
- Cream
- Dark brown
Whimsical Grinch
- Bright green
- Candy red
- Snow white
- Purple
Rustic Christmas
- Olive green
- Deep red
- Ivory
- Brown
🧶 Beginner Tips
Keep your stitches tight
Small amigurumi pieces look best when the stuffing doesn’t show through.
Use a stitch marker
Place it at the beginning of every round.
Count regularly
One extra or missing stitch can change the shape dramatically.
Stuff gradually
Adding small amounts of stuffing gives you better control over the shape.
Reinforce sewn pieces
Arms, legs, and accessories should be attached with several secure stitches.
Embroider facial details carefully
The face determines the personality of your finished Grinch.
🎁 Ways to Use Your Grinch Amigurumi
This cute Christmas character can be used as:
- Christmas tree decoration
- Shelf decoration
- Handmade holiday gift
- Christmas stocking stuffer
- Desk decoration
- Holiday centerpiece
- Bag charm
- Nursery or children’s room decoration
- Handmade craft-fair item
You can also make several Grinch-inspired characters in different sizes.
❓ Frequently Asked Questions
Is this Grinch amigurumi suitable for beginners?
Yes. The main components use basic amigurumi techniques such as single crochet, increases, decreases, stuffing, and sewing. The facial details and accessories may require a little extra practice.
What yarn should I use?
A smooth worsted or DK-weight yarn works well. Cotton or acrylic yarn can both produce good results.
How do I make the Grinch larger?
Use thicker yarn and a larger hook, or add additional increase and body rounds.
Can I make the Grinch without the Santa clothes?
Absolutely. You can create a simple green character and add other seasonal accessories later.
Can I make the face child-safe?
Yes. Embroider the eyes and facial details with yarn instead of using plastic eyes or other small detachable parts.
Can I turn the Grinch into a Christmas ornament?
Yes! Add a secure crochet loop to the top of the hat.
❤️ Final Thoughts
This Grinch Amigurumi Crochet Pattern is a fun Christmas project filled with festive details. The bright green body, expressive face, red Santa hat, cozy scarf, and little red boots create an adorable handmade holiday character.
Whether you’re making one for your Christmas tree, creating a special handmade gift, or adding a cheerful piece to your holiday décor, this project is easy to personalize. Try different yarn colors, facial expressions, sizes, and accessories to create your own unique Christmas crochet character.
SEO Keywords: Grinch Amigurumi Crochet Pattern, Grinch crochet pattern, Christmas amigurumi, crochet Grinch, free Christmas crochet pattern, crochet Christmas ornament, Grinch plush crochet, easy amigurumi pattern, beginner crochet Christmas, crochet holiday decor, handmade Christmas gift, crochet Christmas toy, Christmas crochet ideas, crochet character pattern, festive amigurumi.

