
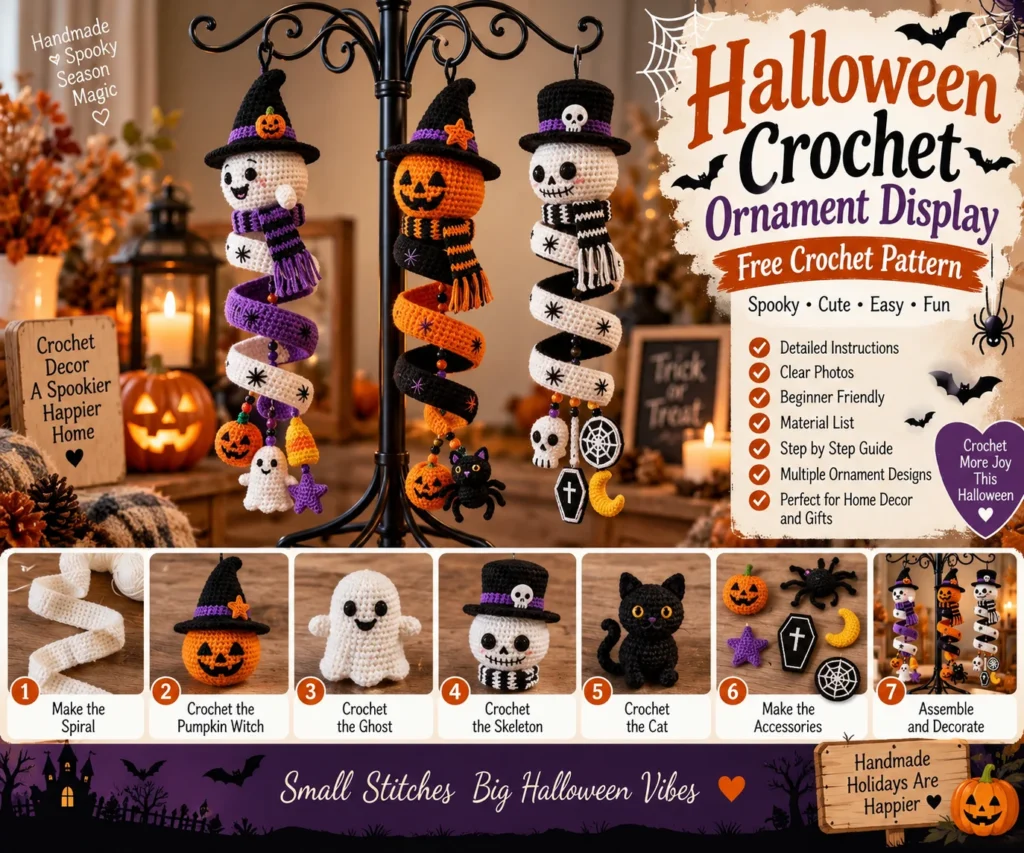
Create a spooky and charming focal point for your home with this Halloween Crochet Ornament Display. This creative crochet project combines spiral hanging ornaments with classic Halloween characters such as ghosts, pumpkins, skeletons, bats, spiders, and witches.
The finished display can be arranged on a decorative stand, coat rack, shelf, mantel, or tabletop tree. With black, orange, purple, and white yarn, you can create a coordinated Halloween decoration that adds handmade personality to your autumn home décor.
This is an original, adaptable crochet project inspired by the visual reference. The exact dimensions and stitch counts can be adjusted according to your preferred yarn, hook size, and display space.
Halloween Crochet Ornament Display
This Halloween decoration is built around several long spiral crochet strands decorated with small seasonal amigurumi and ornaments.
The main display can feature:
A witch
A pumpkin
A ghost
A skeleton
A bat
A spider
Small Halloween charms
A coffin
A crescent moon
The spiral strands create movement and allow the individual ornaments to hang at different heights.
Materials Needed
Black worsted-weight yarn
White or cream worsted-weight yarn
Orange worsted-weight yarn
Purple worsted-weight yarn
Green worsted-weight yarn
Small amount of yellow yarn
Small amount of pink yarn
Small amount of gray yarn
Crochet hook suitable for your yarn
Fiberfill stuffing
Black embroidery thread
White embroidery thread
Yarn needle
Scissors
Stitch markers
Black craft wire or floral wire, optional
Small metal rings
Thin hanging cord
Small wooden or plastic beads, optional
Fabric stiffener, optional
Decorative display stand or coat rack
Finished Size
The finished display can be customized to suit your space.
A typical individual spiral strand can measure approximately 40–70 cm long.
Small Halloween ornaments can measure approximately 4–10 cm.
For a larger wall or mantel display, simply make longer spirals and larger ornaments.
Crochet Abbreviations
MR — magic ring
ch — chain
sc — single crochet
hdc — half double crochet
dc — double crochet
sl st — slip stitch
inc — increase
dec — decrease
st — stitch
sts — stitches
BLO — back loop only
FO — fasten off
How to Crochet the Spiral Ornament Strand
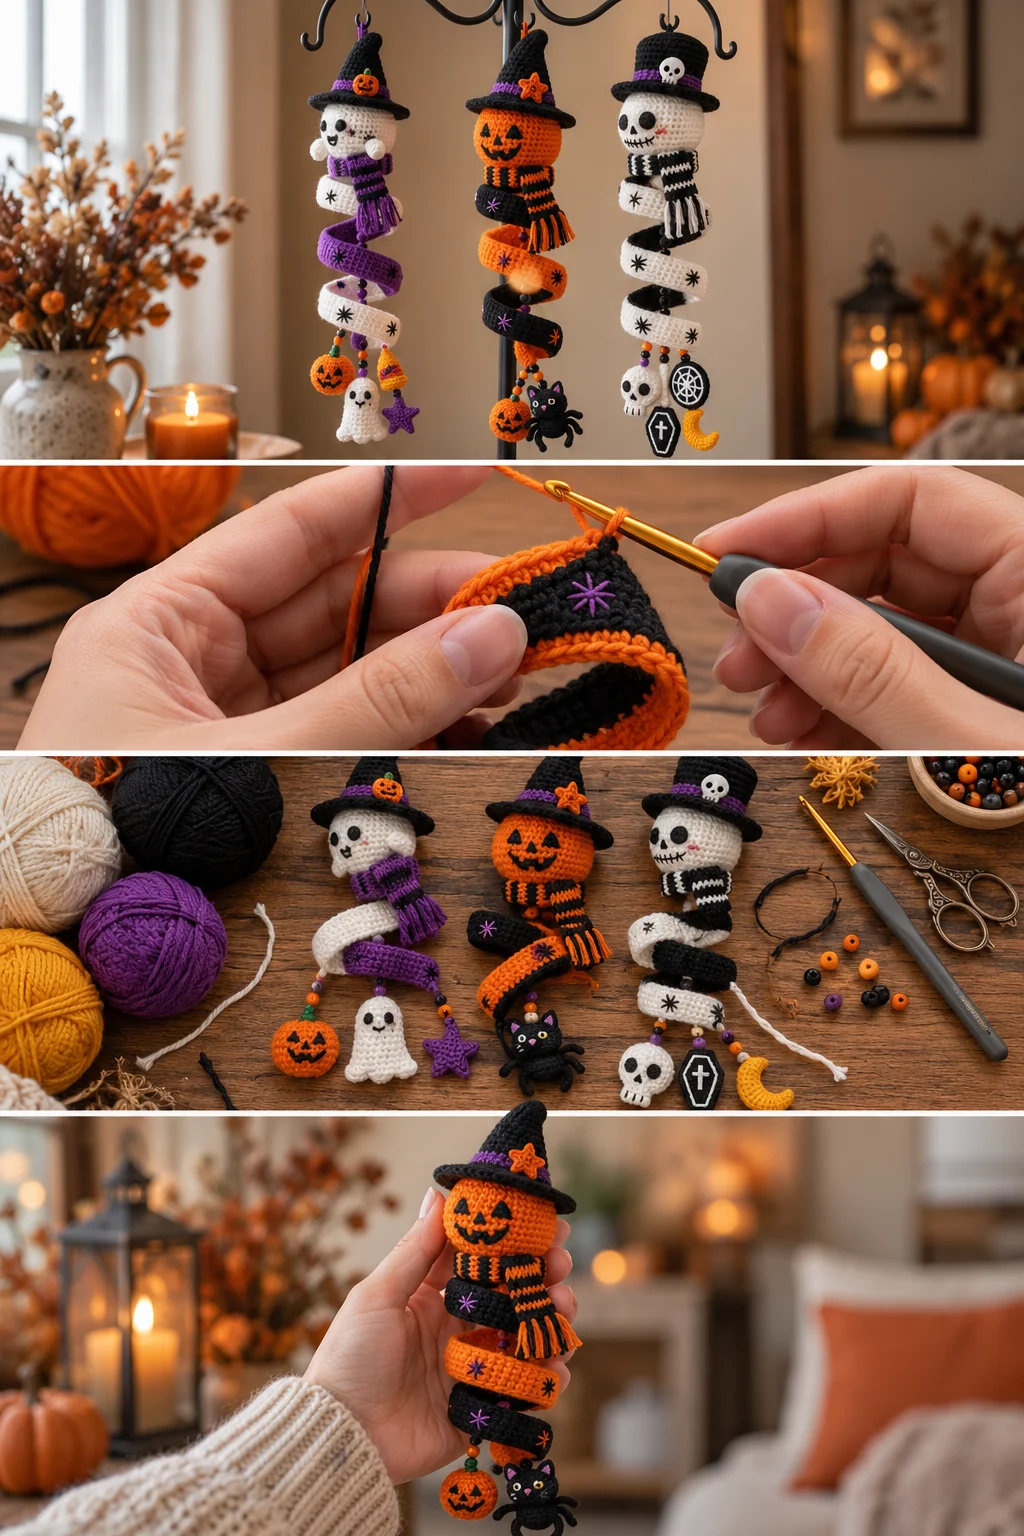
The spiral strand is the foundation of the display.
Use black, white, orange, or purple yarn depending on the Halloween color scheme.
Step 1: Create the Foundation Chain
Chain approximately 70–100 stitches.
For a longer decoration, add more chains.
For a shorter hanging ornament, use fewer chains.
Step 2: Crochet the First Row
Starting in the second chain from the hook, work 1 sc across the chain.
Chain 1 and turn.
Step 3: Create the Curl
Work 2 sc into each stitch across the row.
As the number of stitches increases, the strip will naturally begin curling.
Continue until the desired spiral shape forms.
Step 4: Shape the Spiral
Gently twist and arrange the crochet strip into a spiral.
If the spiral is too loose, add more increases.
If it curls too tightly, reduce the number of increases.
Fasten off and weave in the yarn tail.
Step 5: Add a Hanging Loop
At the top of the spiral, create a small chain loop.
Join it with a slip stitch.
This loop allows the finished decoration to hang from a hook or display stand.
How to Make a Crochet Halloween Ghost
Use white yarn.
Round 1
Make a magic ring.
Work 6 sc into the ring.
6 sts
Round 2
Work 2 sc in every stitch.
12 sts
Round 3
Repeat:
1 sc, inc.
18 sts
Round 4
Repeat:
2 sc, inc.
24 sts
Rounds 5–8
Work 1 sc around.
24 sts
Begin stuffing lightly.
Round 9
Repeat:
2 sc, dec.
18 sts
Round 10
Repeat:
1 sc, dec.
12 sts
Round 11
Dec around.
Fasten off and close.
Add two black embroidered eyes and a small mouth.
Ghost Bottom
For a wavy ghost shape, work several small increases and decreases along the bottom edge.
This creates gentle points that resemble a flowing ghost sheet.
How to Crochet a Mini Pumpkin
Use orange yarn.
Round 1
Make a magic ring.
Work 6 sc.
Round 2
Increase around.
12 sts
Round 3
Repeat:
1 sc, inc.
18 sts
Round 4
Repeat:
2 sc, inc.
24 sts
Rounds 5–7
Work 1 sc around.
24 sts
Round 8
Repeat:
2 sc, dec.
18 sts
Round 9
Repeat:
1 sc, dec.
12 sts
Stuff with fiberfill.
Round 10
Dec around.
Close the opening.
Pumpkin Details
Use brown or black yarn to create the stem.
Add a small green leaf.
Use black embroidery thread to create a jack-o’-lantern face.
For a tiny hanging pumpkin, attach a small metal ring to the top.
How to Crochet a Mini Skeleton
Use white yarn for the skull and black yarn for the body.
Skeleton Head
Make a small round head.
Round 1
MR with 6 sc.
Round 2
Increase around.
12 sts
Round 3
Repeat:
1 sc, inc.
18 sts
Rounds 4–5
Work 1 sc around.
18 sts
Round 6
Repeat:
1 sc, dec.
12 sts
Stuff lightly.
Close the opening.
Skeleton Face
Embroider two dark eye sockets.
Add a small nose.
Use black thread to create a stitched mouth.
Add several short vertical lines across the mouth.
Skeleton Body
Use black yarn.
Create a narrow stuffed body using approximately 10–12 rounds of sc.
Add white embroidered bones down the front.
Attach small arms and legs.
Sew the skull onto the body.
How to Make a Crochet Bat
Use black or purple yarn.
Create a small round body using the same basic amigurumi construction.
Add two pointed ears.
Crochet two small wings separately.
Sew the wings onto the back.
Add embroidered eyes and a tiny mouth.
Attach a small loop at the top.
The bat can be placed near the bottom of a spiral for additional movement.
How to Crochet a Spider
Use black yarn.
Create a small round body.
Body
Make a magic ring.
Work 6 sc.
Increase to approximately 18 stitches.
Work several even rounds.
Decrease gradually.
Stuff and close.
Spider Legs
Cut or crochet eight thin legs.
Arrange four legs on each side.
Sew them firmly onto the body.
For a softer decoration, crochet the legs using chains and slip stitches.
For a more structured spider, flexible craft wire can be placed inside the crocheted legs.
How to Make a Crochet Witch Ornament
Use purple, black, orange, and cream yarn.
Create a small stuffed body.
Add a cream-colored face.
Crochet a black pointed witch hat.
Add a purple hat band.
Create small orange or purple hair strands.
Embroider simple eyes and a small smile.
Attach the witch to one of the spiral strands.
How to Crochet a Halloween Coffin
Use black or dark purple yarn.
Chain 10.
Work sc across.
Gradually decrease at the top and bottom to create a coffin-shaped silhouette.
Add a purple or white cross using embroidery thread.
Attach a small hanging loop.
This tiny coffin makes an effective spooky accent between the larger ornaments.
How to Make a Crochet Crescent Moon
Use yellow or gold yarn.
Crochet a small curved crescent shape using increases and decreases.
Alternatively, create a yellow circle and embroider a curved inner section to form the crescent shape.
Add a hanging loop.
Place the moon near a ghost, bat, or witch.
Halloween Ornament Assembly
Once the individual ornaments are finished, arrange them across the spiral strands.
Place larger ornaments higher on the display.
Add smaller charms toward the bottom.
Alternate the colors to create visual balance.
For example:
Black spiral
Orange pumpkin
White ghost
Purple bat
Black spider
White skeleton
Orange moon
Purple witch
This creates a balanced Halloween color palette.
Step-by-Step Halloween Display
Step 1: Choose Your Color Palette
Select your main Halloween colors.
Black, orange, purple, and white create a traditional seasonal appearance.
Step 2: Crochet the Spiral Strands
Create several spiral strips in different colors.
Step 3: Make the Halloween Characters
Crochet pumpkins, ghosts, skeletons, bats, spiders, witches, and other small ornaments.
Step 4: Add Facial Details
Embroider eyes, mouths, stitches, and other character features.
Step 5: Create Hanging Loops
Add a small loop to each ornament.
Step 6: Attach the Ornaments
Secure each character to a spiral strand using yarn or small metal rings.
Step 7: Arrange the Spiral Strands
Hang the spirals at different heights.
Step 8: Balance the Colors
Distribute orange, purple, black, and white decorations evenly.
Step 9: Add Extra Charms
Attach small bats, pumpkins, stars, moons, spiders, or ghosts.
Step 10: Display Your Finished Decoration
Hang the completed display from a decorative stand, coat rack, mantel, shelf, or sturdy wall hook.
How to Attach the Ornaments
There are several ways to attach the crochet decorations.
Crochet Loop
Create a small chain loop at the top of each ornament.
Thread it directly onto the spiral.
Metal Ring
Attach a small metal ring to the ornament.
Connect it to the spiral using another ring.
Embroidery Thread
For lightweight ornaments, use strong yarn or embroidery thread to tie the ornament directly to the spiral.
Make sure every connection is secure before hanging the finished display.
Creating Different Spiral Lengths
A layered display looks more interesting when the strands are different lengths.
Make some spirals approximately 40 cm long.
Make others approximately 50 cm.
Use one or two longer spirals around 60–70 cm.
This allows the ornaments to hang at different levels.
How to Keep the Spirals in Shape
If your crochet spiral becomes too loose, lightly block it.
You can also apply a small amount of fabric stiffener.
Allow the piece to dry completely before attaching ornaments.
Do not use excessive stiffener because the crochet should retain some flexibility.
Halloween Color Combinations
Classic Halloween
Black
Orange
Purple
White
Gothic Halloween
Black
Dark purple
Gray
Burgundy
Cute Halloween
Lavender
Orange
Cream
Pink
Black
Vintage Halloween
Cream
Rust orange
Brown
Muted green
Black
Decorating Ideas
The finished Halloween Crochet Ornament Display can be used in many areas of your home.
Place it on a mantel.
Hang it from a decorative coat rack.
Display it beside your entryway.
Use it as a Halloween party backdrop.
Place it on a large shelf.
Hang it near a fireplace.
Use it as a seasonal centerpiece.
Create multiple displays around your home.
Tips for Making a Professional-Looking Display
Keep the spiral widths consistent.
Use the same yarn weight throughout the project.
Choose a limited color palette.
Place the largest ornaments near the center.
Use smaller ornaments toward the bottom.
Leave enough space between hanging pieces.
Secure every ornament carefully.
Hide all yarn ends.
Keep the overall display visually balanced.
How to Make the Display Larger
For a larger Halloween decoration, create additional spiral strands.
Make longer spirals.
Use larger amigurumi characters.
Add more pumpkins, bats, ghosts, and skeletons.
A large display can cover an entire mantel or become a dramatic seasonal wall decoration.
How to Make a Mini Halloween Display
Use thinner yarn.
Make shorter spirals.
Create miniature pumpkins and ghosts.
Use small hanging rings.
Place the finished decoration on a tabletop stand.
A miniature version is also useful for decorating a child’s room, craft room, office, or small apartment.
Storage After Halloween
Before storing your crochet display, remove all detachable metal pieces if possible.
Dust the ornaments gently.
Allow everything to dry completely.
Store the spirals loosely rather than tightly compressing them.
Place the decoration inside a clean storage container.
Keep it away from moisture and excessive heat.
Avoid placing heavy decorations on top of the crochet pieces.
Frequently Asked Questions
Is this Halloween Crochet Ornament Display beginner friendly?
The spiral strands and simple ornaments are suitable for adventurous beginners, while the more detailed characters may be easier for intermediate crocheters.
What yarn should I use?
Acrylic or cotton-blend worsted-weight yarn works well for most of the ornaments. Cotton gives crisp stitch definition, while acrylic creates a softer decoration.
How many spiral strands should I make?
You can make as few as three strands for a small display or create five to seven strands for a fuller arrangement.
Can I use different Halloween characters?
Yes. You can replace any of the suggested decorations with pumpkins, bats, cats, witches, ghosts, skeletons, moons, stars, spiders, or other Halloween motifs.
How do I make the spirals longer?
Simply increase the length of the foundation chain and continue crocheting the strip.
Can I make the display without a coat rack?
Yes. The spiral ornaments can be attached to a wooden dowel, decorative branch, wall-mounted hooks, curtain rod, mantel, or other secure display structure.
How do I keep small ornaments from falling off?
Use secure hanging loops or small metal rings and reinforce the attachment points with several stitches.
Can I sell finished Halloween crochet displays?
If you create your own original finished decorations, you can determine how you use them. If you work from another designer’s pattern, check that designer’s terms regarding finished-item sales.
Final Thoughts
This Halloween Crochet Ornament Display is a creative way to turn small crochet projects into one coordinated seasonal decoration. The combination of spiral strands, spooky characters, pumpkins, ghosts, skeletons, bats, spiders, and witches creates a playful display with plenty of personality.
You can keep the design simple with a few ornaments or build a large statement piece filled with different Halloween characters. Experiment with colors, spiral lengths, and ornament placement to create a display that fits your own Halloween decorating style.

