
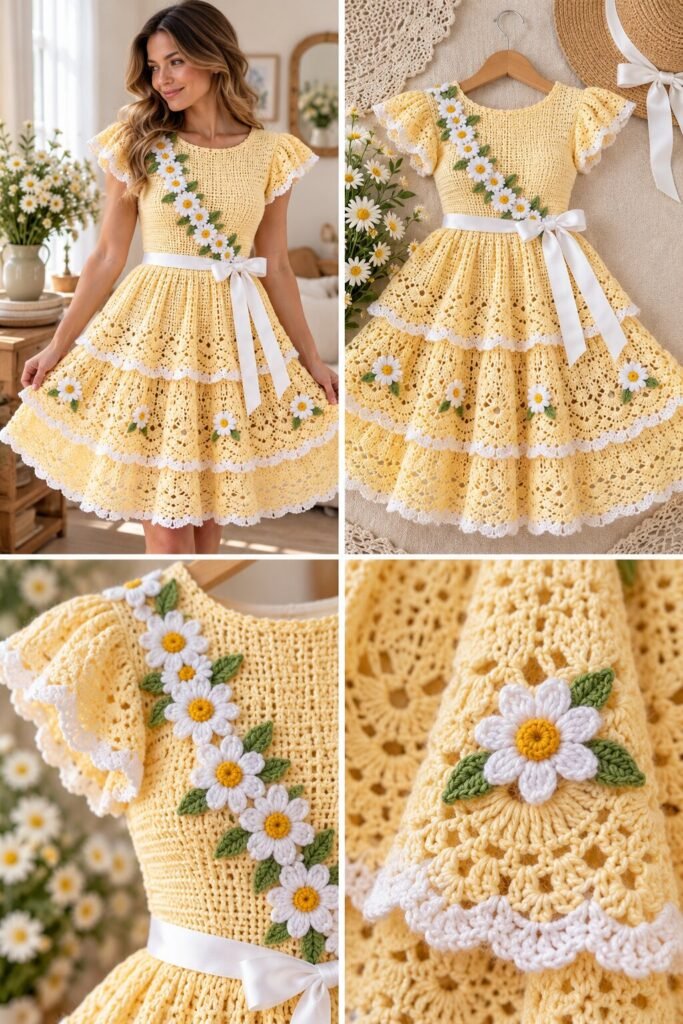
A pale lemon-yellow dress with a closed round neckline, ruffled flutter sleeves, and a fitted bodice in a tight mesh-like stitch. A diagonal line of small white daisies with yellow centers and green leaves runs from the left shoulder down across the chest to the waist, where a wide white satin ribbon ties into a bow with long tails. Below the waist, the skirt falls in three lacy tiers, each edged in white scallops, with a few more daisies scattered across the lower tiers.
The daisy trail is what keeps the dress from being just a tiered skirt. It runs on a diagonal rather than straight down, so it breaks up the bodice and leads the eye to the bow. The white scalloped trim does a similar job at the sleeves and at every tier edge, outlining the layers in a way that makes the skirt look lighter than the yellow alone would.
This suits someone who has made a lace skirt or a basic fitted bodice and wants to put the two together, with small flowers as the finishing practice. Nothing here is exotic, but the number of tiers and edgings adds up.
Reading the Construction
The bodice fabric looks like a dense grid, with a faint woven look. That usually points to a stitch such as single crochet worked in the back loop, or a mesh of tight chain spaces, worked in rows or rounds to hold a fitted shape. The neckline is a plain round with no visible trim, and the sleeves look like short cap shapes with extra stitches added along the edge to create the ruffle, finished with a white scalloped round.
The skirt tiers show a fan or shell lace, with the repeats clearly visible in the close-up and open spaces between the clusters. Each tier looks like it was worked down from a point on the previous one, with more stitches added at the join for fullness, rather than gathered on afterward. The white edging on each tier looks like a small shell or picot round worked in a second color.
The daisies are separate motifs: a white five- or six-petal flower around a yellow center, with small green leaves tucked beside each one. They appear to be sewn on after the dress is finished. The waist ribbon looks like satin rather than crocheted cord, and is probably woven through a row of open spaces or simply tied around the waistline.
Materials You’ll Need
- Pale lemon yarn for the dress (a cotton or cotton blend is a reasonable suggestion, since it holds the lace and the tier edges)
- White yarn for the scalloped trim and daisy petals
- Small amounts of golden yellow and green yarn for the daisy centers and leaves
- Wide white satin ribbon for the waist sash
- A crochet hook sized to your yarn (see below)
- Yarn needle for weaving in ends and sewing on daisies
- Scissors
- Stitch markers, helpful for tracking tier joins and increase points
- A tape measure, since fit depends on your own measurements
- A hidden zipper or button closure, if the neckline is too snug to pull over the head
Yarn and Hook Notes
The lace repeats look fine and crisp, so a DK weight cotton is a sensible starting point, with a hook roughly in the 3mm to 4mm range. Use a slightly smaller hook for the bodice so it stays firm, and a size larger for the skirt lace so it drapes. Swatch both stitches, block the swatches, and measure gauge afterward, because lace changes a lot once wet.
Choose the white and yellow yarns in the same weight so the trim sits cleanly on the tier edges.
Skill Level
Intermediate. The skirt lace is repetitive and forgiving. The harder parts are fitting a closed neckline and bodice without a visible opening, adding even fullness at each tier join, and making the sleeve ruffles match. The daisies are small but need consistent sizing.
Stitches Likely Involved
- Chain (ch): lace spaces, foundation rows, and daisy centers
- Slip stitch (sl st): joining rounds and moving across stitches
- Single crochet (sc): bodice, trim, and daisy centers
- Double crochet (dc) and treble crochet (tr): the shell or fan lace in the skirt
- Back loop only (BLO): a possible way to get the bodice texture
- Shell or picot stitch: the white scalloped edging
- Magic ring: starting daisy centers
- Increase (inc) and decrease (dec): shaping the bodice, sleeves, and each tier
Building It: A Practical Sequence
Swatch the bodice stitch and the lace and decide your hook sizes.
Work the bodice to your measurements, shaping the neckline and armholes, and try it on before moving down.
Add the sleeves. Work short caps and add extra stitches along the bottom edge to create the ruffle.
Begin the first skirt tier at the waist. Increase evenly for fullness and work the shell or fan lace to your chosen length.
Add the white scalloped edge to the first tier before starting the second, so you can see how the trim sits.
Attach the lower tiers. Work each one from a point on the tier above, adding extra stitches at the join, and finish each with its own white edge.
Make the daisies and leaves. Crochet a batch, then pin them in a diagonal line on the bodice and scatter a few on the skirt before stitching.
Finish and block. Weave in ends, block the skirt flat to open the lace, and tie the satin ribbon at the waist.
Adjusting the Fit and Look
Bust and waist fit come from your own measurements and gauge. The skirt is the easy part to adjust: more tiers for a longer, fuller dress, or two tiers for a shorter one. The daisy trail can be shortened or lengthened to suit the bodice. The same construction would work in sage with cream daisies, or pale blue with white. For a quicker version, skip the daisies and keep the scalloped edges.
Where It’s Easy to Go Wrong
Uneven tier increases. The hem will lean. Mark the join round with stitch markers and count at the end of each round.
A bodice with no ease. A closed neckline can be hard to get over the head. Test the fit or add a button or zipper opening.
Sleeve ruffles that differ. Make both at once and compare them side by side.
Daisies of different sizes. Make them in one sitting with the same tension.
A ribbon that slips. Sew a few small stitches to hold the bow at the front, or thread the ribbon through open spaces.
Skipping blocking. Lace looks scrunched off the hook. Pin out the scallops and the tier edges.
Care
Hand wash in cool water and lay flat to dry, reshaping while damp. Remove the satin ribbon before washing. Avoid hanging the dress wet, since the tiers can stretch, and keep it away from high heat. Follow the yarn label.
Common Questions
Is this a beginner project?
Not really. The fitted bodice and the number of lace tiers are better suited to intermediate crocheters.
Do I need the ribbon?
No. A crocheted tie works as well, though satin gives the crisp bow shown here.
Can I make it with fewer tiers?
Yes. Two tiers still give a full skirt and are quicker.
How many daisies do I need?
It depends on your bodice size. Make a batch, arrange them first, and add more only if the line looks sparse.

