Introduction
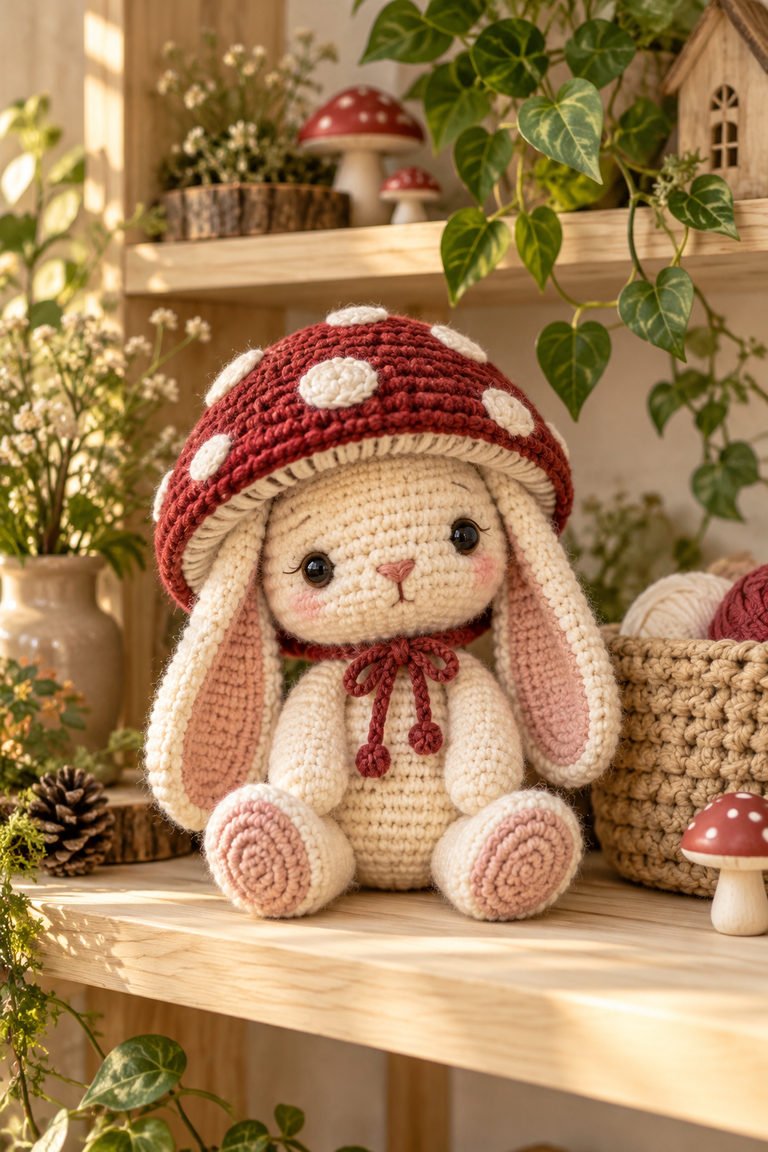
Meet a sweet woodland-inspired crochet bunny wearing a red mushroom-cap hood dotted with creamy spots. The reference image shows a seated cream bunny with long blush-lined ears, rounded paws, a simple embroidered face, and a generous mushroom cap. Its soft colors and expressive shape make it a charming handmade plush and a lovely gift idea.
This article is an original image-based design and construction guide, not a tested, counted pattern. The photo does not show stitch counts, yarn label, hook size, gauge, or finished dimensions. Use the visible features as inspiration and follow a complete size-specific amigurumi pattern or your own tested calculations for exact instructions.
Why You’ll Love This Mushroom Bunny
- A memorable woodland character: The mushroom hood turns a classic bunny plush into a playful forest friend.
- Soft, appealing colors: Cream, red, ivory, and blush create a warm palette that is easy to adapt.
- A useful amigurumi project: The design gives you room to practice shaping, stuffing, embroidery, and sewing parts together.
- Easy to personalize: Change the mushroom color, ear length, expression, or spot arrangement to make a one-of-a-kind bunny.
Skill Level
Plan for a beginner to confident beginner if you already know basic crochet stitches and can work in the round. Amigurumi shaping, neat stuffing, attaching separate pieces, and making a fitted mushroom cap add care and patience. If you are new to crochet, practice single crochet in a spiral and invisible decreases on a small swatch before making the toy.
Materials
- Smooth yarn in cream or warm ivory for the bunny
- Red or cranberry yarn for the mushroom cap
- Small amounts of ivory for the cap spots and blush yarn for the inner ears
- Black or dark brown embroidery thread for facial details
- Crochet hook selected to create a firm fabric with your yarn
- Fiberfill stuffing
- Stitch marker for tracking rounds
- Tapestry needle, scissors, and pins for assembly
- Optional safety eyes, only when appropriate for the intended recipient
For toys intended for babies or very young children, embroidered eyes and facial details are a safer alternative to small hard parts. Secure all sewn features firmly and supervise play.

Yarn Recommendations
A smooth, tightly spun acrylic or cotton-blend yarn is a practical choice because it shows stitch definition and is easy to handle while shaping small pieces. A soft worsted-weight yarn is one possible option for a palm-sized plush, but the photo does not identify yarn weight or fiber. Choose yarn first, then make a small swatch and adjust your hook so the stuffing will not show through the fabric.
Use yarns with similar thickness for the bunny, cap, spots, and inner ears. A very different thickness can make the appliques pucker or the cap sit unevenly. Check the care labels if you want the finished toy to be washable.
Hook Size
The hook size cannot be identified from the image. Start with the recommendation on your yarn label, then test a small amigurumi swatch. The stitches should be even and firm enough to hold stuffing without large gaps, while still feeling comfortable to work. Adjust the hook as needed; no specific size is implied here.
Gauge
There is no numeric gauge in the reference image. Amigurumi is usually worked to a firm fabric rather than a garment measurement. Make a small sample in the round, lightly stretch it, and check that the spaces between stitches stay closed. Your yarn, hook, tension, and stuffing will determine the finished scale.
Finished Measurements
The photo has no scale, so it cannot establish the bunny’s height or width. Decide how large you want the plush to be, then record the finished height including the ears and cap, the seated body height, and the cap width. If you adapt an existing pattern, follow its size guidance and remember that a larger hook or thicker yarn will change the result.
Crochet Abbreviations
These common abbreviations use US crochet terminology. They are a general reference, not a stitch key for this pictured bunny.
- ch — chain
- sl st — slip stitch
- sc — single crochet
- inc — increase
- dec — decrease
- st(s) — stitch(es)
- MR — magic ring
- BLO / FLO — back loop only / front loop only
- FO — fasten off
Construction Overview
The image suggests a rounded bunny head and body, long ears with blush centers, small limbs, a sweet face, and a domed red mushroom cap with light spots. A common amigurumi construction approach is to crochet stuffed components in the round, make the cap and spots separately, and sew the parts together. The image does not reveal whether the head and body are joined, worked as one piece, or assembled from separate shapes, so choose a method from a complete pattern that matches your experience.
Step-by-Step Guidance From the Image
These steps describe a reasonable workflow based on visible details. They are not row-by-row directions, and no stitch counts, exact shaping, or finished size are provided.
1. Choose the yarn palette and toy size
Pick a main cream shade, a red or cranberry cap color, an ivory spot color, and optional blush for the ear centers. Decide on the finished scale and whether the toy is decorative or intended for supervised play.
2. Test your hook and fabric
Make a small sample in the round using your chosen yarn. Adjust the hook until the crochet fabric is firm enough to contain stuffing. Keep the tension consistent, especially if you are using a dark cap color against a light bunny.
3. Crochet the bunny shapes
Use a complete amigurumi pattern or your own tested method to form the rounded head and body, small arms and feet, and long ears shown in the photo. If the ears are made in two colors, attach or crochet the blush inner panels before closing them. Stuff shapes gradually so they stay smooth rather than lumpy.

4. Make the mushroom cap and spots
Crochet a red domed cap sized to sit comfortably over the bunny’s head. The image shows a slightly flared lower edge and raised ivory spots. Make the spots as separate small appliques or use a method from your chosen pattern, then arrange them evenly before sewing them down.
5. Add the face details
Position the eyes and nose before securing them so the expression looks balanced. The pictured bunny has dark eyes and a small pink nose with a simple mouth. Embroidery lets you adjust the expression and avoids small hard parts for a child’s toy.
6. Assemble and shape the bunny
Pin the head, body, arms, feet, and ears in place before sewing. Check that the bunny sits upright and that the ears frame the face. Add or remove small amounts of stuffing before closing seams to refine the shape.
7. Fit the cap and finish securely
Set the mushroom cap over the head so the bunny’s ears emerge on either side. Pin the cap in place and check that it sits evenly above the eyes. Sew on the cap and spots securely if they are intended to stay attached, weave in all ends, and inspect every seam.

Customization Ideas
- Try a golden, rust, or muted pink cap instead of red.
- Use cream spots, pale yellow spots, or embroidered dots for a different mushroom look.
- Make the inner ears, paws, or nose a contrasting shade.
- Adjust the embroidered expression with a tiny smile, sleepy eyes, or a simple nose.
- Add a removable scarf for display, keeping loose accessories away from babies and toddlers.
- Create a family of woodland plushies by changing the cap colors while keeping the bunny shape consistent.
Finishing
Before closing each piece, distribute stuffing evenly and shape the curves with your fingers. Pin the parts in place and view the toy from the front and side before sewing. Use matching yarn for seams, weave in tails securely, and check the cap brim, spots, and facial details for loose ends. If you plan to give the bunny to a child, inspect it regularly for wear.
Care Instructions
Follow the yarn label and the care needs of any stuffing or safety eyes. For many handmade plush toys, gentle surface cleaning is a good first choice. If the yarn and construction allow washing, place the toy in a laundry bag, use a cool gentle cycle, and let it dry completely in a well-ventilated place. Avoid high heat, which can distort stitches or damage fibers. Do not machine-wash a toy with parts that may detach.
Helpful Tips
- Use a stitch marker at the beginning of each spiral round and move it as you work.
- Stuff in small amounts and check the shape often; overstuffing can stretch the stitches.
- Pin all parts before sewing so the bunny sits evenly and the cap stays centered.
- Test the cap on the head before attaching spots or finishing the brim.
- Embroider the face before final assembly if that gives you better access to the head.
- Keep embellishments age-appropriate, securely attached, and under supervision during play.
- Treat this guide as visual inspiration unless you have complete, tested stitch instructions.
Frequently Asked Questions
Is this a complete tested amigurumi pattern?
No. The reference image shows the finished character but does not include row instructions, stitch counts, gauge, yarn details, or measurements. This is an original image-based construction guide, not a tested counted pattern.
What yarn should I use for a mushroom bunny?
Choose a smooth yarn that is comfortable to work with and has clear stitch definition. Worsted-weight acrylic or cotton blend is one possible option, but the image does not specify a yarn weight or fiber.
How do I keep stuffing from showing through?
Use a hook and yarn combination that produces firm, even stitches. Make a small sample in the round and adjust your hook before making the larger pieces. Add stuffing gradually instead of stretching the fabric by overfilling it.
Can I make the bunny safe for a baby?
Use embroidered facial features instead of safety eyes or other small hard parts, sew every piece securely, and inspect the toy before use. Follow applicable toy-safety guidance for the recipient’s age and supervise play.
How should the mushroom cap fit?
The image shows a domed cap that rests over the bunny’s head while leaving the ears visible. Test the cap against your own head shape as you work; the photo does not provide exact dimensions or a placement method.
Can I change the mushroom colors?
Yes. A golden, brown, pink, or muted green cap can create a different woodland style. Keep the bunny and cap yarns similar in thickness so the finished pieces fit together.
Final Thoughts
This mushroom bunny combines a soft crochet rabbit with a spotted woodland cap for a cozy amigurumi design. Use the photo to guide the colors and character details, then rely on a complete pattern or your own tested shaping for exact rounds and sizing. Careful stuffing, secure seams, and age-appropriate facial details will help the finished plush look polished and hold up to use.