
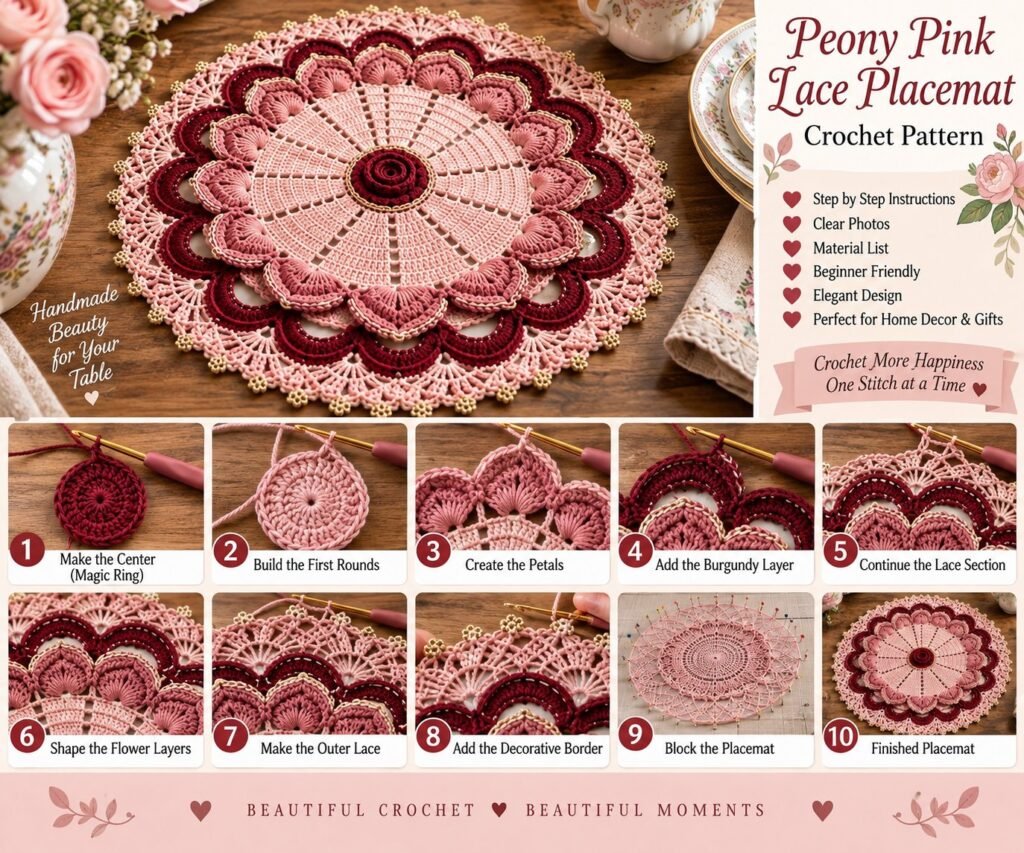
Create an elegant Peony Pink Lace Placemat with this detailed crochet pattern inspired by the beautiful floral lace design shown in the reference. The finished placemat features a delicate circular center, layered flower petals, deep burgundy accents, an intricate lace border, and small decorative edging details.
This crochet placemat is perfect for romantic table settings, afternoon tea, special occasions, dining room décor, handmade gifts, and vintage-inspired home decoration.
The pattern below is an original, adaptable design inspired by the reference image. Because the original written pattern was not provided, the stitch counts and finished measurements may vary depending on yarn, hook size, and tension.
Peony Pink Lace Placemat Crochet Pattern
Skill Level: Intermediate
Finished Size: Approximately 14–16 inches in diameter
Crochet Terms: US terminology
Construction: Worked from the center outward in circular rounds
Main Techniques: Magic ring, chains, single crochet, half double crochet, double crochet, treble crochet, increases, picots, shell stitches, and lace loops
Gauge: Gauge is not critical for a decorative placemat. Work with consistent tension and adjust the hook size if the piece becomes too loose or curls excessively.
Materials Needed
Fine cotton crochet thread in blush pink
Fine cotton crochet thread in dusty rose
Fine cotton crochet thread in burgundy or wine
Small amount of cream or gold crochet thread for decorative edging
1.75 mm crochet hook
2.0 mm crochet hook
Yarn needle
Small scissors
Blocking pins
Blocking mat
Spray bottle with water
Optional fabric stiffener
Optional small gold beads for decorative accents
Crochet Abbreviations

ch = chain
sc = single crochet
hdc = half double crochet
dc = double crochet
tr = treble crochet
sl st = slip stitch
inc = increase
dec = decrease
st = stitch
sts = stitches
sk = skip
sp = space
rep = repeat
rnd = round
FO = fasten off
picot = 3 chains joined with a slip stitch
BLO = back loop only
FLO = front loop only
Pattern Notes
The placemat is crocheted in rounds from the center outward.
Join each round with a slip stitch unless otherwise stated.
The reference design uses several shades of pink and burgundy. You can keep the entire project in one color or change colors between sections.
When changing colors, complete the final yarn-over of the previous stitch with the new color for a cleaner transition.
Lace crochet requires consistent tension. Avoid pulling your chains too tightly.
Blocking is highly recommended because it opens the lacework and gives the placemat its finished circular shape.
STEP 1: CREATE THE CENTER FLOWER
Start with burgundy yarn.
Make a magic ring.
Rnd 1: Ch 3, work 11 dc into the ring. Sl st to the top of the beginning ch 3. (12 dc)
Rnd 2: Ch 1, sc in the same stitch, ch 2, skip the next stitch, sc in the next stitch. Repeat around. Sl st to the first sc.
You should now have 6 chain spaces.
Rnd 3: Sl st into the first ch-2 space.
Work 1 sc, 3 dc, 1 sc into the same space.
Repeat in every ch-2 space around.
Sl st to the first sc.
This creates the small flower-like center.
FO burgundy yarn.
STEP 2: ADD THE DUSTY ROSE CENTER PETALS
Join dusty rose yarn behind one of the center petals.
Rnd 4: Ch 1, sc around the base of each petal, placing approximately 2 sc along each petal and 1 sc between petals.
Join with a sl st.
Rnd 5: Ch 3, dc in the same stitch.
Work 2 dc in each stitch around.
Join with a sl st.
The center should now begin expanding into a circular floral shape.
STEP 3: CREATE THE OPEN LACE SECTION
Continue with dusty rose yarn.
Rnd 6: Ch 5, skip 2 stitches, sc in the next stitch.
Repeat around.
Join with a sl st.
Rnd 7: Sl st into the first chain space.
Ch 3, 3 dc into the same space, ch 2, 4 dc into the same space.
Skip the next chain space.
Repeat around.
Join with a sl st.
This creates the first decorative shell section.
STEP 4: FORM THE PEONY PETALS
For the next floral layer, work inside each ch-2 space.
Rnd 8:
Sc in the first space.
Hdc, 4 dc, hdc in the same space.
Sc in the next space.
Repeat around.
This creates rounded petals surrounding the center.
For a more pronounced petal shape, gently pull the tops of the stitches forward while working.
STEP 5: CREATE THE PETAL OUTLINE
Change to burgundy yarn.
Join behind the first petal.
Rnd 9: Ch 1.
Sc around the base of the first petal.
Ch 3.
Sc around the base of the next petal.
Repeat around.
This creates decorative arches between the pink petals.
Rnd 10: Work 5 sc into each ch-3 space.
Continue around.
Sl st to the first sc.
FO burgundy yarn.
STEP 6: ADD THE LARGE LACE LOOPS
Change back to dusty rose.
Rnd 11:
Ch 7.
Skip 4 stitches.
Sc in the next stitch.
Repeat around.
Rnd 12:
Sl st into the first ch-7 space.
Ch 3.
Work 5 dc into the same space.
Sc into the next chain space.
Repeat around.
This creates a delicate lace ring surrounding the flower petals.
STEP 7: CREATE THE OPENWORK PETAL RING
Continue with pink yarn.
Rnd 13:
Ch 5.
Sc into the next shell.
Repeat around.
Rnd 14:
Into each ch-5 space work:
1 sc
1 hdc
3 dc
1 hdc
1 sc
Repeat around.
The repeated clusters form another ring of decorative petals.
STEP 8: ADD THE BURGUNDY SCALLOP LAYER
Change to burgundy.
Join at the base of one petal.
Rnd 15:
Sc into the first stitch.
Ch 3.
Skip 2 stitches.
Sc into the next stitch.
Repeat around.
Rnd 16:
Work 5 dc into each ch-3 space.
Sl st between each shell.
Repeat around.
The burgundy scallops should appear behind the pink petals and create the strong contrast visible in the reference design.
STEP 9: CREATE THE LARGE OUTER LACE SECTION
Change to blush pink.
Rnd 17:
Ch 8.
Sc into the next shell.
Repeat around.
Rnd 18:
Into each ch-8 space work:
1 sc
1 hdc
5 dc
1 hdc
1 sc
Repeat around.
This creates large rounded lace arches.
STEP 10: ADD THE SECOND BURGUNDY ARCHES
Change to burgundy yarn.
Rnd 19:
Sc around the base of each large pink arch.
Ch 5.
Skip approximately 4 stitches.
Sc into the next stitch.
Repeat around.
Rnd 20:
Work 7 dc into each ch-5 space.
Sl st between each group.
This produces the dramatic burgundy scalloped ring seen around the outside of the placemat.
STEP 11: CREATE THE FINAL PINK LACE BORDER
Change to pink yarn.
Rnd 21:
Ch 6.
Sc into the center of the next burgundy shell.
Repeat around.
Rnd 22:
Into every ch-6 space work:
1 sc
1 hdc
3 dc
1 hdc
1 sc
Repeat around.
The edge should now begin taking on the delicate floral lace appearance of the reference.
STEP 12: ADD THE OUTER LACE LOOPS
Rnd 23:
Ch 7.
Sc into the center of the next petal.
Repeat around.
Rnd 24:
Ch 3.
Work 3 dc into the same chain space.
Ch 3.
Sc into the next chain space.
Repeat around.
This creates the open lacework around the outer edge.
STEP 13: CREATE THE DECORATIVE PICOT EDGE
For the final round, use pink or cream yarn.
Rnd 25:
Sc into the first chain space.
Ch 3.
Sl st into the first chain to form a picot.
Sc into the same space.
Repeat around.
For an even more decorative edge, alternate:
3 sc
picot
3 sc
picot
around the entire placemat.
FO and weave in all ends.
STEP 14: ADD THE SMALL DECORATIVE DETAILS
The reference design has tiny decorative elements along the outer edge.
For a similar appearance, you can add small picots around the final border.
Another option is to use very fine gold thread for the final round.
You can also carefully sew tiny gold beads onto selected points of the lace.
If the placemat will be frequently washed or used around children, embroidered details are preferable to loose beads.
STEP 15: BLOCK THE PLACEMAT
Blocking is one of the most important finishing steps for lace crochet.
Place the finished placemat on a blocking mat.
Lightly mist it with water.
Gently stretch the placemat into a perfect circle.
Use blocking pins around the outer edge.
Place pins evenly around the circumference.
Pay special attention to the lace arches and scalloped sections.
Allow the placemat to dry completely.
Once dry, carefully remove the pins.
The lace should now lie flat and display the floral pattern clearly.
STEP 16: OPTIONAL STIFFENING
If you want the placemat to have a more structured decorative appearance, apply a light layer of fabric stiffener after blocking.
Do not oversaturate the crochet.
Shape it again while slightly damp.
Allow it to dry completely before removing it from the blocking mat.
For a functional dining placemat, a softer finish is generally more practical.
COLOR COMBINATIONS
Peony Pink
Blush pink
Dusty rose
Deep burgundy
Cream
Vintage Rose
Antique pink
Mauve
Wine
Ivory
Soft Gold
Romantic Garden
Pale pink
Rose pink
Burgundy
Sage green
Cream
HOW TO MAKE THE PLACEMAT LARGER
To make a larger placemat, continue adding lace rounds before beginning the final border.
You can add another round of:
ch-7 spaces
shell stitches
petal clusters
open lace arches
When increasing the size, make sure the additional stitches are distributed evenly around the entire circle.
If the project begins to ruffle, you have added too many stitches.
If the project begins to cup or curl upward, you may need additional increases.
HOW TO MAKE A SMALLER PLACEMAT
For a smaller doily or coaster, stop after one of the earlier floral or lace rounds.
You can also use a smaller crochet hook and finer crochet thread.
A smaller version makes an elegant coaster for teacups, candles, vases, or small decorative objects.
TIPS FOR CROCHETING LACE PLACEMATS
Use smooth cotton thread because it makes the stitches easier to see.
Keep your chain tension relaxed.
Count the stitches and chain spaces regularly.
Use stitch markers when working complicated repeating rounds.
Lay the project flat occasionally to check whether it is staying circular.
Do not pull the yarn too tightly when working lace arches.
Block the finished piece before deciding whether the shape is correct.
COMMON PROBLEMS AND SOLUTIONS
Why is my placemat curling?
The tension may be too tight or the round may need additional increases.
Try using a slightly larger hook.
Blocking can also help flatten mild curling.
Why is my placemat becoming wavy?
Too many increases may have been added.
Check your stitch count and make sure each repeating section contains the correct number of stitches.
Why doesn’t my placemat look as detailed as the reference?
The reference uses several layered floral and lace sections. Make sure you complete the petal, scallop, and openwork rounds rather than simplifying the pattern.
Using fine cotton thread will also create a more delicate lace appearance.
Can I use regular yarn?
Yes, but the finished placemat will be considerably larger and heavier.
For a delicate lace appearance, crochet thread or fine cotton yarn is recommended.
Can I use only one color?
Yes.
A single-color version in ivory, white, dusty pink, or burgundy can create a beautiful vintage lace effect.
CARE INSTRUCTIONS
Hand wash the finished placemat gently in cool or lukewarm water.
Avoid aggressive scrubbing.
Press gently between towels to remove excess water.
Reshape and lay flat to dry.
If the placemat has been stiffened, avoid twisting or wringing it.
Store flat or gently rolled.
FREQUENTLY ASKED QUESTIONS
What size is the finished placemat?
Using fine crochet thread and a 1.75–2.0 mm hook, the finished piece should measure approximately 14–16 inches across. The final size will depend on your tension and materials.
Is this crochet pattern beginner-friendly?
The basic stitches are simple, but the multiple lace rounds, color changes, shells, and decorative edging make this project more suitable for an intermediate crocheter.
What yarn is best for a lace placemat?
Mercerized cotton crochet thread is an excellent choice because it produces clearly defined stitches and holds its shape well after blocking.
Can I sell finished placemats made from this pattern?
Yes, you can use the instructions to make physical handmade items for yourself or as gifts. If you publish or distribute the written pattern itself, use your own original wording and respect any applicable pattern copyright terms.
Can this pattern be used as a table centerpiece?
Yes. A larger version can work beautifully as a centerpiece underneath a vase, candle arrangement, or decorative bowl.
SEO INFORMATION
SEO Title:
Peony Pink Lace Placemat Crochet Pattern – Free Crochet Pattern
Meta Description:
Learn how to crochet a beautiful Peony Pink Lace Placemat with layered floral petals, burgundy accents, open lacework, scalloped edges, and a delicate picot border.
Focus Keyword:
Peony Pink Lace Placemat Crochet Pattern
Secondary Keywords:
crochet lace placemat
pink crochet placemat
crochet floral placemat
lace crochet pattern
crochet table mat
crochet doily placemat
round crochet placemat
vintage crochet placemat
flower crochet placemat
crochet table decor
Suggested URL Slug:
peony-pink-lace-placemat-crochet-pattern
Featured Image Filename:
peony-pink-lace-placemat-crochet-pattern.jpg
Featured Image Alt Text:
Peony pink lace placemat crochet pattern with floral petals and burgundy lace edging
Image Title:
Peony Pink Lace Placemat Crochet Pattern
Image Caption:
A delicate handmade pink and burgundy lace crochet placemat featuring layered floral petals and an intricate decorative border.
FINAL THOUGHTS
The Peony Pink Lace Placemat is a beautiful project for crocheters who enjoy detailed floral motifs and elegant lacework. The combination of soft pink, deep burgundy, layered petals, open lace arches, and a delicate outer border gives the finished piece a romantic vintage appearance.
It can be used as a dining table placemat, tea table decoration, centerpiece, decorative doily, or handmade gift. Changing the colors and thread weight also makes it easy to create different versions for different seasons and home décor styles.

