
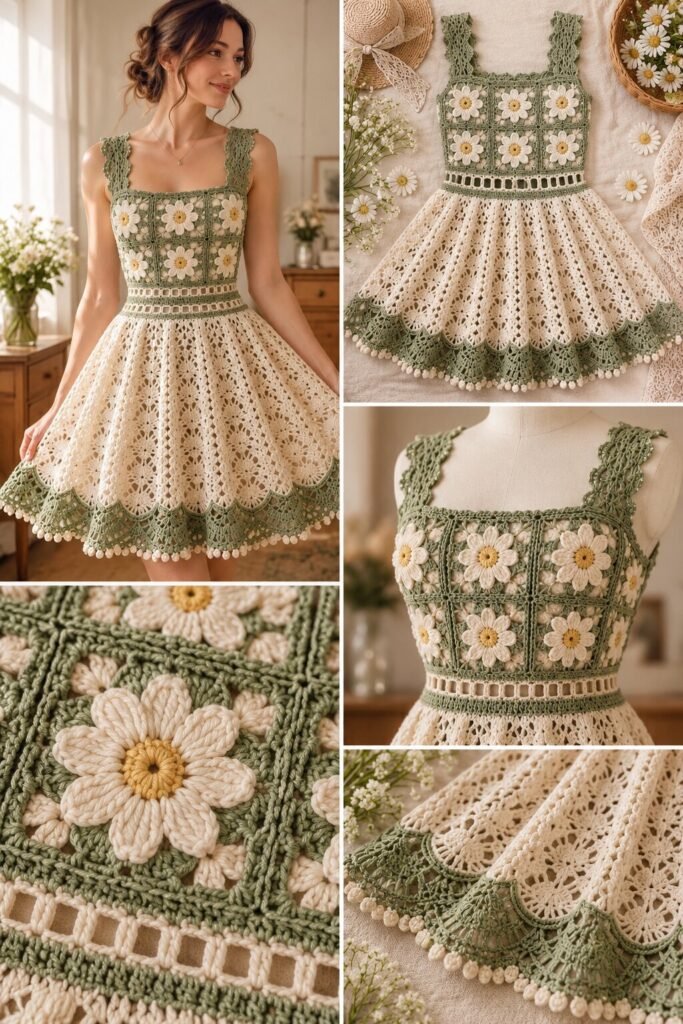
A bodice built from individual daisy granny squares — cream petals, yellow centers, sage borders — joined edge to edge, with a thin filet-mesh band separating the bodice from a full lace skirt that falls in a diamond-pattern openwork, finished at the hem with a scalloped sage border and a row of tiny bobble trim running along the very edge. Square-strapped shoulders echo the same granny-square daisy motif in miniature. Every piece of this dress shares the same sage and cream palette, but it’s the granny-square construction of the bodice that sets it apart from most crochet sundresses, which usually use continuous fabric rather than joined motifs up top.
That bodice is worth pausing on, because it’s a genuinely different approach from how most fitted crochet garments are built. Rather than shaping a bust and waist through increases and decreases in continuous rows, this dress assembles the bodice from a grid of pre-made daisy squares, which means fit here is partly a matter of choosing how many squares across and down you need rather than purely stitch-count shaping. That’s a real advantage for anyone who finds continuous bust shaping tricky, since each square is a small, self-contained, low-stakes piece to get right before joining it to the next.
This suits someone who already enjoys granny-square motif work and daisy flower construction, and who’s ready to combine that familiar skill with the less familiar challenge of turning a sheet of joined squares into something that actually fits like a garment bodice.
How the Granny-Square Bodice Actually Works
Look closely at the close-up and each square reads as a classic layered daisy flower — a yellow center, a ring of raised cream petals, worked inside a solid granny-square frame in sage with filet-style open corners. That’s a well-established motif in crochet, commonly used for daisy-pattern blankets and bags, just scaled down and applied to a garment front here instead.
The squares appear joined with a simple join-as-you-go or whip-stitch seam, visible as thin sage lines running both horizontally and vertically across the bodice. Getting a joined-square bodice to actually sit against a body rather than hanging stiff requires either sizing the squares carefully to the bust and ribcage measurements, or building in some stretch through the joining method itself — join too tightly and the bodice won’t have any give at all.
Below the squares, the thin filet-mesh waistband is doing double duty: visually, it’s a clean transition line between the dense squares and the open skirt; structurally, it’s probably also where any waist shaping happens, since it’s easier to ease in width changes through an open mesh band than through solid granny squares.
Materials You’ll Need
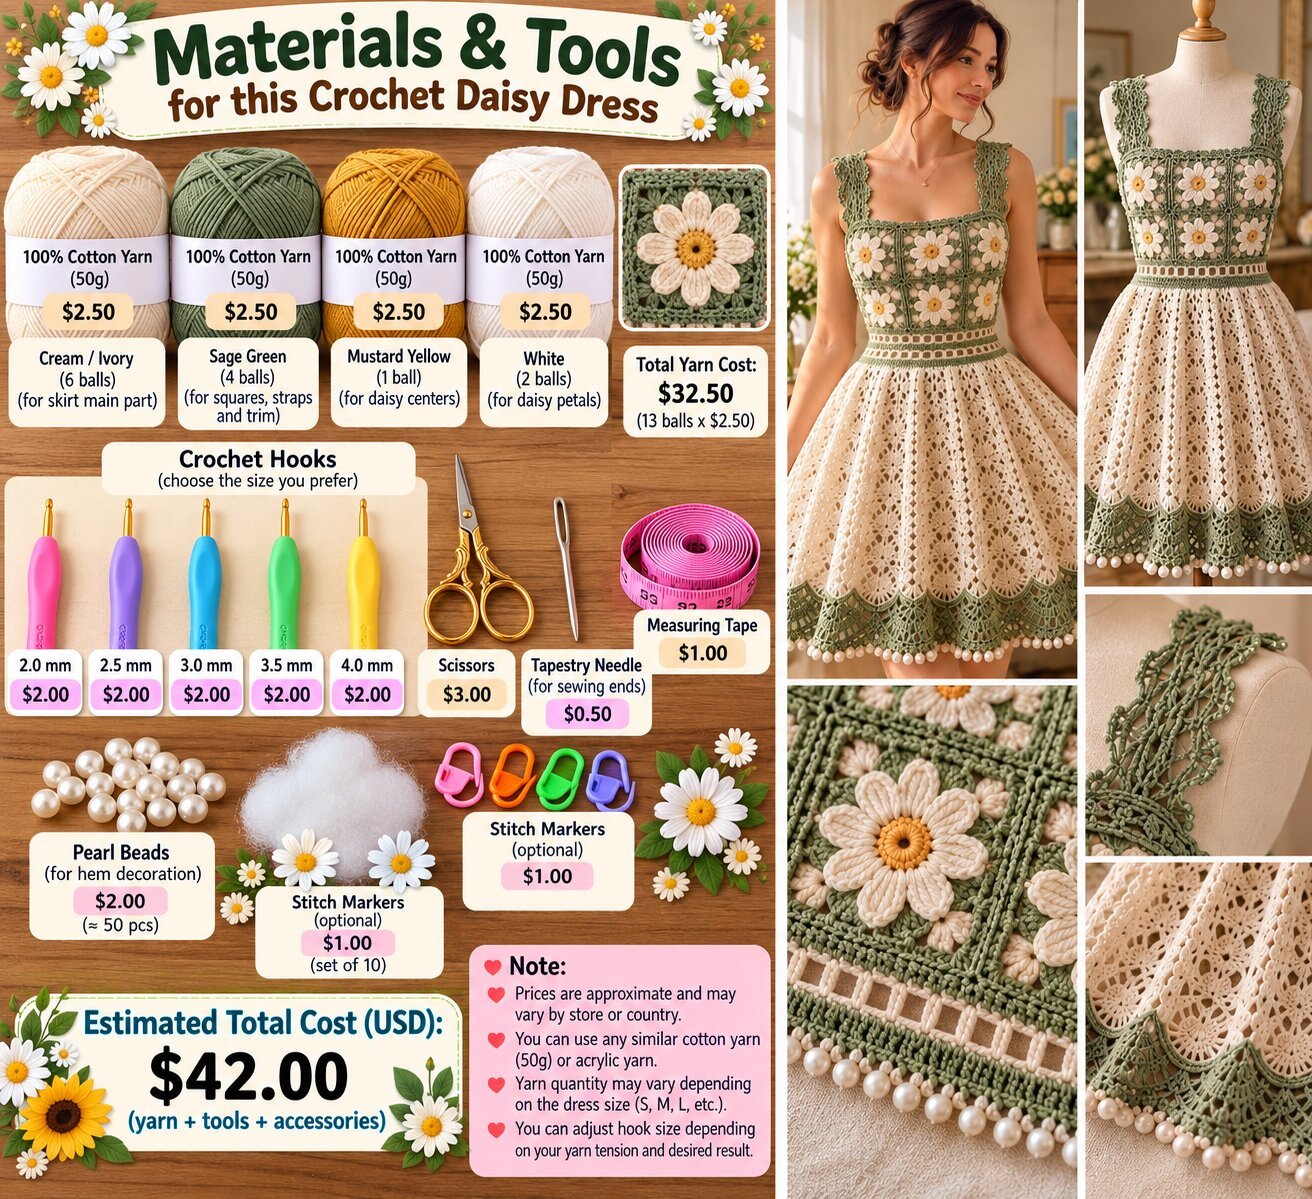
- Cream yarn for the daisy petals and the main skirt lace (a cotton or cotton-blend yarn is a reasonable suggestion, based on how crisp the petal and mesh stitch definition looks)
- Sage green yarn for the square borders, waistband, and scalloped hem trim
- A small amount of yellow yarn for the daisy centers
- A crochet hook sized to your yarn (see below)
- Yarn needle, for joining the granny squares and weaving in ends
- Scissors
- Stitch markers, useful for keeping track of square placement across the bodice grid
- A tape measure, since bodice sizing here depends on calculating how many squares you need based on your own measurements
Yarn and Hook Notes
Given the fine, well-defined texture in both the daisy petals and the diamond lace skirt, a DK or light worsted weight cotton is a sensible starting point — substantial enough to let the raised petals read clearly, fine enough that the skirt’s openwork doesn’t look heavy or clunky. A hook somewhere around 3mm to 3.5mm is reasonable for that weight, though it’s worth swatching a single daisy square first to check both its finished size and how many you’ll realistically need across your own bust measurement before committing to a full grid.
Cotton is worth prioritizing here specifically because the raised petal texture depends on decent stitch definition — a fuzzier or more elastic yarn would blur the daisy shape rather than letting it stand out crisply against the sage frame.
Skill Level
This is an intermediate to advanced project. Making one daisy granny square well is a manageable, well-documented technique on its own, but this dress asks you to make many of them consistently sized, then join them into a bodice that needs to fit a body — a different challenge from joining squares into a flat blanket, where exact fit doesn’t matter. The transition from solid squares into open filet mesh, and from mesh into the diamond lace skirt, also requires some planning to make the stitch counts line up cleanly at each transition.
Crochet Stitches You May Need
- Chain (ch) — the filet mesh waistband and the skirt’s diamond lace pattern
- Slip stitch (sl st) — joining granny squares and finishing rounds
- Single crochet (sc) — joining seams and the scalloped hem border
- Double crochet (dc) — the solid granny-square frames and skirt diamond clusters
- A layered daisy motif, worked in the round with a contrasting center and a ring of raised petal stitches, set inside a granny-square frame
- Shell or picot stitch — the scalloped hem trim, paired with a small bobble or popcorn stitch for the dotted edge beneath it
- Increase (inc) — shaping the skirt’s flare below the waistband
Step-by-Step Crochet Guide
Step 1: Start the Foundation
Begin by crocheting a full set of daisy granny squares — enough to cover the front and back of the bodice based on your own bust and torso measurements — making sure each one matches in size and tension before moving on.
Step 2: Create the Main Section
Join the squares into two panels, front and back, using a consistent seaming method so the lines between squares stay even. Attach these panels at the shoulder straps, which appear to be worked as narrower strips of the same daisy or filet pattern rather than plain crocheted cord.
Step 3: Shape the Project
Work the filet-mesh waistband directly onto the bottom edge of the joined squares, using this band as the transition point where any waist shaping can be eased in through the mesh’s open structure rather than through the solid squares themselves.
Step 4: Add Decorative Details
The daisy motifs are really the main decorative element here, so the key detail work happens during square construction rather than afterward — getting the raised petal texture and consistent centers right across every square is what gives the bodice its cohesive look.
Step 5: Create the Border or Finishing Edge
Work the skirt in a diamond lace pattern from the waistband down, finishing with a scalloped sage border and a row of small bobble or popcorn stitches along the very edge, echoed again at the shoulder strap trim.
Step 6: Finishing
Join the front and back bodice panels at the sides, attach the straps securely at the shoulders, and weave in the considerable number of ends generated by the granny-square construction. Block the finished bodice flat to help the squares sit evenly against each other before wearing.
Size and Customization
Since bodice fit here comes down to square count and sizing rather than a fixed chart, measure your own bust and torso length, then calculate how many squares across and down will cover that area before starting, adjusting square size through hook and yarn choice if needed. The skirt length and flare are easier to adjust after the fact — more lace rounds for a longer hem, fewer for something shorter.
Swapping the sage for a different accent color, or the daisy motif for a simpler granny square without the flower detail, would both simplify or restyle the piece while keeping the same overall joined-square bodice construction.
Helpful Crochet Tips
- Crochet a full batch of daisy squares before joining anything, checking that they’re all consistent in size, since any variation becomes obvious once squares are seamed together.
- Calculate your square grid based on your own bust measurement before starting, rather than guessing at a number and adjusting later.
- Keep your joining tension even across all seams, since tight joins in some spots and loose joins in others can distort the bodice shape.
- Block each daisy square individually before joining, so the petals sit flat and open rather than curling.
- Plan the waistband width carefully, since it’s the one section doing double duty as both a visual transition and a fit adjustment point.
Common Mistakes to Avoid
- Inconsistent square sizing. Even small variations between squares become very visible once joined into a grid. Crochet all squares with the same tension and stitch count.
- A bodice with no ease. Joining squares too tightly can leave no give at all, making the bodice uncomfortable or hard to get into. Consider a slightly looser join or added ease through the waistband mesh.
- Uneven transition from squares to mesh. If the stitch count doesn’t align cleanly where the squares end and the filet waistband begins, the seam can pucker. Plan this transition point before you reach it.
- Skipping blocking on the daisy squares. Unblocked petals tend to curl rather than lie flat, which dulls the clean look of the finished bodice.
Frequently Asked Questions
Is this dress beginner-friendly?
Not especially — while daisy granny squares are a well-known, approachable motif on their own, turning a batch of them into a properly fitting garment bodice is a more advanced undertaking than a flat blanket or bag.
What yarn works best for the daisy squares?
A cotton or cotton-blend yarn in DK or light worsted weight is a reasonable suggestion, since it holds the raised petal texture and keeps the lace skirt from looking heavy.
How many squares will I need for the bodice?
That depends entirely on your own measurements and the finished size of your test square, so it’s worth making one square first and calculating the grid before committing to the full set.
Can I simplify this dress for an easier version?
Yes, replacing the daisy motif with a plain solid granny square would keep the joined-square construction while cutting out the more detailed petal work.
Do I need to block this project?
Blocking is likely to help significantly, particularly for the daisy petals and the lace skirt, both of which tend to look tighter and less defined right off the hook.
Final Thoughts
The sage daisy lace dress crochet pattern takes a familiar motif — the daisy granny square — and applies it in an unusual place: a fitted garment bodice rather than a blanket or bag. Between the joined-square construction, the filet waistband transition, and the diamond lace skirt finished in scalloped trim, this is a project that rewards crocheters who already enjoy motif work and want to push that skill into garment territory.

