

Introduction
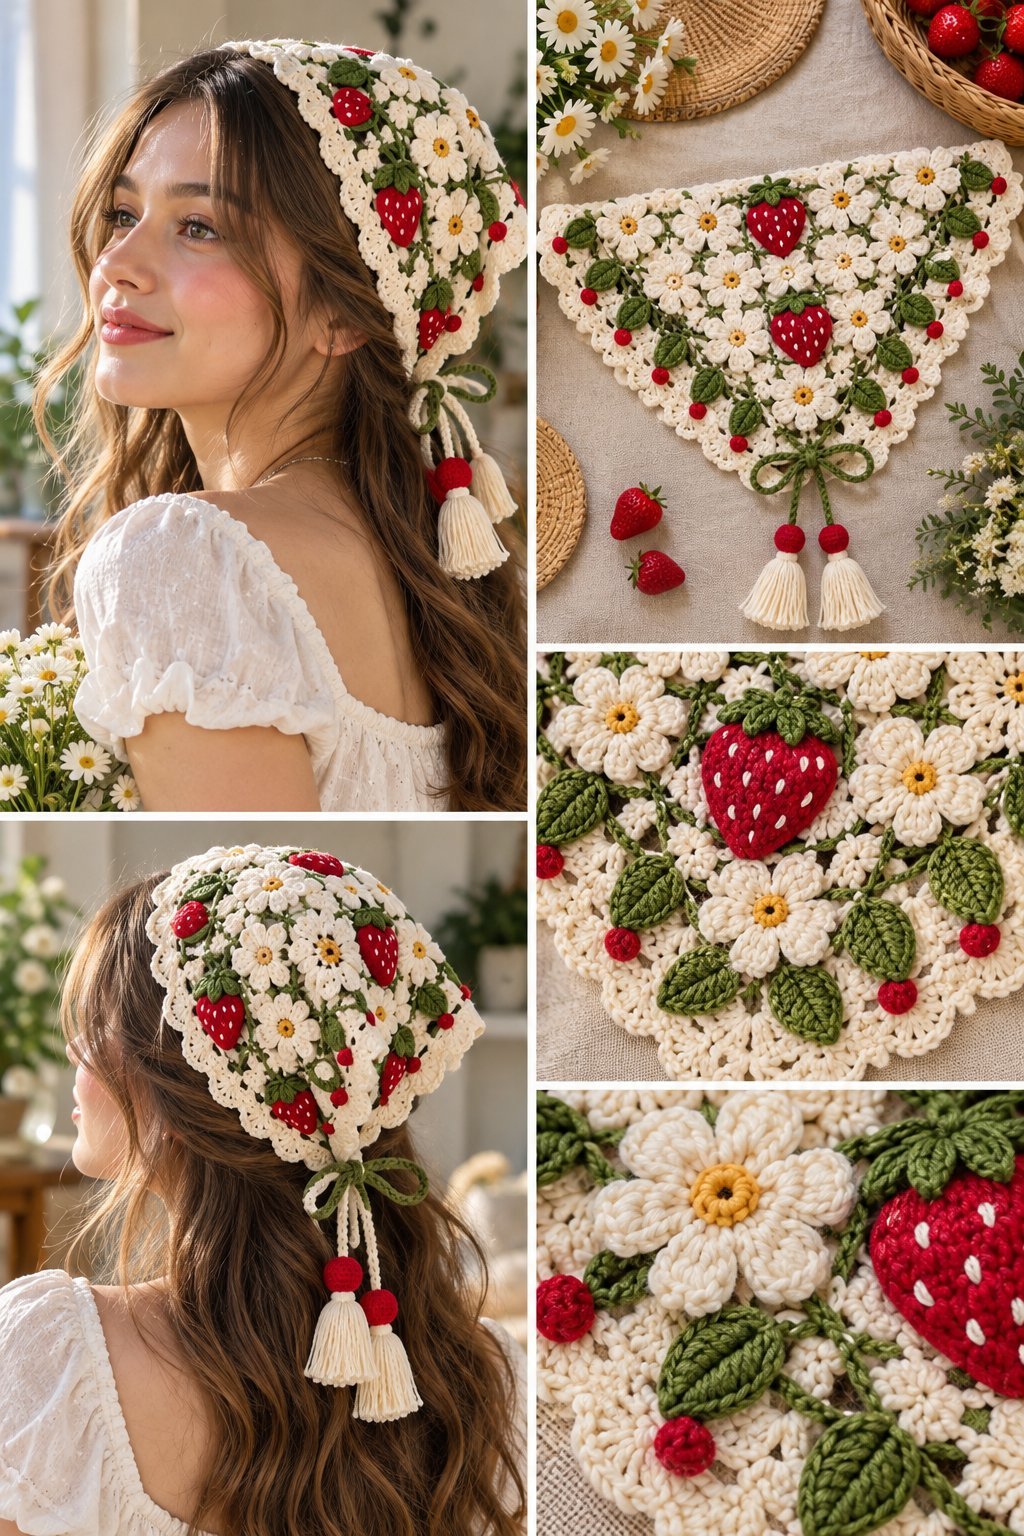
The strawberry blossom headscarf crochet pattern is the kind of design that turns a simple triangle bandana into a wearable garden. Picture a cream-colored floral base built from small crocheted daisies, connected by winding green vines and leaves, with plump three-dimensional strawberries scattered throughout and tiny red berry accents tucked between the blossoms. Finished with tassels at the tie ends, this headscarf feels like something pulled straight from a cottagecore daydream.
This style of headscarf has become a favorite among crocheters who enjoy motif-based construction and love a project with a strong seasonal, romantic theme. It suits spring and summer wear especially well, whether tied over the head like a classic kerchief, worn as a hair accessory at a garden party, or simply kept as a decorative piece to display. The combination of floral motifs, dimensional fruit appliques, and a triangle base also makes it a rewarding project for anyone who wants to build motif-joining skills alongside a bit of three-dimensional crochet work.
If you are working on a strawberry blossom headscarf crochet pattern, this guide walks through the materials, stitches, and general construction approach typically used for a design like this, along with practical suggestions for yarn, hook size, and customization so you can bring your own version to life.
Why You’ll Love This Crochet Project
It has an unmistakably romantic, garden-inspired look. The combination of daisy motifs, vining leaves, and dimensional strawberries gives this headscarf a storybook quality that few basic accessories can match.
It is a rewarding motif-based project. Rather than working long, repetitive rows, this design lets you build a collection of small, satisfying motifs and then assemble them into a cohesive whole, which many crocheters find especially enjoyable.
It is a wonderful seasonal accessory. A piece like this feels perfectly suited to spring and summer, making it a great addition to a seasonal wardrobe or a thoughtful handmade gift for someone who loves floral, cottagecore style.
It offers genuine customization potential. The flower colors, fruit choice, and vine density can all be adjusted, allowing you to create a personalized variation while keeping the same overall structure.
It is a good stash project for small amounts of several colors. Since the design uses small quantities of cream, green, red, and yellow rather than large amounts of any single color, it is an efficient way to use up leftover yarn from other projects.
Materials You’ll Need

Exact yardage will depend on the size of your finished headscarf and your gauge, so treat the list below as a practical starting point rather than a fixed requirement.
- Cream or off-white yarn for the daisy petals and headscarf base (suggested main color)
- Yellow yarn for the daisy centers
- Green yarn for the leaves and vine details
- Red yarn for the strawberries and small berry accents
- A crochet hook sized to match your yarn weight (see suggestion below)
- Yarn needle for weaving in ends and joining motifs
- Scissors
- Stitch markers to track rounds and motif placement
- Small amount of stuffing, if making the strawberries more dimensional
Recommended Yarn
A cotton or cotton-blend yarn is a strong suggestion for this headscarf, since it holds its shape well for the small floral motifs and gives crisp stitch definition that helps the daisies, leaves, and strawberries look clean and well defined rather than blurred together. Cotton also has a pleasant, breathable feel that works well for a headscarf worn against hair and skin in warm weather.
In terms of weight, a light DK or sport weight yarn tends to work best for a project with this many small motifs, since it allows fine detail work without becoming too bulky once everything is joined together. The cream, green, red, and yellow palette is central to the strawberry and daisy theme, though other soft floral colors could be substituted for a different seasonal feel.
Recommended Crochet Hook
As a general suggestion, a hook in the C/2 (2.75mm) to E/4 (3.5mm) range pairs well with DK or sport weight cotton yarn for this type of motif-heavy project. A smaller hook helps keep the daisy petals and strawberry shapes tight and well defined, since looser stitches can make small motifs look sloppy or lose their shape.
Keep in mind that hook size should always be adjusted based on your own gauge, since the overall size of the headscarf depends on both the size of the individual motifs and how they are joined together.
Crochet Skill Level
This project is best suited to intermediate crocheters. While each individual motif, such as a daisy or a small leaf, is relatively simple on its own, the sheer number of pieces involved and the process of assembling and joining them cohesively into a triangle shape requires patience and some experience with motif-based construction.
Crocheters who are comfortable working small three-dimensional shapes, joining motifs neatly, and managing multiple color changes will find this project very manageable, while those newer to crochet may want to start with a smaller sample of daisies and strawberries before committing to the full headscarf.
Crochet Stitches You May Need
- Chain (ch)
- Slip stitch (sl st)
- Single crochet (sc)
- Half double crochet (hdc)
- Double crochet (dc)
- Popcorn or bobble stitch, often used to create the rounded strawberry shape
- Basic flower motif construction (typically worked in the round with petal repeats)
- Increase (inc) and decrease (dec) for shaping motifs and the triangle base
- Surface slip stitch, sometimes used to create vine details connecting the motifs
Step-by-Step Crochet Guide
Step 1: Start the Foundation
Many designs like this begin with the triangle base, worked from the center top point downward or from one corner outward, using a simple, dense stitch such as single or double crochet to create a stable foundation that the floral motifs will later be attached to or built directly onto.
Step 2: Create the Main Section
Continue shaping the triangle base, increasing evenly to reach the desired width and length for a comfortable headscarf that will tie under the hair or at the nape of the neck. This base is typically worked in the main cream color to blend seamlessly with the floral motifs layered on top.
Step 3: Shape the Project
Once the triangle reaches its full size, plan out the placement of the daisy motifs and strawberry appliques, working larger motifs toward the center back and gradually smaller or sparser details toward the front tie edges. Green vine lines, worked as simple chain or slip stitch trails, are typically added to visually connect the flowers and berries into a cohesive garden pattern.
Step 4: Add Decorative Details
This is where the signature elements come together. Crochet a collection of small daisy motifs in cream and yellow, several strawberry shapes in red using a bobble or popcorn technique for dimension, and small leaf shapes in green, then arrange and stitch them onto the triangle base following your planned layout. Small red berry dots can be scattered between the larger motifs for extra texture and cohesion.
Step 5: Create the Border or Finishing Edge
Around the outer edge of the triangle, a scalloped or picot border is typically worked in cream, echoing the delicate, floral feel of the motifs and giving the piece a soft, finished silhouette along all three sides.
Step 6: Finishing
Attach ties at the two top corners of the triangle, either as long crocheted chains or cords, and finish each end with a small tassel in cream, accented with a tiny red bead or pom-pom to tie back into the strawberry theme. Weave in all loose ends thoroughly, since a design with this many individual motifs generates a significant number of ends to secure.
Size and Customization
The overall size of this headscarf is controlled by how large you work the triangle base and how many motifs you plan to fit across its surface, so it can be adjusted for a smaller, more delicate accessory or a larger, fuller kerchief style. Working a gauge swatch for both the base and a sample daisy motif will help you estimate how many flowers and strawberries you will need for full coverage.
For customization, consider adjusting the density of the floral motifs for a more subtle or more elaborate finished look, swapping the strawberries for a different fruit or flower motif entirely, or changing the color palette to suit a different season, such as soft lavender and white for a spring wisteria theme. Tie length and tassel size can also be adjusted based on personal preference.
Helpful Crochet Tips
- Crochet a full batch of daisies, leaves, and strawberries before starting to attach anything, so you can arrange the complete layout and adjust spacing before committing to permanent stitching.
- Keep tension consistent across all your motifs, since mismatched tension between pieces can make some motifs look larger or smaller than others once joined.
- Use a smaller hook than you might expect for the small motifs, since tight, well-defined stitches read much more clearly at this scale.
- Block each type of motif separately before attaching, particularly the daisies, since this helps the petals lie flat rather than curling.
- Plan your motif layout on the flat triangle base with pins or a photo before final stitching, since this project relies heavily on visual balance rather than a strict row-by-row pattern.
- Weave in ends from each motif as you attach it, rather than leaving them all until the end, since this project generates far more loose ends than a solid, single-color piece.
- Make a few extra motifs of each type in case some need to be replaced or repositioned during final assembly.
Common Mistakes to Avoid
- Uneven motif sizing: Daisies or strawberries that vary noticeably in size can make the finished headscarf look inconsistent. Try to crochet all motifs of the same type using the same stitch count and tension.
- Overcrowding the design: Attaching too many motifs without planning can make the headscarf look cluttered rather than intentional. Lay out your pieces before stitching them down permanently.
- Loose motif attachment: Flowers, leaves, and strawberries that are only lightly tacked on can shift or come loose with wear. Stitch securely around the edge of each motif.
- Skipping the triangle base gauge: Since the base needs to fit comfortably around the head, skipping a swatch can result in a headscarf that is too small or too large. Take the time to check your gauge before committing to the full base.
- Rushing the blocking step: Skipping blocking on the daisy motifs in particular can leave the petals looking curled or uneven rather than flat and crisp.
- Underestimating tie length: Ties that are too short can make the headscarf difficult to tie comfortably. Err on the side of extra length when working the corner ties.
Frequently Asked Questions
Is the strawberry blossom headscarf crochet pattern good for beginners?
This project is better suited to intermediate crocheters, since the number of individual motifs and the assembly process require more patience and precision than a basic accessory.
What yarn works best for this headscarf design?
A cotton or cotton-blend yarn in DK or sport weight is a practical suggestion, since it holds shape well and gives crisp definition to the small floral and fruit motifs.
How many daisy and strawberry motifs will I need?
This depends entirely on your triangle size and desired coverage density, so it is helpful to crochet a full batch of motifs first and arrange them on your base before deciding if more are needed.
Can I substitute a different fruit or flower for the strawberries and daisies?
Yes, the same construction works well with other small fruit or flower motifs, such as cherries and roses, or blueberries and forget-me-nots, for a different themed headscarf.
How do I keep all the small motifs consistent in size?
Crocheting each type of motif in one sitting with the same yarn, hook, and tension helps keep them uniform, and blocking them together afterward can further even out any small differences.
Finishing and Care
Once the headscarf is complete, weave in all ends securely, paying particular attention to the many attachment points where individual motifs meet the base. A gentle steam or wet block can help both the daisy petals and the scalloped edge lie flat and even, giving the piece a more polished, finished appearance.
For care, hand washing in cool water is generally the safest choice for a piece with this many dimensional details, particularly around the strawberry appliques and tassel ties. Lay flat to dry to preserve the shape of the motifs, and avoid high heat, which can flatten the dimensional texture of the strawberries and distort the delicate petal shapes.
Final Thoughts
The strawberry blossom headscarf crochet pattern is a project that rewards patience with genuine charm. Between the delicate daisy motifs, the plump dimensional strawberries, and the tasseled ties, it is the kind of accessory that feels like wearing a small handmade garden, perfect for anyone who loves floral, romantic crochet design.

