
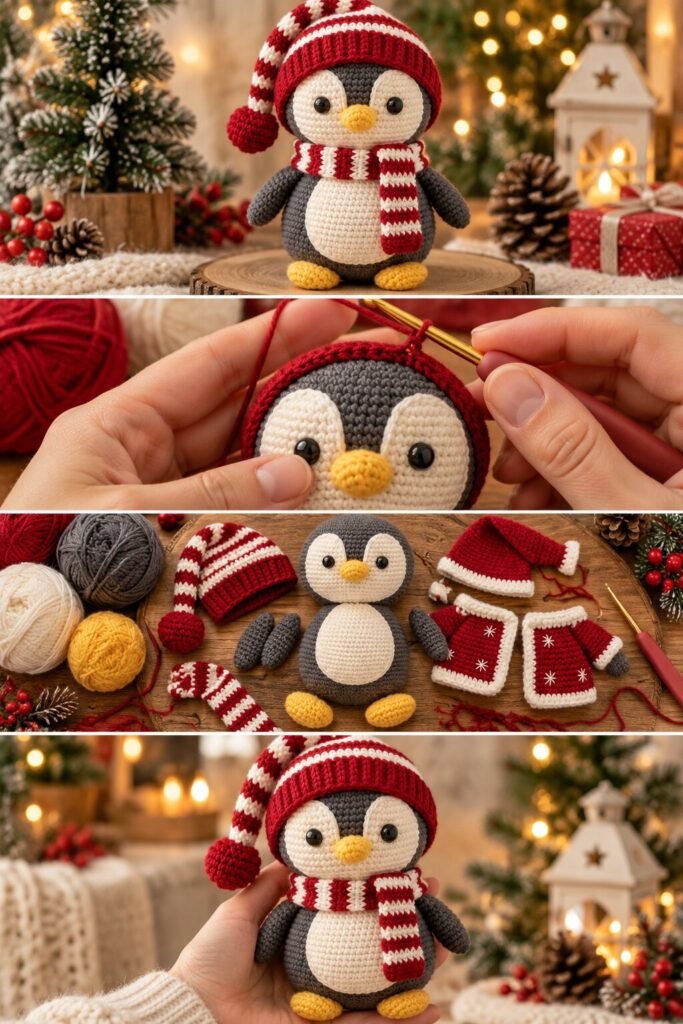
A rounded gray and cream penguin, safety eyes, yellow beak and feet, dressed in a red-and-white striped nightcap with a pom-pom tip and a matching striped scarf. The body is a classic amigurumi shape — one continuous rounded form from head to belly with no visible seam at the neck — and the color blocking between the gray back, cream face and belly, and yellow accents is clean enough that it’s clearly worked in sections rather than embroidered on afterward.
What’s useful to notice in the process shots is that the hat, scarf, and even a little Santa-style jacket are shown as separate pieces laid out beside the finished penguin, not worked directly onto the body. That’s the standard approach for amigurumi accessories, and it’s worth following here too — a removable hat and scarf are far easier to size correctly and attach neatly than trying to crochet them onto a stuffed body that’s already firm and round.
This is a reasonable project for anyone who’s made at least one or two amigurumi before and is comfortable with the basic rhythm of continuous rounds and invisible increases, since nothing about a penguin shape is unusual once you’ve got that foundation down.
Reading the Construction
The body and head look like they’re worked as one continuous piece in amigurumi’s typical spiral rounds, starting from a magic ring at the top of the head, increasing out to the widest point, then decreasing back in before switching to cream at the belly and continuing down to a flatter base. That gray-to-cream transition happens mid-round rather than as a hard stripe, which is a common way to build a round belly patch into an otherwise single-color body.
The face details — eyes, beak, the flat eye-patch shape in cream — all sit within that same continuous body rather than being separate appliques, which means the color changes need to be planned round by round as the stitch count grows and shrinks. The beak and feet, by contrast, look like small separate pieces, each likely worked flat or in small rounds and stitched on individually, which is the easier way to handle a shape that doesn’t fit naturally into the spiral.
The scarf is a simple flat strip, worked back and forth in stripes rather than in the round, and the hat looks like a cone shape worked in continuous rounds with decreases toward the tip, finished with a small pom-pom.
Materials You’ll Need
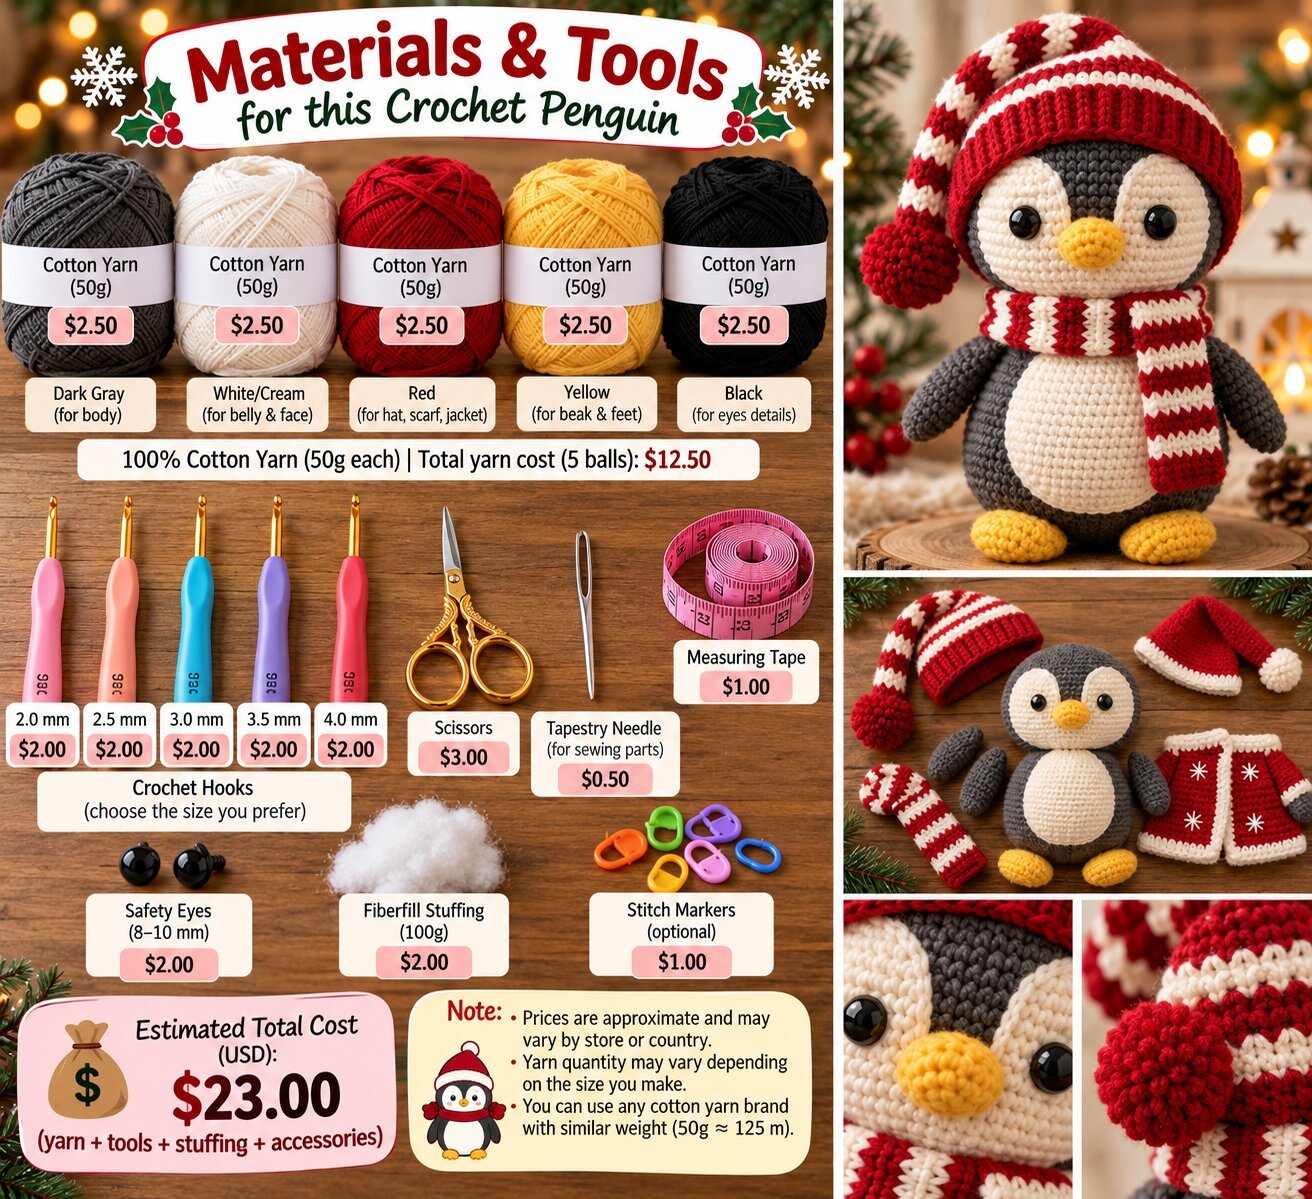
- Yarn in gray, cream, yellow, red, and white (worsted weight is a reasonable suggestion, based on the compact, even stitch texture visible in the close-up shot)
- A crochet hook sized to your yarn (see below)
- Safety eyes, sized to suit the finished head
- Polyester stuffing
- Yarn needle, for closing seams and attaching the beak, feet, hat, and scarf
- Scissors
- Stitch markers, essential for tracking rounds in continuous spiral work
- A small amount of stuffing specifically for the hat’s pom-pom, if you want it to hold shape rather than sitting flat
Yarn and Hook Notes
Based on how tight and even the stitches look in the close-up photo, a worsted weight cotton or acrylic yarn with a hook a size or so smaller than usually recommended for that weight is a sensible approach — amigurumi generally wants a tighter gauge than garment crochet so the stuffing doesn’t show through gaps between stitches. A hook somewhere around 3mm to 3.5mm is a reasonable starting point for worsted weight used this way.
Acrylic is a practical choice for a toy like this, since it’s easy to clean and holds color well, though a cotton-acrylic blend would give slightly crisper stitch definition if that matters to you.
Skill Level
This sits at a confident beginner to intermediate level. The core technique — continuous rounds with increases and decreases, worked in a spiral without joining — is genuinely approachable once practiced, but a project like this does ask for several things at once: color changes mid-round for the belly patch, safety eye placement that needs to look symmetrical, and multiple small accessory pieces that all need to be proportioned correctly relative to the body. Someone who’s only crocheted flat projects before will find the spiral technique the biggest adjustment; someone who’s made a simple amigurumi ball or egg shape already will find this a natural next step.
Stitches Likely Involved
- Magic ring — the standard way to start a tightly closed first round for amigurumi
- Single crochet (sc) — the primary stitch throughout the body, head, and most accessories, chosen for its dense, stuffing-proof fabric
- Increase (inc) and decrease (dec) — shaping the rounded head and body, tapering the hat to its point, and shaping the small feet and beak pieces
- Invisible decrease — a common amigurumi technique that keeps decrease rows looking smoother than a standard decrease would
- Basic color-change technique for the belly patch and the striped scarf and hat bands
Building It: A Practical Sequence
Start the head at the crown with a magic ring, increasing in the first several rounds to establish the rounded shape, then working even rounds until you reach head-to-body circumference where you plan to transition.
Place the safety eyes before stuffing anything. Eye placement is one of the hardest things to fix after the fact, so test positioning with the eyes pushed in but not yet locked, checking symmetry from the front before committing.
Continue down into the body, switching to cream for the belly patch at the appropriate round, then decreasing toward the base and closing with a flattened bottom so the finished penguin can stand upright.
Stuff firmly as you go, not just at the end. Amigurumi holds its shape better when stuffing is added incrementally through the open top rather than packed in all at once right before closing.
Make the beak and feet as separate small pieces, worked in a few rounds of single crochet, stuffed lightly, and stitched onto the face and base once the main body is complete.
Work the scarf as a flat striped strip, back and forth in rows, long enough to wrap around the neck with a bit of drape, and the hat as a cone shape in continuous rounds, decreasing toward the top and finishing with a pom-pom.
Attach the hat and scarf last, positioning the hat so it sits naturally over the crown rather than perched too high, and wrapping the scarf so the striping shows cleanly rather than twisting.
Adjusting the Fit and Look
Size is really just a matter of hook and yarn weight — a smaller hook with thinner yarn gives you a miniature ornament-scale penguin, while a larger hook and bulkier yarn scales the same construction up to something more huggable. Stitch count and round count both scale with that choice, so a gauge swatch at your intended size is worth doing before committing to the full project.
The color palette and accessories are easy to vary — the process photos show a Santa jacket as an alternative to the hat and scarf, and swapping yarn colors on the same basic penguin shape could easily produce a different Christmas animal entirely, depending on how you alter the proportions.
Where It’s Easy to Go Wrong
Asymmetrical eye placement. This is the single most common amigurumi mistake and the hardest to fix once eyes are locked in from the inside. Count rounds and stitches from a center point on both sides before inserting.
Underfilled stuffing leaving visible dents. A lightly stuffed amigurumi looks soft and uneven rather than rounded and firm. Stuff more than feels necessary, checking the shape against a flat surface as you go.
Losing track of your round in continuous spiral work. Without a joining slip stitch to mark round ends, it’s easy to lose count. Use a stitch marker at the start of every round and move it up as you go.
A belly patch that doesn’t match side to side. If the color change round isn’t started and ended at the same stitch count position on each side, the cream patch can look lopsided. Mark your transition point clearly before switching colors.
Care
Hand washing in cool water, if washing is needed at all, is the gentler approach for a stuffed toy like this, since a washing machine’s agitation can shift stuffing unevenly or loosen safety eye backings. Air dry fully before handling, and avoid high heat entirely, since it can melt or warp both the stuffing and the plastic safety eye components. If the piece is mainly decorative rather than a child’s toy, spot cleaning is often sufficient.
Common Questions
Is this a good first amigurumi project?
It’s a reasonable second project rather than an absolute first — the spiral rounds and basic shaping are approachable, but the color-change belly patch and multiple accessories add more complexity than the simplest round ball or egg shape typically used as a true beginner project.
Can I make this without safety eyes?
Yes, embroidered eyes using black yarn or floss are a reasonable substitute, and are a safer choice if the finished toy is meant for a very young child.
How do I decide what size to make it?
Pick your yarn weight and hook size first, then crochet a small test swatch to see how many rounds and stitches you’ll likely need at that gauge before starting the full body.
Can I swap the hat and scarf for the Santa jacket shown in the process photos?
Yes, both options appear interchangeable on the same basic penguin body, so you could make one, the other, or both if you want variety.

