

Introduction
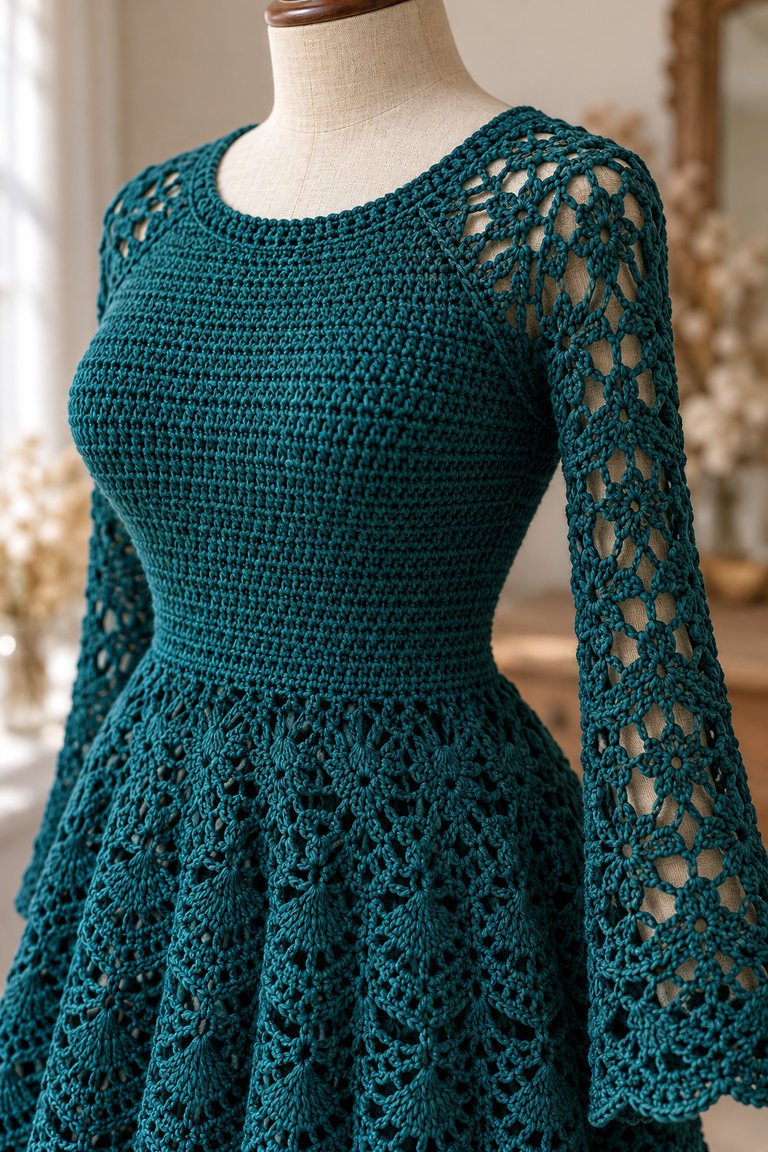
This teal crochet mini dress combines a fitted, textured bodice with openwork shoulders and sleeves, a softly flared lace skirt, and a scalloped hem. The deep teal shade keeps the look cohesive, while the contrast between dense and airy stitches gives the garment its handmade character.
This article is an original design and construction guide inspired by the reference photo, not a tested, counted pattern. The image does not provide yarn weight, hook size, gauge, stitch counts, or finished measurements. Use a complete size-specific pattern or your own tested calculations for exact shaping and fit.
Design Features
- Textured fitted bodice: A denser stitch fabric gives the upper section structure.
- Openwork sleeves: Lace stitches create airy long sleeves with a gathered look above fitted cuffs.
- Flared mini skirt: The open lace skirt adds movement and a light drape.
- Scalloped hem: A decorative edge gives the skirt a neat, finished outline.
- Single-color impact: Teal highlights the stitch texture without competing with the lace details.
Skill Level
Plan for an intermediate project if you are making the garment from scratch. It involves garment shaping, maintaining gauge, checking fit, and transitioning between solid and open stitch patterns. A confident beginner may prefer to adapt a tested dress pattern and add the sleeve and hem details after becoming comfortable with the construction.
Materials and Tools
- Smooth yarn in a deep teal shade
- Crochet hook suited to the yarn and the fabric density you want
- Measuring tape and stitch markers
- Tapestry needle and scissors
- Blocking mat and pins, if suitable for the chosen fiber
- Optional lining or slip for additional coverage beneath the lace skirt
Choose a yarn with enough drape for the skirt while still holding its shape in the bodice and cuffs. Check the yarn label for care instructions before making a full garment.

Yarn, Hook, and Gauge
The photo does not identify a yarn brand, fiber, weight, hook size, or gauge. Cotton and cotton blends are common warm-weather garment choices, while a soft blend with more drape may suit a flowing skirt. Whatever fiber you choose, swatch both the denser bodice texture and the open lace stitch.
Wash and dry the swatches the way you expect to care for the finished dress, then measure them without stretching. Gauge affects the bodice fit, sleeve width, and skirt fullness. Adjust your hook or stitch choice before starting the garment if the swatch is too stiff, too open, or too heavy.
Fit and Measurement Planning
Take current measurements for the bust, waist, upper arm, sleeve length, and desired skirt length. Compare them with a garment that fits comfortably, and decide how much ease you want. Record the measurement at the underarm and the length from shoulder to waist so you can check the bodice as you work.
The openwork skirt may reveal more than the wearer wants, so test the fabric in daylight and consider a lining or slip. Crochet can stretch with wear, especially when the skirt is heavy or loosely worked. Recheck the fit after washing your swatch and again before finishing the hem.
Construction Overview
The photo suggests a close-fitting bodice with long lace sleeves, fitted cuffs, and a flared openwork skirt. A construction plan could work the bodice and sleeves as separate pieces or use a top-down yoke, then continue into the skirt. The image does not reveal which method was used, so choose a complete pattern that supports your measurements and experience.
Step-by-Step Design Workflow
These steps are a planning guide based on the visible garment, not row-by-row instructions.
1. Choose your size and finished length
Write down the wearer’s measurements and desired ease. Decide how short you want the skirt and whether the sleeves should finish at the wrist or just above it. Keep notes so you can compare the garment with the plan as you crochet.
2. Swatch both fabric styles
Make a sample of the denser bodice stitch and a second sample of the sleeve or skirt lace. Wash and block them if appropriate for the yarn. Check that the bodice fabric feels comfortable and that the lace has the coverage and drape you want.
3. Shape and fit the bodice
Follow a tested garment pattern or your own measured calculations for the neckline, shoulders, bust, waist, and armholes. Try on the bodice or compare it with a well-fitting garment before adding the sleeves and skirt. Make changes while the piece is still easy to adjust.

4. Make the lace sleeves and cuffs
Use the lace pattern for the sleeves, checking the upper-arm and wrist measurements as you go. The reference shows a gathered appearance above fitted cuffs, with an open section along the forearm. If you recreate that detail, plan the opening and cuff so the sleeve remains comfortable and secure.
5. Join the skirt and create the flare
Work the skirt from the bodice or attach it according to your chosen construction method. Add fullness gradually to create a gentle flare, checking the width and length against your measurements. Keep the stitch pattern consistent so the transition from bodice to skirt looks intentional.
6. Finish the scalloped edge
Try the dress on or lay it flat to confirm the hem length before adding the edging. Use a flexible finish that follows the lace without pulling it inward. Block the edge gently if the fiber allows.
7. Weave in ends and check the fit
Secure yarn tails, inspect sleeve joins and cuffs, and check the skirt for uneven tension. Try the dress on after blocking and make any final adjustments to the neckline, sleeves, or hem.
Customization Ideas
- Use forest green, plum, rust, or dusty blue in place of teal.
- Make the skirt knee length or add another lace tier for a longer silhouette.
- Replace the scalloped edge with a simple picot or ribbed finish.
- Add a narrow waist tie for adjustability.
- Use short sleeves or a sleeveless bodice for a warmer-weather variation.
- Add a lining or wear a coordinating slip beneath the openwork skirt.
Finishing and Care
Block the dress according to the yarn fiber and label instructions, taking care not to stretch the bodice or cuffs out of shape. If the yarn is prone to growing, dry the dress flat and store it folded. Check the underarm joins, cuffs, and hem after wear, and repair loose ends before they unravel further.
Helpful Tips
- Keep separate gauge notes for the solid and lace stitch patterns.
- Try on the bodice before committing to the skirt length.
- Use stitch markers at sleeve joins and waist transitions.
- Test lace coverage in natural light before completing the full skirt.
- Consider the finished garment’s weight; a long lace skirt may stretch as it hangs.
- Follow a complete counted pattern for exact stitch counts and shaping.
Frequently Asked Questions
Is this a complete counted crochet dress pattern?
No. The reference photo shows the finished style but does not include stitch counts, gauge, yarn details, or sizing. This is a visual design and construction guide, not a tested, counted pattern.
What yarn should I use for a teal crochet dress?
Choose a comfortable garment yarn with the drape you want. Cotton or a cotton blend is one option for a summer dress, but the reference does not identify the fiber or yarn weight. Swatch before beginning.
How do I get the bodice to fit?
Use current measurements and a washed gauge swatch. Compare the bodice with a garment that fits well and check it during construction. Use a tested size-specific pattern for exact shaping.
How can I make the lace skirt more opaque?
Choose a denser stitch, add a lining, or wear a coordinating slip. Test the fabric in daylight before deciding how much coverage it provides.
Can I change the sleeves?
Yes. You can shorten the sleeves, make them more fitted, or omit them. Keep the sleeve cap or armhole shaping consistent with the bodice construction you choose.
Final Thoughts
The teal crochet mini dress balances a fitted textured bodice with airy lace sleeves and a softly flared skirt. Let the reference guide the color and overall silhouette, then rely on measurements, gauge swatches, and a complete pattern for the details that determine fit. Careful blocking and a coverage check will help the finished garment feel polished and comfortable.


