

A solid rust-terracotta bodice tops a cream skirt banded in a thin terracotta stripe, finished with a row of full sunflower motifs — yellow petals, dark brown centers, green leaves — stitched right into the hem above a deep golden scalloped lace border. Ruffled petal-shaped cap sleeves in that same gold pick up the sunflower color at the shoulders, each anchored by a small white daisy appliqué, and a wide satin ribbon sash ties into a bow at the waist. It’s a dress built around one clear idea: a child’s dress that reads as an actual sunflower field rather than just floral-adjacent yellow and green.
The sunflower motifs are the obvious focal point, but the construction decision worth noticing is where they’re placed — not scattered across the whole skirt, but concentrated in a single band right above the golden lace hem. That placement keeps the bodice clean and simple, lets the cream mid-skirt breathe without too much competing detail, and makes the sunflower row read as a deliberate border rather than busy all-over patterning.
This is a good project for someone who already has basic garment shaping under their belt and wants to practice a layered flower motif, since the sunflower itself — with its distinct petal layer, contrasting center, and separate leaf pieces — is more involved than a simple daisy or granny-square flower.
What’s Actually Happening in the Stitch Work
Looking at the close-up, the sunflower petals appear to be worked as a ring of elongated, pointed stitches (likely a cluster of chain-and-double-crochet picot-style petals) fanning out from a tightly worked dark brown center, with the center itself looking like a small, dense round worked in a contrasting color before the petals are added around it. The green leaves sit as separate pointed leaf shapes tucked behind the flower, attached afterward rather than worked in the same continuous piece.
The gold scalloped border beneath the sunflowers is a different, more open stitch — likely a shell or fan pattern worked in rounds, which is what gives it that lacy, layered look compared to the denser bodice and mid-skirt sections. The ruffled cap sleeves use the same gold and appear to repeat that scalloped shell technique at a smaller scale, which is a nice way to tie the sleeve detail back to the hem without introducing an entirely new stitch.
The bodice itself reads as a fairly standard dense single or half-double crochet panel — nothing fancy there, which makes sense, since a bodice for a small child needs to be sturdy and fairly plain so the real visual interest can live in the skirt and sleeves.
Materials You’ll Need
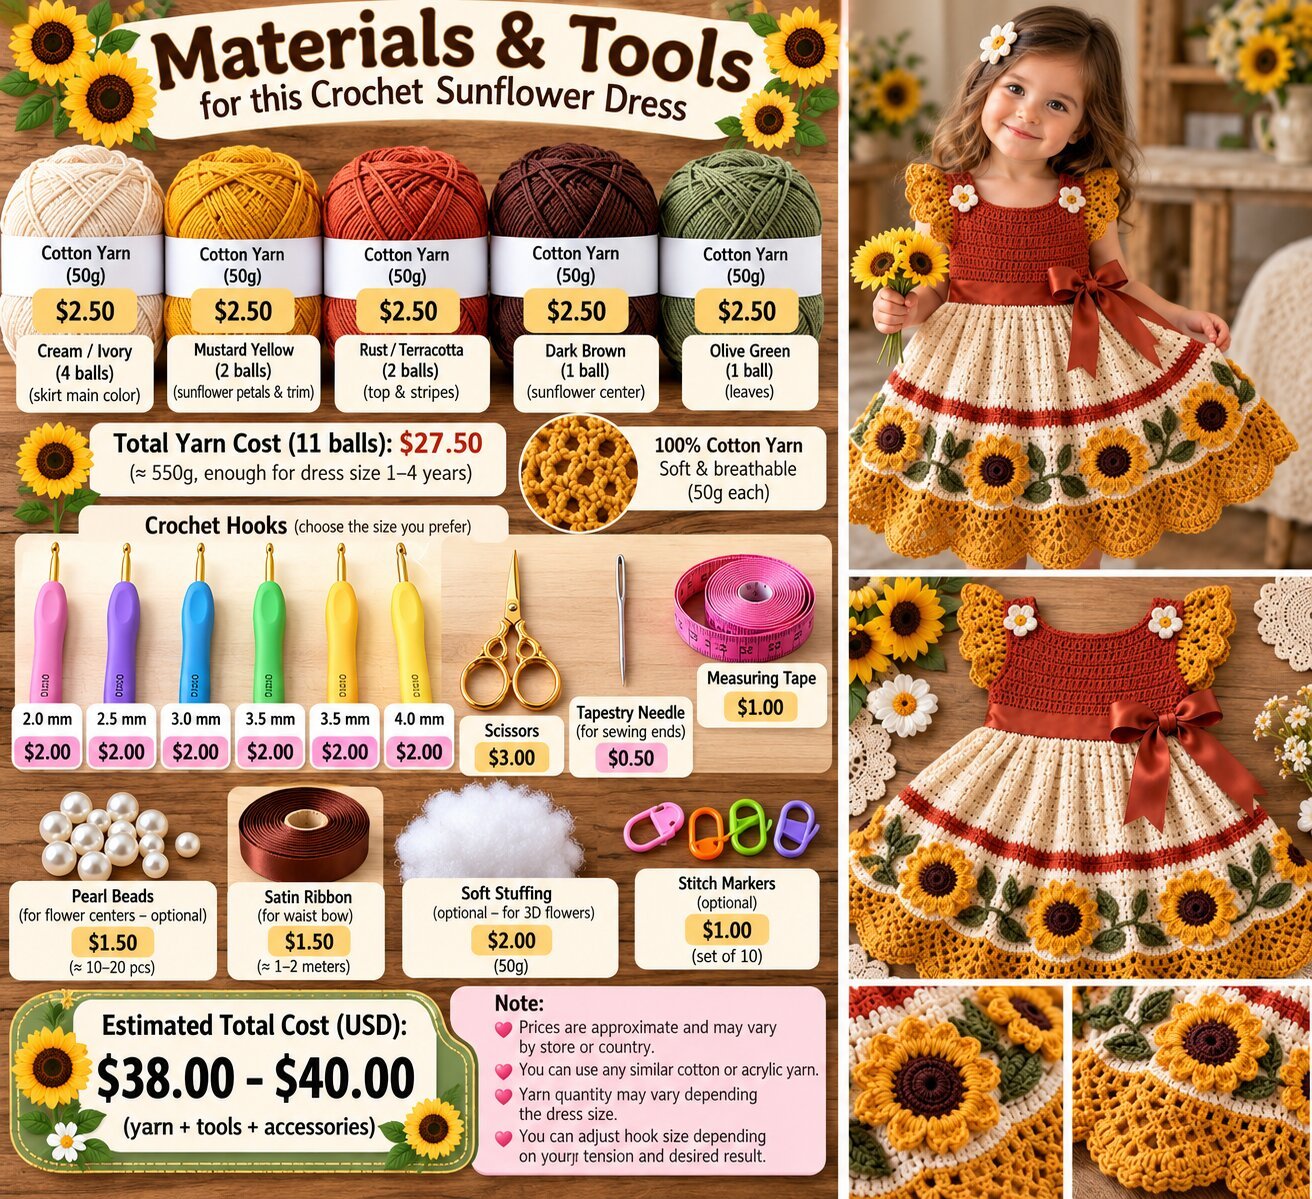
- Terracotta or rust yarn for the bodice and the thin skirt stripe (a cotton or cotton-blend yarn is a reasonable suggestion, based on how crisp the stitch definition looks throughout)
- Cream yarn for the main skirt body
- Golden yellow yarn for the sunflower petals, the scalloped hem border, and the cap sleeves
- Dark brown yarn for the sunflower centers
- Green yarn for the leaves
- White yarn for the small daisy appliqués at the shoulders
- Satin ribbon for the waist sash, since the bow in the photos looks like ribbon rather than crocheted cord
- A crochet hook sized to your yarn (see below)
- Yarn needle, for attaching all the separate sunflower and leaf pieces
- Scissors
- Stitch markers, useful for keeping the sunflower row evenly spaced around the hem
- A tape measure or child sizing reference, since there’s no official size chart behind this dress
Yarn and Hook Notes
Given the clear, well-defined stitch texture in the photos, a DK or light worsted weight cotton is a sensible starting point for a child’s garment like this — fine enough to keep the sunflower motifs crisp, substantial enough that the bodice holds some structure. A hook somewhere around 3mm to 4mm is a reasonable range to begin swatching in, though the sunflower petals specifically might benefit from a slightly tighter gauge than the rest of the dress to keep them from looking floppy.
Cotton is worth prioritizing for a child’s dress specifically, since it holds up to regular washing and doesn’t pill the way some acrylics do after repeated wear.
Skill Level
This is an intermediate project. The bodice and basic skirt shaping are approachable on their own, but the layered sunflower motif — petals, contrasting center, and separate leaves, all needing to be made consistently and then placed evenly around the hem — asks for more precision and patience than a simple striped or solid dress would. Someone who’s made a basic crochet flower before but never one with this many distinct layered components will find the sunflower the main learning curve here.
Crochet Stitches You May Need
- Chain (ch) — foundation rows and the scalloped border
- Slip stitch (sl st) — joining rounds and finishing motifs
- Single crochet (sc) — the dense bodice panel and sunflower centers
- Half double crochet (hdc) and double crochet (dc) — building the skirt body and petal shapes
- Shell or fan stitch — the scalloped gold border at the hem and the ruffled cap sleeve edges
- A layered petal motif construction for the sunflowers, worked as a contrasting center round followed by a ring of elongated petal stitches
- Simple leaf shaping, worked as small pointed pieces and attached separately
- Increase (inc) — shaping the skirt’s flare from the narrower waist
Step-by-Step Crochet Guide
Step 1: Start the Foundation
Begin with the bodice, worked flat or in the round depending on preference, establishing the shoulder straps and armhole shaping early since this sets the fit for the top of the dress.
Step 2: Create the Main Section
Continue the bodice down to the waist, then transition into the cream skirt with a noticeable increase round to create the flared silhouette, working the thin terracotta stripe as a simple color-change round near the top of the skirt.
Step 3: Shape the Project
Keep increasing evenly as the skirt widens toward the hem, checking the overall length and flare against a child’s sizing reference rather than a fixed stitch count, since there’s no chart to confirm proportions against.
Step 4: Add Decorative Details
Crochet the sunflower motifs separately — a brown center round followed by a ring of gold petals — along with individual green leaves, then arrange and stitch them evenly around the hem just above where the gold border will begin. Attach the small white daisy appliqués to the shoulder straps once the bodice is complete.
Step 5: Create the Border or Finishing Edge
Work the golden scalloped border in a shell or fan stitch along the entire bottom hem, beneath the sunflower row, echoing the same technique in a smaller scale along the ruffled cap sleeve edges.
Step 6: Finishing
Attach the ribbon sash at the waist, tying it into a bow, and weave in all the ends generated by the many separate sunflower and leaf pieces. Block the skirt flat to help the scalloped border and sunflower motifs lie evenly.
Size and Customization
Since there’s no official size chart, use a well-fitting existing child’s garment or standard sizing measurements to determine bodice width and skirt length, trying the piece against that reference as you work. The number of sunflowers around the hem can be adjusted based on the finished skirt’s circumference — more flowers for a fuller look, fewer with wider spacing for something more minimal.
Swapping the terracotta for a softer rust or the gold for a paler butter yellow would shift the palette toward something gentler, while keeping the same sunflower-and-scallop construction intact.
Helpful Crochet Tips
- Crochet all the sunflower motifs and leaves before starting to attach anything, so you can space them evenly around the hem before committing to permanent stitching.
- Keep tension consistent across all sunflowers, since a project with this many repeated motifs will show size inconsistencies clearly once attached side by side.
- Block the skirt before attaching the sunflowers, so the base fabric lies flat and the motifs sit evenly on top of it.
- Try the bodice against your child sizing reference before finishing the waist transition, since the fit here matters more than it would on a looser garment.
- Weave in ends from each sunflower and leaf as you attach it, rather than saving them all for the end.
Common Mistakes to Avoid
- Uneven sunflower spacing around the hem. Eyeballing placement without measuring can leave gaps that look accidental rather than intentional. Measure and mark even intervals before stitching any down.
- Petals that look flat rather than dimensional. Skipping a tight, even gauge on the petal round can leave the sunflowers looking limp. Keep tension firm on this section specifically.
- A scalloped border that doesn’t lie flat. Skipping blocking here can leave the lacy hem looking tight and uneven rather than open and scalloped.
- A bodice that doesn’t match your child’s measurements. Since there’s no chart to confirm against, skipping a fit check is the easiest way to end up with a dress that doesn’t sit right at the shoulders or waist.
Frequently Asked Questions
Is this dress beginner-friendly?
It’s better suited to intermediate crocheters, mainly because of the layered sunflower motif, which takes more precision than a simple striped or solid dress.
What yarn works best for this design?
A cotton or cotton-blend yarn in DK or light worsted weight is a practical suggestion, since it holds crisp stitch definition for both the sunflower motifs and the scalloped border.
Can I use a ribbon instead of crocheting the waist sash?
Yes, based on the finish visible in the photos, a satin ribbon sash is likely what’s used here rather than a crocheted tie, and it’s a simple substitution either way.
How many sunflowers will I need for the hem?
This depends on your skirt’s finished circumference, so it’s worth crocheting a batch of motifs and laying them around the hem to judge spacing before deciding if more are needed.
Can I simplify the sunflower motif for an easier version?
Yes, a flatter flower with fewer petal layers and no separate leaf pieces would still read as floral while cutting down on the construction time significantly.
Final Thoughts
The terracotta sunflower dress crochet pattern combines a straightforward bodice and skirt shape with a genuinely involved decorative element in the sunflower hem band. Between the layered petals, the contrasting centers, the scalloped gold border, and the ribbon-tied waist, this is a project that rewards patience with a dress that reads as distinctly seasonal and specific rather than generically floral.

