
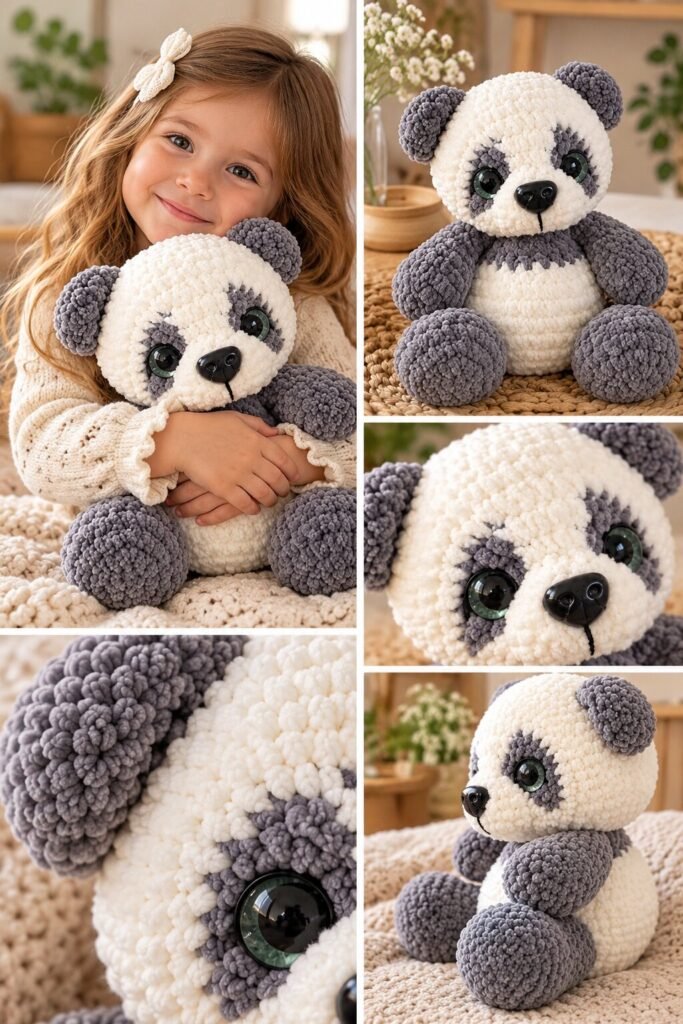
A round, slightly oversized head sits on a smaller body, both worked in the same thick, bobbly yarn texture that reads almost like a soft bouclé rather than a smooth cotton. Gray ear patches, matching gray eye patches shaped like upside-down teardrops, a black safety nose, and oversized glass-look safety eyes in a green-gray tone give the face most of its personality. The body carries a lighter gray chest band, and the arms and legs are big rounded shapes in the same gray as the ears, set wide for a stable sit.
What makes this panda read as “baby” rather than generic bear-shaped amigurumi is proportion — the head is noticeably larger relative to the body than you’d see on an adult-animal amigurumi, and the limbs are short and rounded rather than elongated. That head-to-body ratio is doing most of the emotional work here, the same principle behind why baby animals in general look appealing to us.
This is a solid project for someone who already has a finished amigurumi or two behind them and wants to work on the specific skill of getting facial proportions and eye placement to actually look right, since that’s really the technical heart of this pattern.
Reading the Construction
The yarn itself looks like a textured, looped or bouclé-style yarn rather than smooth worsted cotton — you can see the nubby, almost popcorn-like surface clearly in the close-up shots, especially on the ears and limbs. That texture is doing a lot of the “cute” work here, since it gives the whole toy a soft, fuzzy appearance without needing actual fun fur or brushed fiber.
The head and body look like they’re worked as two separate pieces, each in continuous spiral rounds from a magic ring, then joined with a visible neck seam rather than as one unbroken piece — you can see a slight color or texture break at the neck in the full-body shots that suggests this rather than a single continuous spiral.
The gray eye patches appear to be worked as a color change within the head’s rounds, shaped like elongated teardrops rather than simple circles, which takes more planning than a round patch would. The ears and limbs all look like separate small pieces, stuffed and stitched on individually, which is the standard amigurumi approach for any part that doesn’t sit naturally within the main body’s spiral.
Materials You’ll Need

- Chunky or bulky weight textured yarn in white/cream and gray (something with a looped or bouclé texture, based on how nubby the surface looks in the photos)
- A crochet hook sized to your yarn (see below)
- Safety eyes in a green-gray tone, sized to suit the head
- A safety nose, or black yarn for an embroidered alternative
- Polyester stuffing
- Yarn needle, for closing seams and attaching ears, arms, and legs
- Scissors
- Stitch markers, essential for tracking rounds in continuous spiral work
Yarn and Hook Notes
Given how chunky and textured the finished stitches look, this is likely worked in a bulky or super bulky weight yarn with a bouclé or looped texture rather than a plain smooth yarn — that nubby surface is part of what gives the panda its soft, plush look rather than a flat, defined stitch texture you’d see with standard worsted cotton. A hook somewhere in the 5mm to 6mm range is a reasonable starting point for that weight, worked slightly tighter than the yarn label might suggest, which is typical for amigurumi where you want a dense fabric that holds stuffing without gaps.
If a bouclé-style yarn feels hard to control for small amigurumi shaping, a smooth bulky yarn in the same weight will still produce a similar sized project, just with a cleaner stitch definition rather than the fuzzy, nubby surface shown here.
Skill Level
This sits at a confident beginner to intermediate level. The core shaping — rounds of increases and decreases to build a sphere-like head and a smaller body — is approachable, but the oversized head-to-body ratio and the shaped teardrop eye patches both ask for more precision than a simple round shape would. Getting the safety eyes placed symmetrically on a head this size, where even a small placement error is very visible, is probably the single trickiest part of the whole project.
Stitches Likely Involved
- Magic ring — starting point for the head, body, and each limb
- Single crochet (sc) — the primary stitch throughout, chosen for its dense fabric that holds stuffing well
- Increase (inc) and decrease (dec) — shaping the rounded head, body, and limbs
- Invisible decrease — keeps the head’s shaping rounds looking smooth rather than pointed
- A shaped color-change technique for the teardrop-style eye patches, worked by increasing and decreasing the gray section within specific rounds rather than a simple round patch
Building It: A Practical Sequence
Start the head at the crown with a magic ring, increasing steadily over several rounds to build out the rounded shape, then begin the gray eye patches partway down, shaping each patch with its own small increases and decreases within the main round rather than as a flat circle.
Place the safety eyes and nose before stuffing fully, checking symmetry carefully from the front and the side, since the head’s larger scale here makes any placement error more noticeable than it would be on a smaller toy.
Work the body separately as a smaller rounded piece, adding the lighter gray chest band as a color change partway up, then stuff firmly and close the opening before joining it to the head at the neck.
Make the ears, arms, and legs as individual pieces, each worked in a few rounds of increases in gray yarn, stuffed lightly so they stay soft rather than firm, and set aside until the head and body are both complete.
Attach the ears to the top of the head at a slight outward angle rather than straight up, which is part of what gives the finished panda its alert, listening expression.
Attach the arms and legs to the body, positioning the legs wide enough apart that the finished panda can sit upright on its own, matching what’s shown in the reference photos.
Join the head to the body last, stitching around the neck seam securely, since this is a stress point that will see repeated handling if the toy is meant to be hugged or played with.
Adjusting the Fit and Look
Scale here comes down entirely to your yarn and hook choice — this same construction works at a smaller size with a thinner yarn and smaller hook, or larger still with a heavier bulky yarn, as long as your round counts scale proportionally with the gauge change. A swatch of the main stitch pattern at your intended yarn weight will tell you roughly how many rounds you’ll need before committing to the full project.
If the textured bouclé yarn feels too slippery or hard to control for precise shaping, working the same pattern in a smooth yarn and then brushing the surface lightly afterward is one way to add texture without sacrificing stitch control during construction.
Where It’s Easy to Go Wrong
Asymmetrical eye patches or eye placement. Because both the gray teardrop patches and the safety eyes themselves need to be placed with mirror symmetry, this is the single most common place this project goes visibly wrong. Count stitches from a center point on both sides before committing to shape or placement.
A head-to-body ratio that doesn’t read as “baby.” If the body is worked too large relative to the head, the panda will look more like a standard teddy bear than the proportions shown here. Keep the head noticeably larger than the body throughout.
Underfilled stuffing in the limbs, leaving them looking flat or floppy rather than rounded. Stuff firmly, especially in the larger paw and foot shapes, checking the form against a flat surface as you go.
A neck seam that’s too loose. Since the head and body are joined afterward rather than worked as one piece, a sloppily stitched neck seam can leave the head wobbling or at risk of detaching with handling. Stitch around the full circumference securely, going around more than once if needed.
Care
Hand washing in cool water, if the yarn fiber allows it, is the gentler approach for a stuffed toy with safety eyes and a nose, since a washing machine’s agitation can loosen those components or shift stuffing unevenly. Air dry fully away from direct heat, since high heat risks warping both the stuffing and the safety eye backings. Check the specific yarn label for care instructions suited to whatever texture or fiber you’ve chosen.
Common Questions
Is this panda a good first amigurumi project?
It’s better suited as a second or third project — the basic shaping techniques are approachable, but the oversized head proportions and shaped eye patches ask for more precision than a true beginner project like a simple ball or egg shape.
What yarn gives the same fuzzy texture shown in the photos?
A bouclé or looped chenille-style yarn is what’s producing that nubby surface — a plain smooth yarn in the same weight will still work for the construction but won’t have quite the same plush look.
Can I skip the safety eyes for a child’s toy?
Yes, embroidered eyes using black yarn or floss are a safer substitute for a toy intended for a very young child, since they can’t be pulled loose the way safety eye components sometimes can.
How do I keep the ears from flopping forward or sideways?
Attaching them at a slight angle and stitching securely around their full base, rather than just tacking them at a couple of points, helps them hold their position against the head.

