
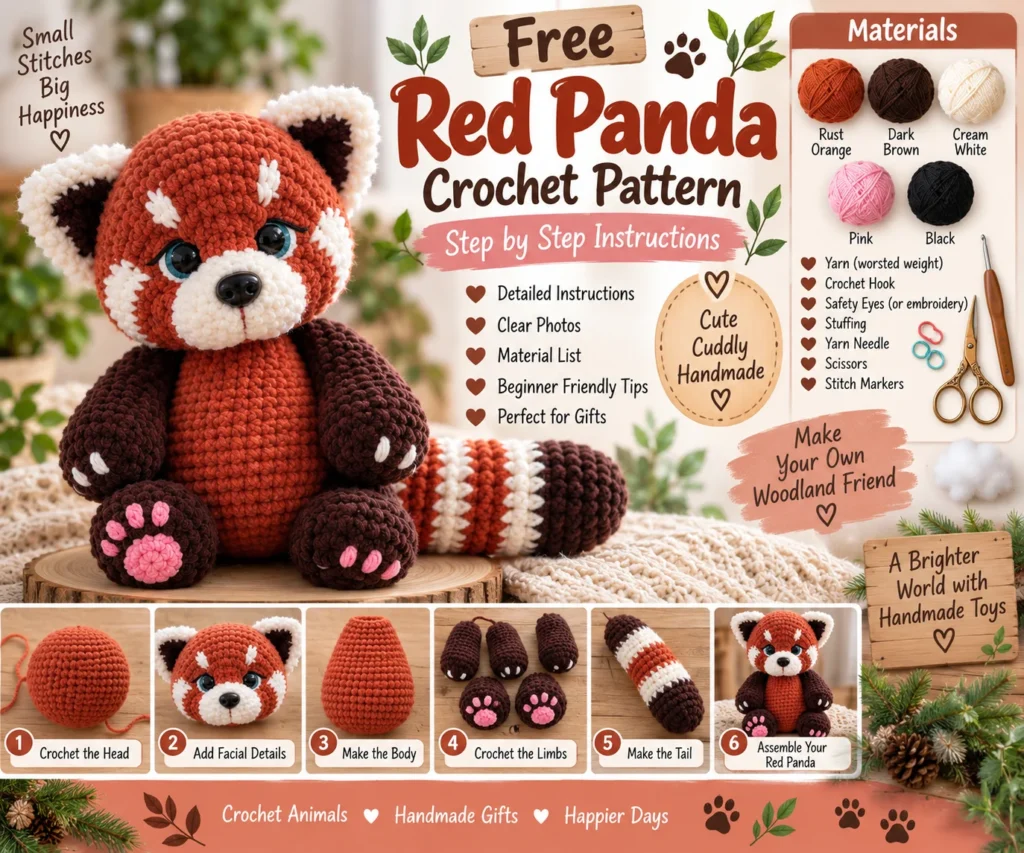
Create your own adorable woodland friend with this Free Red Panda Crochet Pattern. This cute amigurumi red panda features a rounded body, expressive face, fluffy-looking ears, striped tail, little paws, and a sweet handmade appearance.
With simple crochet techniques such as single crochet, increases, decreases, and basic color changes, you can build the red panda piece by piece and assemble it into a cuddly finished toy. The pattern is perfect for crochet lovers who enjoy animal amigurumi and handmade gifts.
Pattern note: This is an original, adaptable tutorial inspired by the provided reference image. Stitch counts may need minor adjustments depending on your yarn, hook, tension, and desired finished size.
Free Red Panda Crochet Pattern Details
- Project type: Amigurumi
- Animal: Red panda
- Skill level: Intermediate
- Crochet terms: US terminology
- Main colors: Rust orange, dark brown, cream, pink, and black
- Construction: Crocheted in separate pieces and assembled
- Finished style: Cute woodland animal
- Best for: Gifts, nursery decoration, collectibles, and handmade toys
Materials
Yarn
You will need small amounts of:
- Rust orange yarn
- Dark brown yarn
- Cream or white yarn
- Black yarn
- Pink yarn
A smooth worsted-weight or aran yarn works well for a medium-sized amigurumi.
For a smaller red panda, use DK or sport-weight yarn with an appropriately smaller hook.
Other Supplies
- 3.0–3.5 mm crochet hook
- Yarn needle
- Scissors
- Stitch markers
- Polyester fiberfill
- Black safety eyes or embroidery thread
- Optional fabric glue for temporary positioning
- Pins for assembling pieces
If the finished toy is intended for a very young child, embroidered eyes are a safer alternative to plastic safety eyes.
Crochet Abbreviations
- MR — Magic ring
- ch — Chain
- sc — Single crochet
- hdc — Half double crochet
- dc — Double crochet
- sl st — Slip stitch
- inc — Increase
- dec — Decrease
- st — Stitch
- BLO — Back loop only
- FLO — Front loop only
- rep — Repeat
- FO — Fasten off
Finished Size
The finished red panda will be approximately 20–25 cm tall when worked with medium-weight yarn and a 3.0–3.5 mm hook.
The final size will vary depending on yarn weight, hook size, and crochet tension.
Step-by-Step Red Panda Crochet Pattern

Step 1: Crochet the Head
Start with rust-orange yarn.
Make a magic ring.
Work:
- Round 1: 6 sc into MR
- Round 2: 2 sc in each stitch around — 12 sts
- Round 3: sc in next st, inc around — 18 sts
- Round 4: sc in next 2 sts, inc around — 24 sts
- Round 5: sc in next 3 sts, inc around — 30 sts
- Round 6: sc in next 4 sts, inc around — 36 sts
Continue working several rounds of sc without increasing to create the rounded head.
Check the size as you work.
Step 2: Shape the Head
Once the head reaches the desired width, begin decreasing.
Work decreases evenly around the following rounds.
Stuff the head gradually as the opening becomes smaller.
Do not wait until the very end to add stuffing.
This helps prevent lumps and gives the head a smooth round shape.
Continue decreasing until only a small opening remains.
Add the final amount of stuffing.
Fasten off and close the opening with a yarn needle.
Step 3: Create the Red Panda Face
The face is one of the most recognizable features of the design.
Using cream yarn, crochet two small cheek or muzzle pieces.
Position them symmetrically on the lower front of the head.
Sew them securely into place.
Step 4: Add the Nose
Using black yarn, embroider or crochet a small oval nose.
Place it at the center where the two cream muzzle sections meet.
Sew several stitches to create a firm shape.
Step 5: Embroider the Mouth
Use black embroidery yarn.
Create a short line extending downward from the nose.
Add two small curved lines to form a gentle red-panda smile.
Keep the embroidery neat and symmetrical.
Step 6: Add the Eyes
Place two black safety eyes above the cream muzzle sections.
Position them evenly.
If using safety eyes, attach the backs securely from inside the head before completely closing it.
Alternatively, embroider the eyes with black yarn.
Add small cream or white markings around the eyes to recreate the characteristic red-panda facial pattern.
Step 7: Add Facial Markings
Using cream yarn, embroider small patches around the eyes and cheeks.
The reference design uses light markings that contrast beautifully against the rust-orange head.
Use short stitches rather than long loose strands.
Secure all ends inside the head.
Step 8: Crochet the Ears
Use rust-orange yarn to crochet two rounded ears.
Start with a magic ring.
Increase for several rounds.
Then decrease slightly to create a rounded triangular shape.
Add a smaller dark-brown or cream inner-ear section.
Sew the inner section onto each ear.
Fold the base slightly before attaching the ears to give them a natural shape.
Step 9: Attach the Ears
Position the ears near the top of the head.
Make sure they are at equal heights.
Use a yarn needle and matching yarn to sew around the entire base.
Reinforce the attachment with several stitches.
Crochet the Body
Step 10: Start the Body
Using rust-orange yarn, create a magic ring.
Work:
- Round 1: 6 sc
- Round 2: 12 sc
- Round 3: 18 sc
- Round 4: 24 sc
- Round 5: 30 sc
- Round 6: 36 sc
Continue increasing if you want a larger body.
Once the desired width is reached, work several rounds evenly.
Step 11: Shape the Body
Continue working sc rounds without increases.
The body should become slightly elongated rather than completely round.
Begin decreasing toward the lower portion.
Add fiberfill as you decrease.
Make sure the body is firmly stuffed but not overfilled.
Close the opening securely.
Step 12: Add the Belly
For a two-tone appearance, crochet a small oval or rounded cream section.
Sew it onto the front of the body.
Alternatively, create the belly directly into the body using cream yarn and color changes.
Keep the belly centered beneath the head.
Crochet the Arms
Step 13: Make the Arms
Create two identical arms using dark-brown yarn for the outer sections and rust-orange yarn where desired.
Start with a magic ring.
Work several rounds of sc.
Increase slightly near the upper portion.
Continue without increases to create a narrow tube.
Add a small amount of stuffing.
Step 14: Shape the Paws
Switch to dark brown near the paw area.
Crochet several rounds.
For the paw pads, use pink yarn to create small embroidered circles.
Add three tiny pink toe details if desired.
Fasten off and leave a long tail.
Step 15: Attach the Arms
Place the arms on either side of the body.
Position them slightly below the head.
Sew each arm securely to the body.
You can attach them vertically for a sitting pose or angle them slightly outward for a more playful appearance.
Crochet the Legs
Step 16: Make the Legs
Create two short cylindrical legs.
Start with dark-brown yarn.
Work a magic ring followed by several rounds of sc.
Change to rust-orange yarn if you want a contrasting upper leg.
Stuff lightly.
Close each leg.
Step 17: Create the Feet
Use dark-brown yarn for the feet.
Shape each foot into a rounded form.
Add pink paw pads using embroidery.
Create three small toe markings above the central pad.
This gives the finished red panda an especially cute appearance.
Step 18: Attach the Legs
Place the legs at the lower front of the body.
Sew them firmly into place.
For a sitting red panda, angle the feet slightly forward.
This creates a stable sitting position.
Crochet the Striped Tail
Step 19: Start the Tail
The large striped tail is an important feature of the red panda.
Begin with rust-orange yarn.
Create a magic ring.
Work several rounds of sc.
Continue crocheting in a long tube.
Step 20: Add Tail Stripes
Change colors every few rounds.
Alternate:
- Rust orange
- Cream
- Dark brown
For a more natural appearance, keep the stripes approximately the same width.
You can also vary the stripe sizes slightly.
Step 21: Shape the Tail
Keep the tail slightly wider near the base.
Gradually decrease toward the tip.
Add a small amount of stuffing as you work.
The tail should remain flexible enough to curve naturally.
Close the tip securely.
Step 22: Attach the Tail
Position the tail on the back of the body.
For the sitting pose shown in the reference, curve the tail around the side of the body.
Sew the base securely.
Use additional stitches to keep the desired curved position.
Step 23: Attach the Head
Place the completed head on top of the body.
Check that the face is centered.
Sew around the entire neck area.
Use several rounds of stitches for a strong connection.
For a toy that will be handled frequently, reinforce this seam carefully.
Adding the Final Details
Step 24: Add Eyebrow and Face Details
Use black or dark-brown yarn to add small facial details.
Keep the markings symmetrical.
The combination of dark and light patches helps create the recognizable red-panda appearance.
Step 25: Add Paw Details
Use pink yarn to embroider:
- Paw pads
- Small toes
- Optional tiny claws
Keep the stitches tight and secure.
Step 26: Shape the Ears
Gently pinch the lower portion of each ear.
Add a few stitches through the base to hold the desired shape.
This gives the ears a slightly pointed appearance.
Finishing
Step 27: Check the Stuffing
Press gently around the body and head.
Add more fiberfill if there are soft or hollow areas.
The head should be firm but still have a soft handmade feel.
Step 28: Weave in Loose Ends
Use a yarn needle to hide every remaining yarn tail inside the crocheted pieces.
Pull the yarn through several stitches.
Trim the excess.
Step 29: Check All Seams
Inspect:
- Head attachment
- Ears
- Arms
- Legs
- Tail
- Face
- Eyes
Reinforce any area that feels loose.
Optional Poseable Red Panda
If you want a poseable version, you can adapt the design by using reinforced joints or suitable internal craft components.
For a simple crocheted version, securely sewn limbs are usually sufficient.
The tail can be gently shaped into a curved position by sewing it at multiple points.
Color Variations
Classic Red Panda
Use:
- Rust orange
- Dark brown
- Cream
- Black
- Pink
Soft Woodland Version
Try:
- Terracotta
- Chocolate brown
- Ivory
- Dusty pink
Pastel Red Panda
Use:
- Peach
- Soft brown
- Cream
- Blush pink
Winter Red Panda
Try:
- Deep rust
- Burgundy
- Cream
- Dark brown
Tips for a Better Amigurumi Finish
Keep your stitches tight
Small gaps between stitches can allow stuffing to show through.
Stuff gradually
Adding stuffing as you crochet helps maintain an even shape.
Use stitch markers
Place a marker at the beginning of each round so you do not accidentally lose your position.
Count your stitches
Amigurumi depends heavily on accurate stitch counts.
Sew pieces before trimming the yarn
Leave a long tail for sewing each component.
Check symmetry
Place the ears, eyes, arms, and legs at matching heights.
Secure decorative details
Make sure all embroidery and attached pieces are firmly secured.
Frequently Asked Questions
Is this red panda crochet pattern suitable for beginners?
The basic stitches are beginner-friendly, but assembling multiple amigurumi pieces and creating the facial markings may be easier for an advanced beginner or intermediate crocheter.
What yarn should I use?
A smooth worsted-weight acrylic, cotton, or cotton-blend yarn works well. Choose a yarn that allows you to maintain tight, consistent stitches.
Can I make a smaller red panda?
Yes. Use thinner yarn and a smaller crochet hook. The finished toy will naturally be smaller.
Can I make the red panda larger?
Use thicker yarn and a larger hook, or increase the number of stitches in the body and head.
Can I embroider the eyes?
Yes. Embroidered eyes are an excellent option when making the toy for a young child.
How do I make the tail curl?
Stuff the tail lightly and sew the base firmly to the body. You can also use a few discreet stitches to hold the tail in a curved position.
Can I sell finished red pandas made from this tutorial?
If you create your own finished pieces, check the terms associated with any pattern inspiration, branding, or character references you use. Avoid presenting your finished work as an official product or pattern from another designer.
Final Thoughts
This Free Red Panda Crochet Pattern is a fun project for anyone who loves woodland animals and handmade amigurumi. The combination of rust-orange yarn, dark-brown limbs, cream facial markings, pink paw pads, and a striped curved tail gives the finished red panda plenty of personality.
Take your time with the face and assembly because these small details make the biggest difference. Once you understand the basic construction, you can easily experiment with different sizes, colors, expressions, and poses to create your own collection of adorable crochet red pandas.
SEO Keywords: Free Red Panda Crochet Pattern, Red Panda Amigurumi, Crochet Red Panda, Red Panda Crochet Tutorial, Free Amigurumi Pattern, Crochet Animal Pattern, Woodland Amigurumi, Cute Crochet Animals, Crochet Toy Pattern, Red Panda Plush Crochet, Beginner Amigurumi Pattern, Handmade Crochet Toy, Crochet Forest Animals, Easy Red Panda Crochet, Amigurumi Crochet Pattern.


1 thought on “Free Red Panda Crochet Pattern”