

A five-piece sage green set: a sundress with a textured corset-style bodice crossed with a lattice pattern at the waist, tied shoulder straps, and a full flared skirt in a lacy shell stitch with pearl-centered flowers scattered across it; a brimmed sun hat with the same scalloped edge and a matching flower pinned at the side; a bow headband; and a pair of Mary Jane-style shoes with strap closures and their own small flower accents. Every piece shares the same color, the same pearl-centered flower motif, and the same scalloped trim, which is what pulls five separate items together into one coordinated outfit rather than a dress with some extras thrown in.
The bodice is the most technically interesting part of the dress on its own. Look closely at the close-up shot and you can see a crossed lattice pattern worked into the front panel, almost like laced criss-cross detailing, sitting above a tied bow at the natural waist. That’s a different texture from the shell-stitch skirt below it, which means this dress — like a lot of well-constructed baby garments — is really two different stitch patterns joined at the waist rather than one continuous repeat top to bottom.
This is a project for someone who wants to make a complete coordinated set rather than just one dress, and who’s comfortable enough with motifs and basic shaping to produce five matching pieces that actually look like they belong together.
What Ties the Set Together
The pearl-centered flower is doing the connective work across every piece — it shows up on the hat, the skirt, and both shoes, which means making one well-practiced flower motif essentially unlocks four of the five pieces’ decorative details. That’s worth leaning into: get the flower construction right once, then repeat it with confidence rather than treating each appearance as a new challenge.
The scalloped edge is the second unifying detail, appearing at the dress hem, the hat brim, and around the edges of the shoes. Like the flowers, this is one technique applied consistently rather than five separate border designs, which is really what makes a handmade set read as coordinated instead of just color-matched.
The bodice’s crossed lattice panel is the one element that doesn’t repeat elsewhere in the set, and it’s also the trickiest part of the whole project — which makes sense, since a bodice needs to fit snugly and look structured in a way that a floppy sunhat or a flat shoe strap simply doesn’t require.
Materials You’ll Need
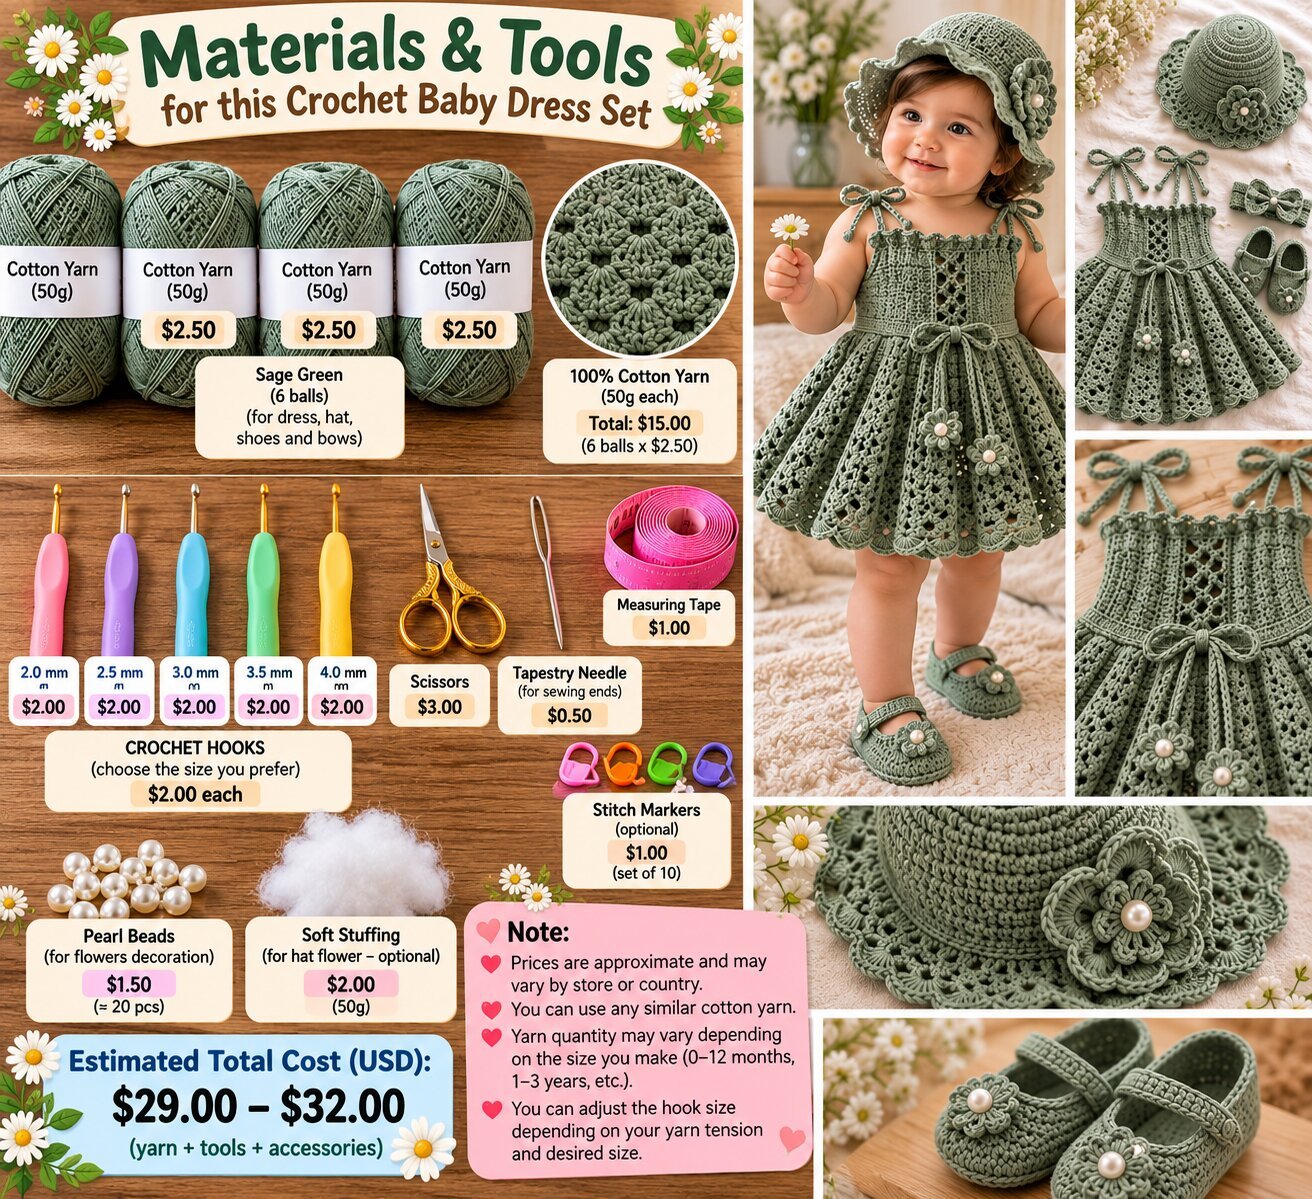
- Sage green yarn, enough to cover all five pieces (a cotton or cotton-blend yarn is a reasonable suggestion, based on how crisp the shell stitches and lattice pattern look in the photos, and because cotton suits a baby garment better than a scratchier fiber)
- A small amount of white or cream yarn for the pearl centers if you’re not using actual beads
- Small pearl beads, if you prefer real beads over crocheted centers
- A crochet hook sized to your yarn (see below)
- Yarn needle, for attaching flowers and seaming
- Scissors
- Stitch markers, useful for tracking the skirt’s shell repeat and the bodice’s lattice pattern
- A tape measure or baby sizing reference, since there’s no official size chart behind this set
- Snap or button closures for the shoe straps, if not worked directly into the crochet
Yarn and Hook Notes
Given the crisp stitch definition visible throughout — the lattice crosses, the shell stitch skirt, the flower petals — a DK or light worsted weight cotton is a sensible starting point for a baby-scale project like this. A hook somewhere around 3mm to 3.5mm is reasonable for that weight, though you’ll likely want to swatch the bodice lattice pattern and the skirt shell stitch separately, since they probably need slightly different tension to each look their best.
Cotton is worth prioritizing for a baby outfit specifically, since it’s gentle against skin, washes well, and holds its shape through repeated wear and laundering better than most synthetic options.
Skill Level
This is an intermediate project, and the number of pieces matters as much as any single technique’s difficulty. The bodice’s lattice panel and the skirt’s shell stitch are both manageable on their own, but keeping stitch count consistent enough to fit a baby properly, while also producing a hat, headband, and two matching shoes with consistent flower motifs throughout, is a bigger commitment than any single garment in the set would be alone. Someone who’s made a baby dress before but never paired it with coordinating accessories will find the accessories more approachable than expected, since they’re smaller and more forgiving than the fitted bodice.
Stitches Likely Involved
- Chain (ch) — foundation rounds, the lattice crosses, and the shoulder ties
- Slip stitch (sl st) — joining rounds and finishing scalloped edges
- Single crochet (sc) — the firm bodice base beneath the lattice detail, and the shoe soles
- Double crochet (dc) — building the shell stitch repeat in the skirt
- Shell stitch — the dominant texture in the skirt and the scalloped trim repeated across the hat and shoes
- A crossed lattice stitch, likely created by working elongated stitches that cross over each other at an angle, for the bodice’s laced front panel
- A layered flower motif, worked in the round with a few rounds of petals, for the shared decorative element across the set
Building It: A Practical Sequence
Start with the dress bodice, working the lattice panel first since it’s the most structured and fit-dependent part of the whole set. Check it against your own baby sizing reference before moving on, since there’s no printed chart to confirm against.
Add the waistband and tie at the natural waist, which is also where the stitch pattern will transition from the bodice’s tighter texture into the skirt’s more open shell repeat.
Work the skirt in the shell stitch pattern, increasing evenly as needed to achieve the flared, full silhouette shown in the photos, continuing down to your desired hem length.
Finish the dress hem with the scalloped border, and attach the shoulder ties as simple crocheted cords long enough to tie into bows at each shoulder.
Crochet the flower motifs in batches, since you’ll need several for the skirt, one for the hat, and one for each shoe — making them all in one sitting helps keep tension and size consistent across the full set.
Work the hat starting from the crown, increasing in rounds to build out the brim, finishing the brim edge with the same scalloped border used on the dress, then attaching one flower at the side.
Build the headband as a simple strip with a bow shape, and the shoes as a basic Mary Jane construction — a sole, a rounded upper, and a strap closure — finishing each shoe with its own flower at the strap.
Attach all flowers last, once each piece’s base construction is complete, stitching them securely at the center so they don’t shift or pull loose with handling.
Adjusting the Fit and Look
Since there’s no official size chart here, the dress bodice is the piece most worth checking against your own baby’s measurements or an existing well-fitting garment before finishing the waist transition. The skirt, hat, and shoes are all more forgiving, since their fit depends less on precise shaping and more on overall proportion.
Color is easy to swap across the whole set — the same construction would work in blush pink, soft lavender, or a deeper sage, as long as you keep the flower and scallop motifs consistent throughout. If producing all five pieces feels like too much for one project, making just the dress and headband first, then adding the hat and shoes later, is a reasonable way to build the set in stages.
Where It’s Easy to Go Wrong
An inconsistent lattice pattern in the bodice. If the crossed stitches aren’t spaced evenly, the lacing effect can look lopsided rather than symmetrical. Count carefully and keep the crossing pattern consistent on both sides of the center panel.
Flower motifs that vary in size across the set. Since the same flower appears on the hat, skirt, and shoes, any inconsistency between batches becomes obvious when the pieces are seen together. Make all your flowers using the same tension and round count.
Uneven shell stitch increases in the skirt. Missing an increase at a consistent interval can cause the skirt to flare unevenly on one side. Use stitch markers to track your increase points round by round.
Shoe straps that don’t match in placement. With two separate shoes being made as mirror pairs, it’s easy for strap position or flower placement to drift slightly between the left and right. Lay both shoes side by side periodically to check they match.
Care
Hand washing in cool water and laying flat to dry is the safer approach for a baby set with this many pearl or bead embellishments, particularly since a washing machine’s agitation risks loosening them. Avoid high heat when drying, since it can distort the lace shell stitch and flatten the flower motifs. Always check the yarn label for anything specific to the fiber you used.
Common Questions
Is this a realistic first project for someone new to baby garments?
The dress alone is a reasonable second or third baby garment project, but making the full five-piece set as a first attempt is a bigger undertaking — consider starting with just the dress and adding accessories once you’re comfortable with the techniques.
Do I need pearl beads, or can I crochet the flower centers instead?
Either works — a small crocheted circle in white or cream yarn is a reasonable substitute for an actual pearl bead at the center of each flower.
Can I make just the dress without the hat, headband, and shoes?
Yes, the dress stands on its own, though making at least one or two of the accessories helps tie the whole look together if that’s part of the appeal for you.
How do I make sure the shoes match as a pair?
Working both shoes side by side rather than one completely before starting the other, and checking strap and flower placement against each other periodically, helps keep them as close to identical as possible.

