
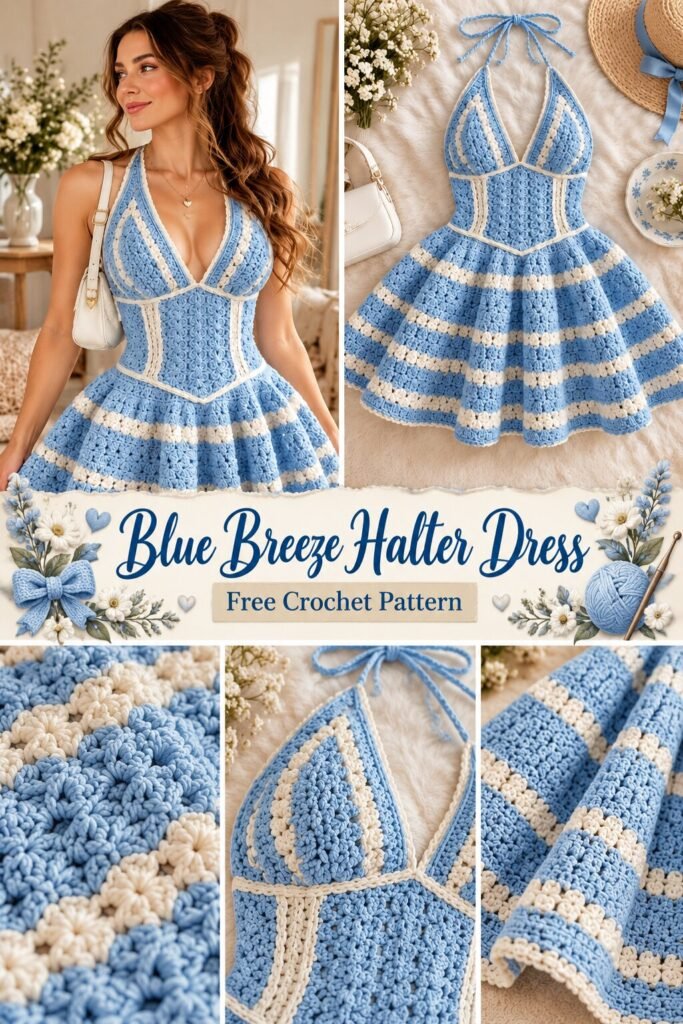
A deep V-neck halter bodice runs straight down into a fitted corset-style waist, cream piping tracing every seam line, then drops into a full, short flared skirt striped horizontally in alternating blue and cream bands. The stitch texture is heavily bobbled — almost puffy — rather than flat, giving the whole dress a dimensional, cable-knit kind of look instead of smooth crochet fabric. Thin crocheted ties cross and knot behind the neck.
The seam piping is the detail worth studying first. Every structural line on this bodice — the princess seams down the front, the edge of the halter straps, the horizontal waist seam — is outlined in cream, which means the dress isn’t just blue fabric with some white stripes added at the skirt. The cream is doing construction work, visually marking exactly where each panel joins the next, on top of its decorative job.
This suits someone who already has a finished fitted bodice or two behind them, since the real challenge isn’t the stripe pattern — that part’s straightforward — it’s getting a corset-style waist to actually taper and support itself in crochet, which behaves differently than woven fabric under tension.
What the Stitch Texture Tells You
Looking at the close-up, those aren’t flat single or double crochet stitches — they’re something bulkier, likely a cluster or bobble stitch worked in rows, which is what gives the fabric that puffed, almost quilted texture. That’s a meaningful choice for a garment like this: a bobble stitch has more structure and body than a flat stitch, which helps a fitted bodice hold its shape without feeling floppy against the torso.
The horizontal stripes in the skirt look like they’re simply color changes row by row within that same bobble pattern, rather than a separate construction. The bodice, by contrast, seems to use the piping technique to create vertical seam lines instead, which is why the top half reads as structured panels while the skirt reads as horizontal bands.
The cream piping itself is probably a simple slip-stitch or single crochet line worked along each seam after the panels are joined, rather than built into the stitch pattern as you go. That’s a common way to add a clean decorative edge to crochet garment seams without changing the main stitch pattern mid-row.
Materials You’ll Need
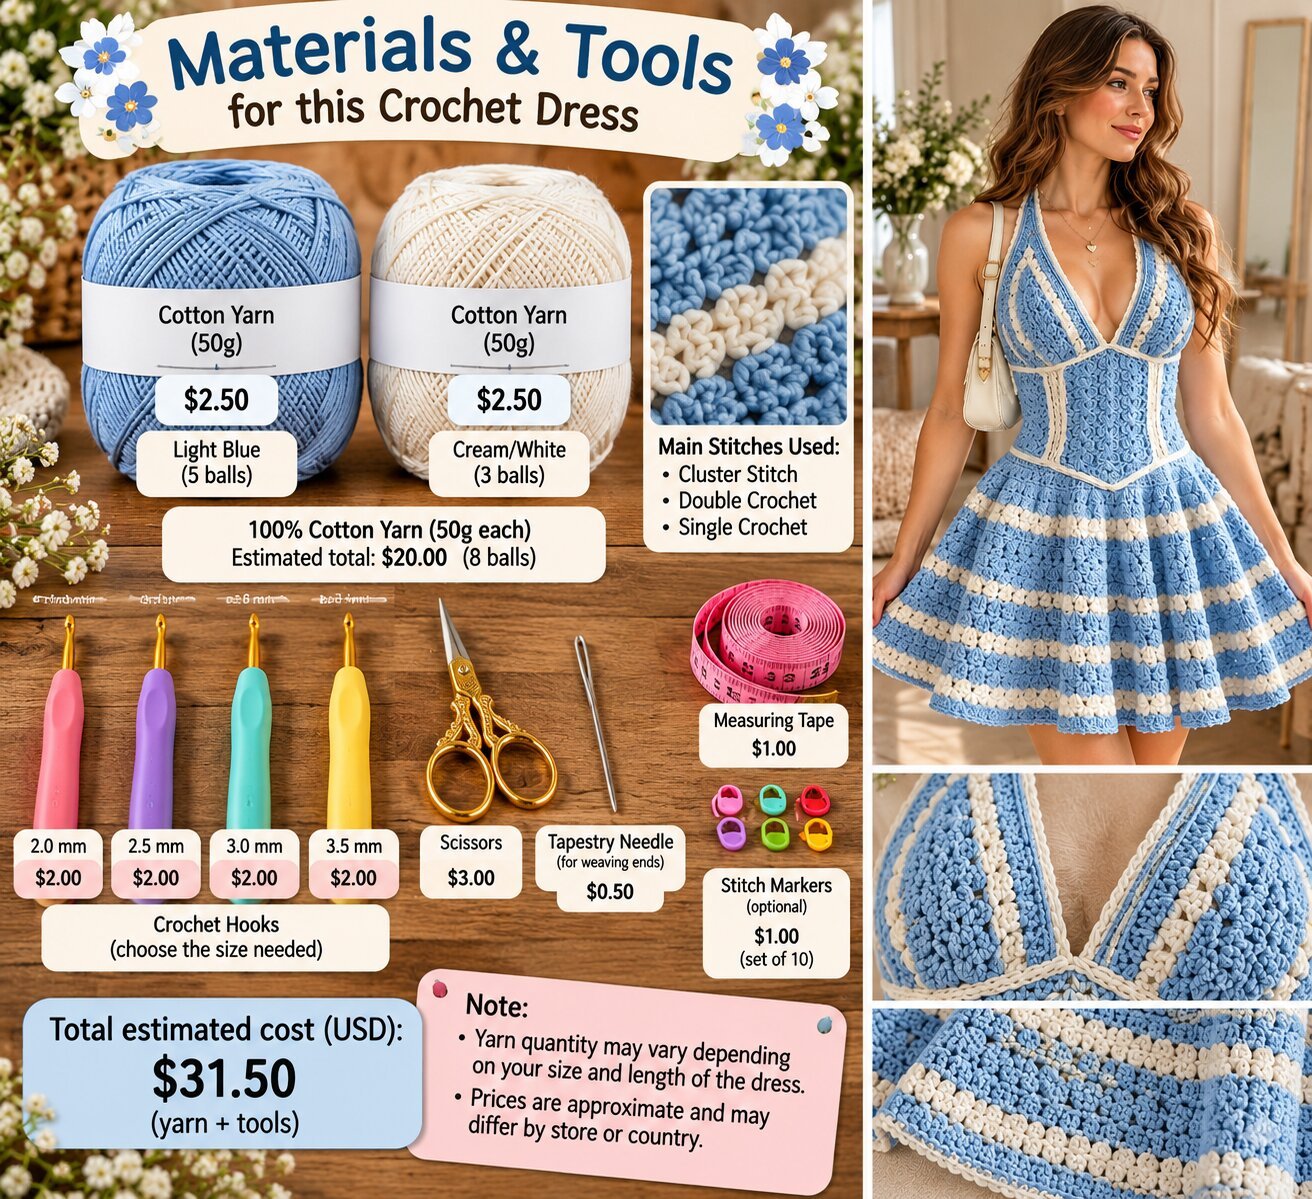
- Blue yarn for the main body of the bodice and skirt stripes (a worsted weight cotton or cotton-blend is a reasonable suggestion, based on how substantial the bobble texture looks)
- Cream or off-white yarn for the piping and alternating skirt stripes
- A crochet hook sized to your yarn (see below)
- Yarn needle, for seaming panels and attaching piping
- Scissors
- Stitch markers, useful for tracking where bodice panels taper at the waist
- A tape measure, since fit depends entirely on your own bust and waist measurements here
Yarn and Hook Notes
Given the dimensional, almost popcorn-like texture visible in the close-up shot, a worsted weight cotton or cotton-blend yarn is a sensible starting point — enough structure to hold the bobble stitch’s shape without collapsing flat. A hook somewhere in the 4.5mm to 5.5mm range is reasonable for that weight, though bobble stitches tend to pull in more than flat stitches, so swatch first and expect to need a slightly larger hook than you would for plain double crochet to keep the fabric from becoming too dense or stiff.
Cotton specifically is worth considering here over a more elastic acrylic, since the fitted bodice needs some rigidity to hold the corset shape rather than stretching out under the skirt’s weight.
Skill Level
This is an advanced-intermediate to advanced project. The bobble stitch pattern itself isn’t difficult once you’ve got the rhythm, but constructing a fitted, tapered bodice with multiple seamed panels — and making sure those panels actually narrow correctly at the waist and widen again at the bust — asks for real garment-shaping experience. Someone who’s made bobble-stitch scarves or blankets before but never a fitted bodice will find the stitch pattern familiar and the construction genuinely new.
Stitches Likely Involved
- Chain (ch) — foundation rows and the halter ties
- Slip stitch (sl st) — joining panels and working the piping detail along seams
- Single crochet (sc) — likely used for the piping lines and possibly the waistband
- A cluster or bobble stitch — the dominant texture throughout the bodice and skirt, built from several stitches worked into one space and drawn together
- Increase (inc) and decrease (dec) — shaping the bodice panels to taper at the waist and flaring the skirt panels outward from the waist seam
Building It: A Practical Sequence

Work the bodice as separate shaped panels rather than one continuous piece. Based on the visible seam lines, this looks like individual front and side panels, each shaped with decreases toward the waist, worked flat and then joined.
Taper each panel gradually rather than all at once. A corset-style waist needs the decreases spread across several rows to create a smooth curve inward, not a sudden jump in stitch count, or the seam will pucker instead of sitting flat against the body.
Add the cream piping along each seam as you join panels, working a simple slip-stitch or single crochet line directly over the seam join. This is easier to do neatly while the dress is still flat or only partially assembled than after the whole bodice is sewn together.
Work the waistband as a horizontal transition row, widening the stitch count significantly here since the skirt needs considerably more circumference than the fitted waist above it.
Build the skirt in horizontal stripe rows, alternating blue and cream at regular intervals, continuing the bobble stitch pattern established in the bodice so the texture feels consistent top to bottom.
Finish with the halter ties, worked as simple crocheted cords long enough to cross and tie behind the neck, and weave in ends carefully along every seam and stripe transition, since this construction generates more color changes than a solid-color dress.
Block the finished bodice panels before final assembly if possible, since bobble stitch can pull fabric in unevenly, and blocking helps even out the tension across panels before they’re permanently joined.
Adjusting the Fit and Look
Bust and waist fit are the two measurements to prioritize here, since the fitted bodice depends on accurate shaping more than the flared skirt does. Swatch the bobble stitch pattern first, check your row gauge, and use that to calculate how many rows of decrease you need between bust and waist based on your own body rather than guessing.
Skirt length and flare are easier to adjust after the fact — more stripe rows for a longer hem, fewer for something shorter, and wider increases at the waistband for extra fullness if you want more movement than shown.
Where It’s Easy to Go Wrong
Uneven panel tapering. If the decrease rate differs between the front and side panels, the waist seam won’t sit straight once everything is joined. Chart your decrease rows on paper before starting so every panel tapers at the same rate.
Piping that pulls the seam tight. Working the slip-stitch piping too tightly can pucker the seam it’s meant to be decorating. Keep tension relaxed along piping rows, testing on a scrap seam first if you’re unsure.
Stripe rows that don’t align across skirt panels, if the skirt is worked in sections rather than continuously. Keep careful track of which row you’re on in each color before joining panels, so the stripes line up rather than staggering.
Skipping gauge entirely. Because a corset bodice depends so heavily on accurate shaping, skipping a gauge swatch here is riskier than it would be for a looser garment. Always check gauge before cutting into your waist-shaping rows.
Care
Hand washing in cool water and laying flat to dry is the safer approach for a fitted piece like this, particularly with the bobble texture, which can flatten under a washing machine’s agitation or a dryer’s heat. Avoid wringing the dress, since twisting can distort both the bobble stitch and the tapered bodice shape. Check the yarn label for anything specific to the fiber you used.
Common Questions
Is this dress a realistic project for someone who hasn’t made a fitted garment before?
It’s a step up from a first garment attempt — the tapered, seamed bodice is genuinely more demanding than a simple tank or halter top, so some prior fitted-garment experience will help considerably.
Can I substitute a different stitch for the bobble texture?
Yes, a plain double crochet would still produce the striped effect in the skirt, though you’d lose the dimensional, textured look that’s a defining feature of this particular dress.
Do I need the cream piping, or can I skip it?
You can skip it, but the piping is doing real visual work in defining the bodice’s panel lines — without it, the seams would likely be much less visible and the structured look would soften considerably.
How do I know how much to taper the waist?
Measuring your own bust and waist and calculating the difference in circumference, then spreading that decrease evenly across your planned number of bodice rows, is more reliable than guessing at a stitch count.


1 thought on “Crochet Blue and White Dress Fitted Bodice Construction”