

Introduction
The honeycomb bee placemat crochet pattern brings a touch of farmhouse charm to any table setting. Picture a round textured centerpiece worked in soft cream, featuring a raised honeycomb-style stitch pattern and a tiny three-dimensional crocheted bee perched right in the middle. Surrounding the center, a mustard yellow eyelet ring adds definition, and the whole piece is framed by a dramatic black scalloped border that echoes the look of a honeycomb hive from above.
This design has become especially popular among crocheters who enjoy home decor projects with a nature-inspired theme. It works beautifully as a single statement placemat, in a matching set for a full table, or simply displayed on its own as a decorative doily beneath a centerpiece or plant. The combination of a textured center, an openwork ring, and a scalloped edge also makes this a rewarding project for anyone who wants to practice several crochet techniques within one cohesive, circular design.
If you are working on a honeycomb bee placemat crochet pattern, this guide walks through the materials, stitches, and general construction approach typically used for a design like this, along with practical suggestions for yarn, hook size, and customization so you can create your own version with confidence.
Why You’ll Love This Crochet Project
It has genuine farmhouse charm. The honeycomb texture, mustard and black color palette, and tiny bee applique give this piece a cozy, cottagecore appeal that suits kitchen and dining decor especially well.
It is a satisfying single-session or weekend project. A round placemat like this uses a manageable amount of yarn and can typically be completed in a shorter timeframe than a larger home decor piece like a blanket or rug.
It combines several enjoyable techniques. Between the textured honeycomb center, the eyelet ring, the scalloped border, and the small bee applique, this project offers variety that keeps the work interesting throughout.
It is a lovely gifting project. Handmade placemats make thoughtful housewarming, hostess, or holiday gifts, especially for anyone who loves bee, garden, or farmhouse-themed decor.
It works well as a set. Since the design uses a repeatable round construction, it is easy to make multiples for a full table setting once you are happy with your first piece.
Materials You’ll Need
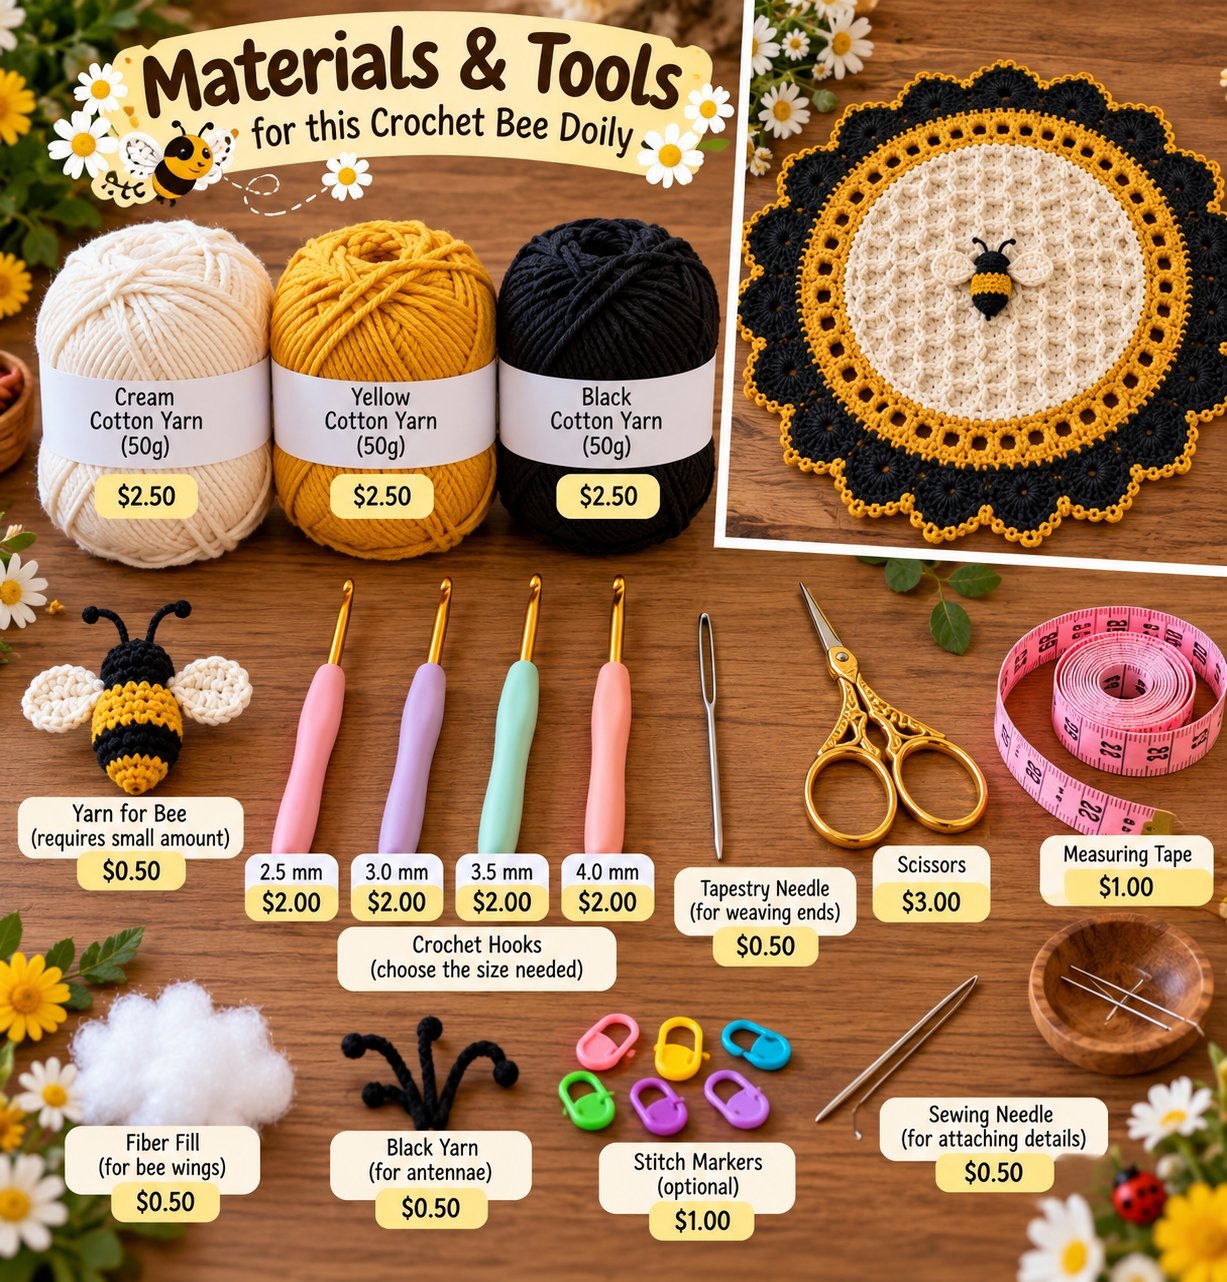
Exact yardage will depend on your finished size and gauge, so treat the list below as a practical starting point rather than a fixed requirement.
- Cream or off-white yarn for the textured center (suggested main color)
- Mustard yellow yarn for the eyelet ring and scalloped border accents
- Black yarn for the outer scalloped border
- Small amounts of yellow and black yarn for the bee applique
- A crochet hook sized to match your yarn weight (see suggestion below)
- Yarn needle for weaving in ends and attaching the bee motif
- Scissors
- Stitch markers to track rounds
- Small amount of stuffing or extra yarn thickness, if making the bee slightly dimensional
Recommended Yarn
A cotton or cotton-blend yarn is a strong suggestion for a placemat like this, since it holds its shape well under everyday use, is easy to wipe clean or wash, and gives crisp stitch definition for both the honeycomb texture and the eyelet border. Cotton also has enough body to help the piece lie flat on a table rather than curling at the edges.
In terms of weight, worsted or DK weight works well for a project like this, since it creates a placemat with enough substance to feel sturdy while still allowing the textured stitch pattern and scalloped edge to show clearly. The cream, mustard, and black combination gives this design its signature honeycomb and bee-inspired look, though other warm neutral palettes could work for a softer, less graphic variation.
Recommended Crochet Hook
As a general suggestion, a hook in the E/4 (3.5mm) to H/8 (5.0mm) range pairs well with worsted or DK weight cotton yarn for this type of textured placemat. A slightly smaller hook can help keep the honeycomb texture and eyelet ring crisp and well defined, while a larger hook may be useful if you want a looser, more open border.
Keep in mind that hook size should always be adjusted based on your own gauge, since achieving a flat, non-curling placemat depends on consistent tension throughout each round.
Crochet Skill Level
This project is best suited to intermediate crocheters. Working the textured honeycomb center requires comfort with a specific stitch pattern that creates a raised, cellular texture, while the eyelet ring and scalloped border both call for careful round-by-round increases to keep the piece lying flat. The small three-dimensional bee applique also requires some precision to look neat and proportional.
Crocheters who are comfortable working in continuous rounds, managing color changes, and creating small motifs will find this project very manageable, while beginners may want to practice the honeycomb stitch pattern on a swatch first before starting the full placemat.
Crochet Stitches You May Need
- Chain (ch)
- Slip stitch (sl st)
- Single crochet (sc)
- Half double crochet (hdc)
- Double crochet (dc)
- Puff stitch or bobble stitch, commonly used to create the raised honeycomb texture
- Shell stitch, often used for the scalloped border
- Increase (inc), essential for keeping a round piece flat
- Basic three-dimensional motif construction, for the bee applique
Step-by-Step Crochet Guide

Step 1: Start the Foundation
Begin at the center with a magic ring or small foundation chain joined into a round, working the first few rounds in cream yarn using the honeycomb or puff stitch pattern that will define the textured center of the placemat.
Step 2: Create the Main Section
Continue working the honeycomb texture outward in rounds, increasing evenly at regular intervals to keep the piece flat as it grows. This textured cream center typically makes up the majority of the placemat’s surface area before transitioning to the decorative border rings.
Step 3: Shape the Project
Once the center reaches your desired size, switch to mustard yellow yarn and work a round or two of eyelet-style stitches, usually created with chain spaces and single or double crochet, to form the open, dotted ring that separates the center from the outer border. Continue increasing evenly to maintain a flat, circular shape.
Step 4: Add Decorative Details
Crochet a small bee applique separately, working two or three rounds in alternating black and yellow to create the striped body, then add small wing shapes in white or cream. Attach the finished bee securely to the center of the placemat once the main rounds are complete.
Step 5: Create the Border or Finishing Edge
Switch to black yarn for the outermost border, working a scalloped edge using shell stitches or clusters that echo the rounded shape of honeycomb cells. This border is typically the most visually dramatic part of the design, framing the entire piece with a bold contrast color.
Step 6: Finishing
Weave in all ends securely, particularly around the color change points between the cream, mustard, and black sections. Block the finished placemat by lightly wetting or steaming it and pinning it flat, which helps the scalloped edges lie evenly and the whole piece sit flat on a table surface.
Size and Customization
The finished size of this placemat is controlled by how many rounds you work in the honeycomb center before transitioning to the eyelet ring and border, so it can be sized up or down depending on whether you want a compact accent piece or a larger placemat meant to hold a full place setting. Working a gauge swatch first and measuring your rounds as you go will help you reach a consistent size if you are making a matching set.
For customization, consider changing the color palette to suit different decor styles, such as sage green and cream for a softer garden look, or swapping the bee applique for a different motif like a small flower or ladybug. The width of the eyelet ring and the depth of the scalloped border can also be adjusted for a more subtle or more dramatic finished look.
Helpful Crochet Tips
- Practice the honeycomb or puff stitch pattern on a small swatch first, since getting comfortable with the texture makes the full-size center much easier to work evenly.
- Use stitch markers at the start of each round to help track your increases and keep the piece lying flat.
- Count stitches carefully at the end of each round, especially through the color transitions, since an uneven increase count can cause the placemat to ruffle or cup instead of lying flat.
- Block the piece thoroughly once finished, since this step makes a significant difference in how flat and polished a round textured piece like this looks.
- Crochet the bee applique in good lighting and take your time with the small details, since its proportions matter more than its size for a clean, recognizable result.
- Weave in ends from each color section as you go, rather than waiting until the end, since a three-color design generates more loose ends than a solid piece.
- If making a full set, keep notes on your stitch and round counts for the first placemat so subsequent pieces match in size.
Common Mistakes to Avoid
- Uneven increases causing cupping: Skipping increases or spacing them unevenly can cause the placemat to curl upward instead of lying flat. Count stitches carefully at the end of every round.
- Skipping the swatch for the honeycomb stitch: Since the puff or bobble texture can behave differently than basic stitches, skipping practice can lead to frustration partway through the full piece. Work a small sample first.
- Rushing the color transitions: Changing colors without properly securing the previous color can lead to loose stitches or visible gaps at the transition points. Take care to carry or weave in yarn neatly at each change.
- Skipping blocking: A textured, multi-round piece like this often needs blocking to lie fully flat. Skipping this step can leave the placemat looking slightly domed or wavy.
- Attaching the bee too loosely: A bee motif that is only lightly tacked on can shift or come loose with regular use. Stitch securely around the base of the applique.
Frequently Asked Questions
Is the honeycomb bee placemat crochet pattern good for beginners?
This project is better suited to intermediate crocheters, since the textured honeycomb stitch, eyelet ring, and scalloped border all require more precision than a basic flat placemat.
What yarn works best for this placemat design?
A cotton or cotton-blend yarn in worsted or DK weight is a practical suggestion, since it holds its shape well, is easy to clean, and gives good definition to the textured and openwork sections.
How do I keep the placemat from curling or cupping?
Keeping your increases even and consistent at the end of every round, along with a thorough blocking session once finished, are the most effective ways to keep the piece lying flat.
Can I make this placemat without the bee applique?
Yes, the honeycomb center, eyelet ring, and scalloped border stand well on their own as a striking design even without the small bee motif.
Can I make a full matching set of these placemats?
Yes, since the construction is worked in repeatable rounds, keeping consistent notes on your stitch and round counts makes it straightforward to create multiple matching pieces for a full table setting.
Finishing and Care
Once the placemat is complete, weave in all ends securely, paying particular attention to the color change points between the cream, mustard, and black sections. Block the piece thoroughly by lightly wetting or steaming it and pinning it flat to a rounded shape, which helps both the eyelet ring and scalloped border sit evenly.
For care, hand washing in cool water is generally the safest choice for a textured cotton piece like this, especially since it will likely see regular use at the table. Lay flat to dry to help the placemat retain its shape, and avoid high heat, which can distort the raised honeycomb texture or cause shrinking.
Final Thoughts
The honeycomb bee placemat crochet pattern is a wonderful way to bring a bit of handmade warmth to everyday table settings. Between the textured center, the eyelet ring, the bold scalloped border, and the sweet little bee at its heart, this is a project that rewards careful, round-by-round work with a genuinely charming and functional finished piece.


1 thought on “Honeycomb Bee Placemat Crochet Pattern”